
Ghosts User Manual
This manual reflects firmware version 1.0.

Have questions? Join the Kinotone community to connect with us and other users at forum.kinotoneaudio.com
For direct support email support@kinotoneaudio.com
Contents
- About Ghosts
- Getting Started
- Ghosts Basics
- Contact Microphone
- Physical Models
- Knob Controls
- Touch Modes
- Presets
- Physical Modeling Instrument
- MIDI Overview
- User chord and scale
- CV / Expression
- Mixing, Input Level, Bypass Options
- Factory Reset
- Firmware Updates
About Ghosts
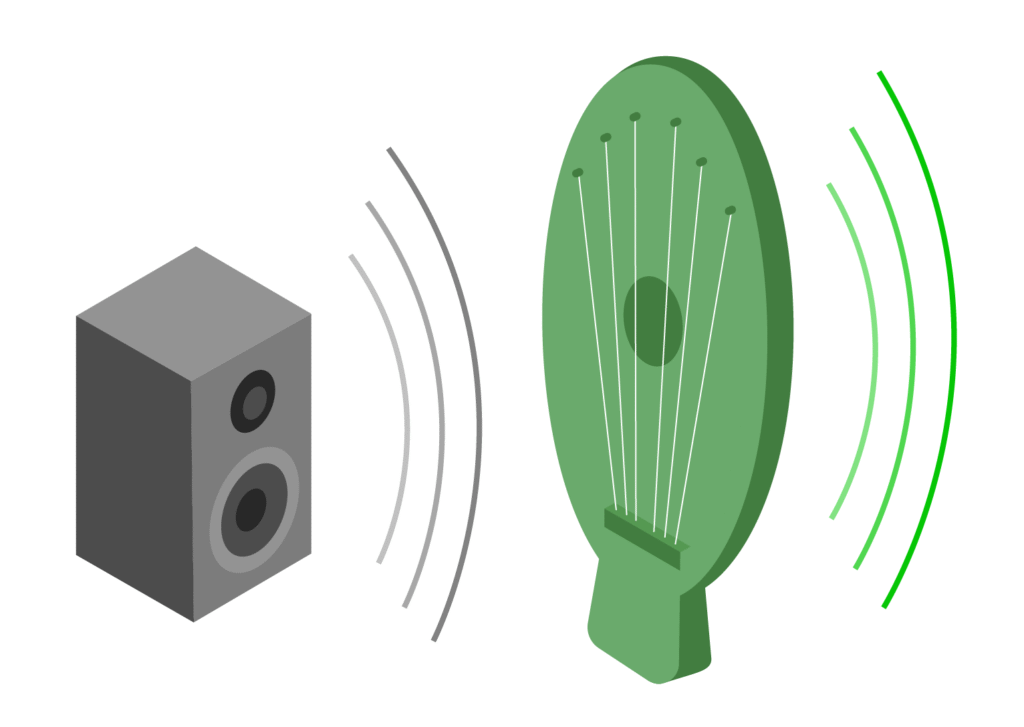
At the heart of Ghosts are mathematical models of 6 strings, tubes, or bars that can be tuned to chords.
Ghosts is an audio effect, a polyphonic instrument, or a hybrid of both.
Excite the resonators with your input and hear them bloom into strange, harmonically rich textures. Play Ghosts as a full-on physical modeling instrument — dial in a harpsichord, a xylophone, a pipe organ, or something entirely new and imagined. There’s also a middle ground to explore, blending your input audio with the precision of MIDI notes.
The contact mic adds a playful, tactile dimension, and the Touch Modes offer a toolkit for transforming the resonators in powerful and surreal ways.
Getting Started
POWER
Use an isolated +9VDC center-negative power supply rated for at least 220 mA.

I / O
Ghosts passes a mono in / mono out signal by default. Mono as the default setting ensures all users hear all 6 resonators right out of the box.
To pass a stereo signal, set Ghosts to stereo in / stereo out and use TRS cables.
To spit a mono input into stereo, set Ghosts to mono in / stereo out.
OUTPUT LEVELS
Ghosts defaults to instrument level, which is ideal for guitar and a wide range of other setups.
You can set Ghosts to line level if you need more output level, or if you find the built-in limiter on the instrument level setting too restrictive.
Use the BYPASS footswitch to engage or disengage Ghosts. If the BYPASS LED is ON, effects are engaged.
Ghosts Basics
Ghosts is a surprisingly simple device to use. There are just a few concepts you’ll want to know about right away:
- Using the LAYER button.
- Visual feedback and how relative knobs work.
- The Touch footswitch. This is a unique feature where you get to choose what it does.
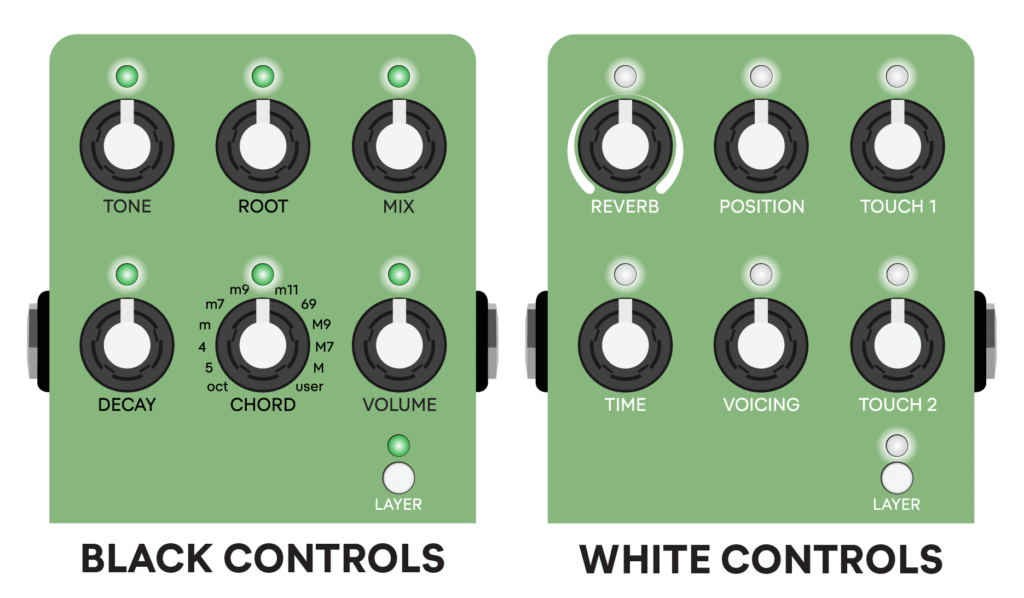
LAYER button
Tap the LAYER button to select between editing black or white knob controls.
The LAYER LED lights up when you are on the white layer.
Visual feedback
- Black controls glow a gradient of green.
- White controls glow a gradient of white.
Each control has its own LED that conveys the real-time intensity of the setting, changing in brightness as you rotate the knob.
Relative knobs
When you switch between editing black and white controls, the physical knob position might not line up with the real-time setting.
When this happens, the control becomes relative, meaning the knob adjusts the parameter based on the amount of space available until they catch up and start tracking again.
We do this intentionally to avoid sudden jumps during live use.
It sounds complicated but it’s really simple — just use your eyes and ears when adjusting the controls.
Ghosts remembers your settings between power cycles. It saves state 3 seconds after LAYER, MIC, MODEL, or BYPASS is pressed.

A tip to guarantee an exact setting match on the next power-up:

Tap LAYER twice (so you're right back on your desired control layer), then wait 3 seconds before removing power.

If you'd like to reset the knob controls to default settings, load the INIT preset.

TOUCH footswitch
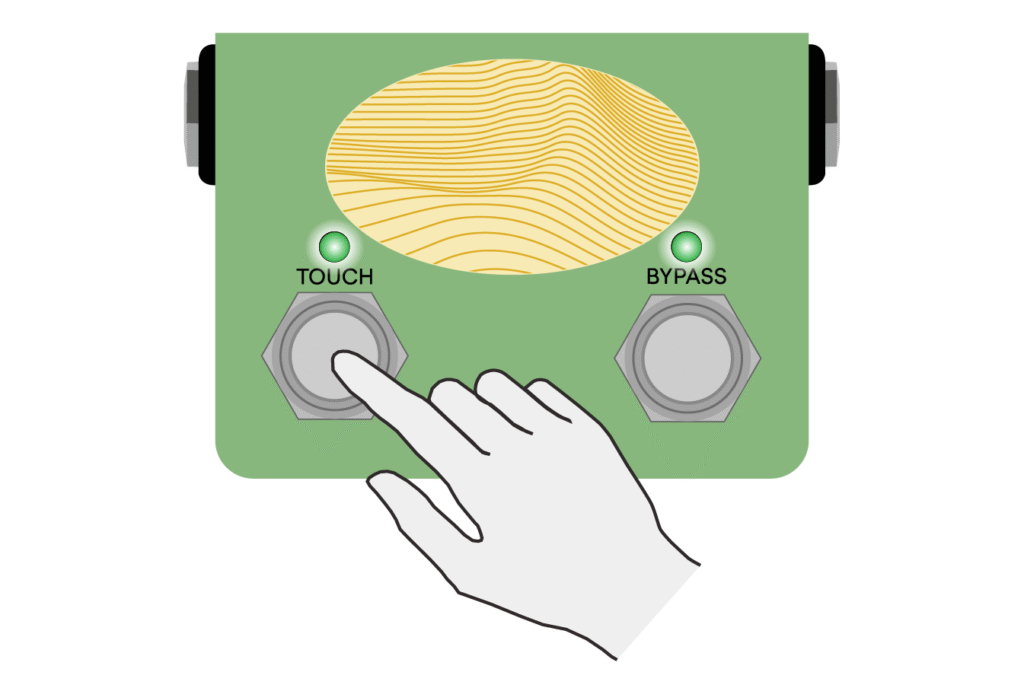
The TOUCH footswitch engages your selected Touch Mode.
This can be a granular processor, a varispeed looper, a drum machine, or a frequency shifter.
The footswitch responds to latched or momentary presses. You can use it for “always on” effects — or quick performance effects.
Each Touch Mode has two main knob controls (TOUCH 1 and TOUCH 2 on the white layer).
Touch Modes are covered in their own section, but this footswitch is a core part of Ghosts’ interface.
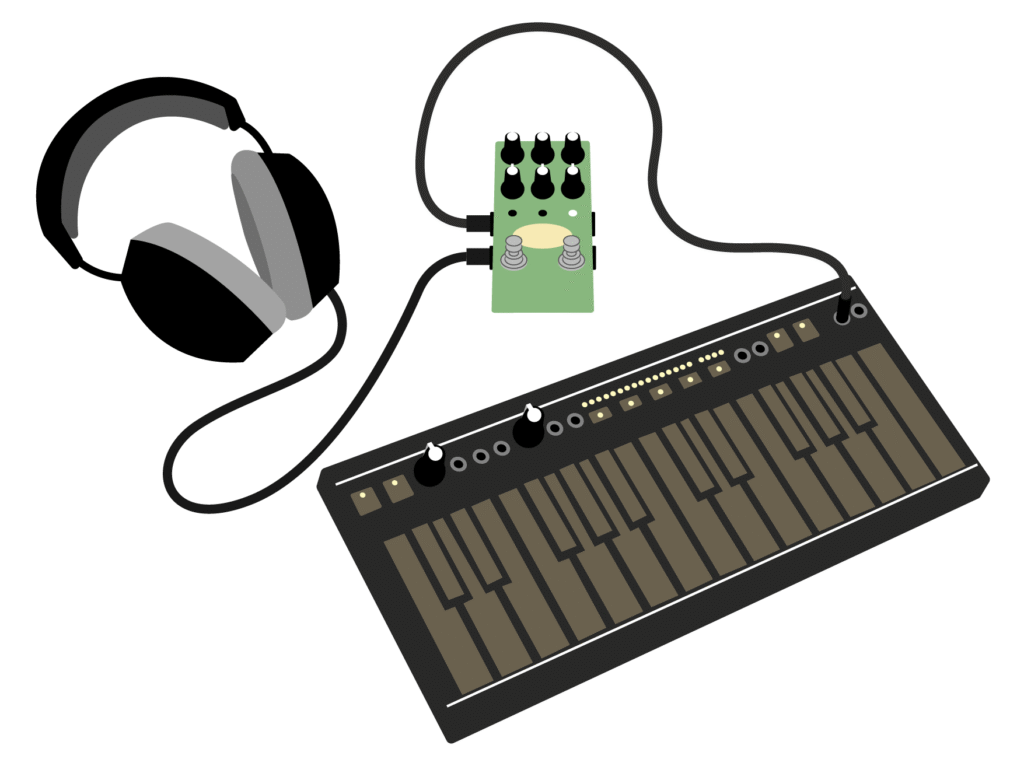
Contact Microphone
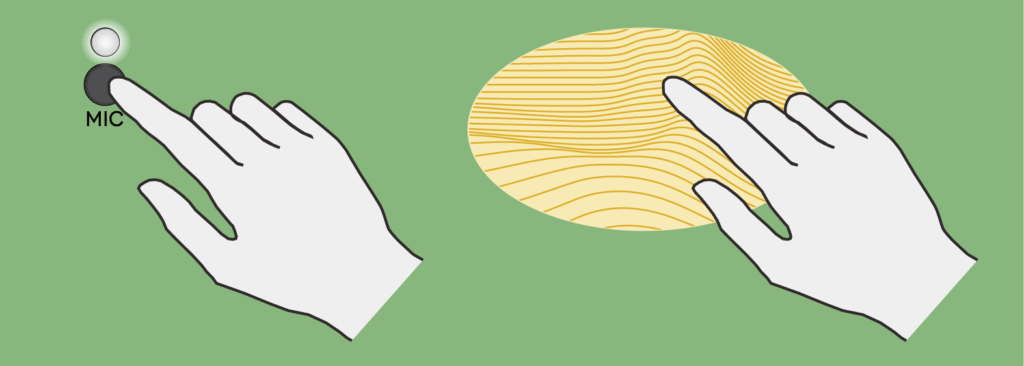
Ghosts has a built-in contact microphone that lets you play the resonators directly. Try strumming the oval pattern to excite them with tactile vibrations.
MIC button
Tap the MIC button to toggle the mic ON or OFF.
The MIC LED lights up to show you if it’s engaged.
When the mic is OFF — or if Ghosts is bypassed — the mic is completely disconnected from the signal path.
When an external audio source is connected to Ghosts, the mic gets mixed with your input audio in the analog domain. You can also use the mic on its own, with nothing plugged into the input.
Turn MIX all the way up for the full effect of the mic. At lower MIX settings, you’ll hear more of the raw contact mic sound.
Mic sensitivity
If you’d like the mic to be more or less sensitive, use the MIC GAIN control.
At higher GAIN settings — especially at line level — the mic is very sensitive, so be careful how you use it.
The entire device transforms into a microphone and it will capture even tiny gestures like tapping the buttons.
In our launch video we placed Ghosts on a snare drum and used the contact mic to pick up vibrations and excite the resonators.

While this was certainly fun, we haven't stress-tested this use case and can't promise that it won't affect the electronics over time.

So — we don't officially encourage this!

If placing Ghosts on drums is your primary use case, we recommend connecting an external contact microphone.

This achieves the exact same effect, and you can pick one up for less than the cost of lunch.
Physical Models
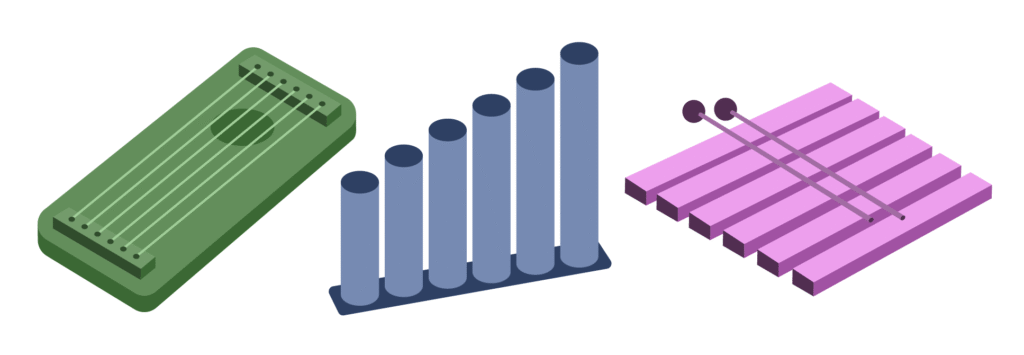
At the core of Ghosts are mathematical models of 6 strings, tubes, or bars that you can excite and transform in real-time. These are the “resonators” — they can produce anything from lifelike, acoustic tones to strange and otherworldly sounds.
MODEL button
Tap the MODEL button to choose your resonator type.
The MODEL LED indicates your selection:
 STRINGS (green LED)
Based on the Extended Karplus-Strong algorithm. Compared to standard Karplus-Strong, this model more accurately captures the sound and behavior of real strings by adding damping, and the ability to adjust the excitation position.
Strings produce harmonic frequencies, meaning overtones that are whole-number multiples of the fundamental pitch.
 TUBES (blue LED)
A type of modal resonator. Ghosts emulates modal resonance using a bank of 18 virtual-analog band-pass filters per voice (that’s 108 band-pass filters in total!).
Unlike plucking a string, striking a tube produces inharmonic frequencies, or tones that are not whole-number multiples of the fundamental, which gives them a rich and complex character.
 BARS (pink LED)
Another type of modal resonator. Like tubes, bars produce inharmonic frequencies, but the overtones are more widely spaced and detuned, resulting in a brighter sound.
Because of its harmonic content, STRINGS is the most universally pleasing model on a wide range of input material.

TUBES and BARS pair especially well with percussive sounds, the contact mic, and the internal exciter (PLUCK / STRIKE or AIR).
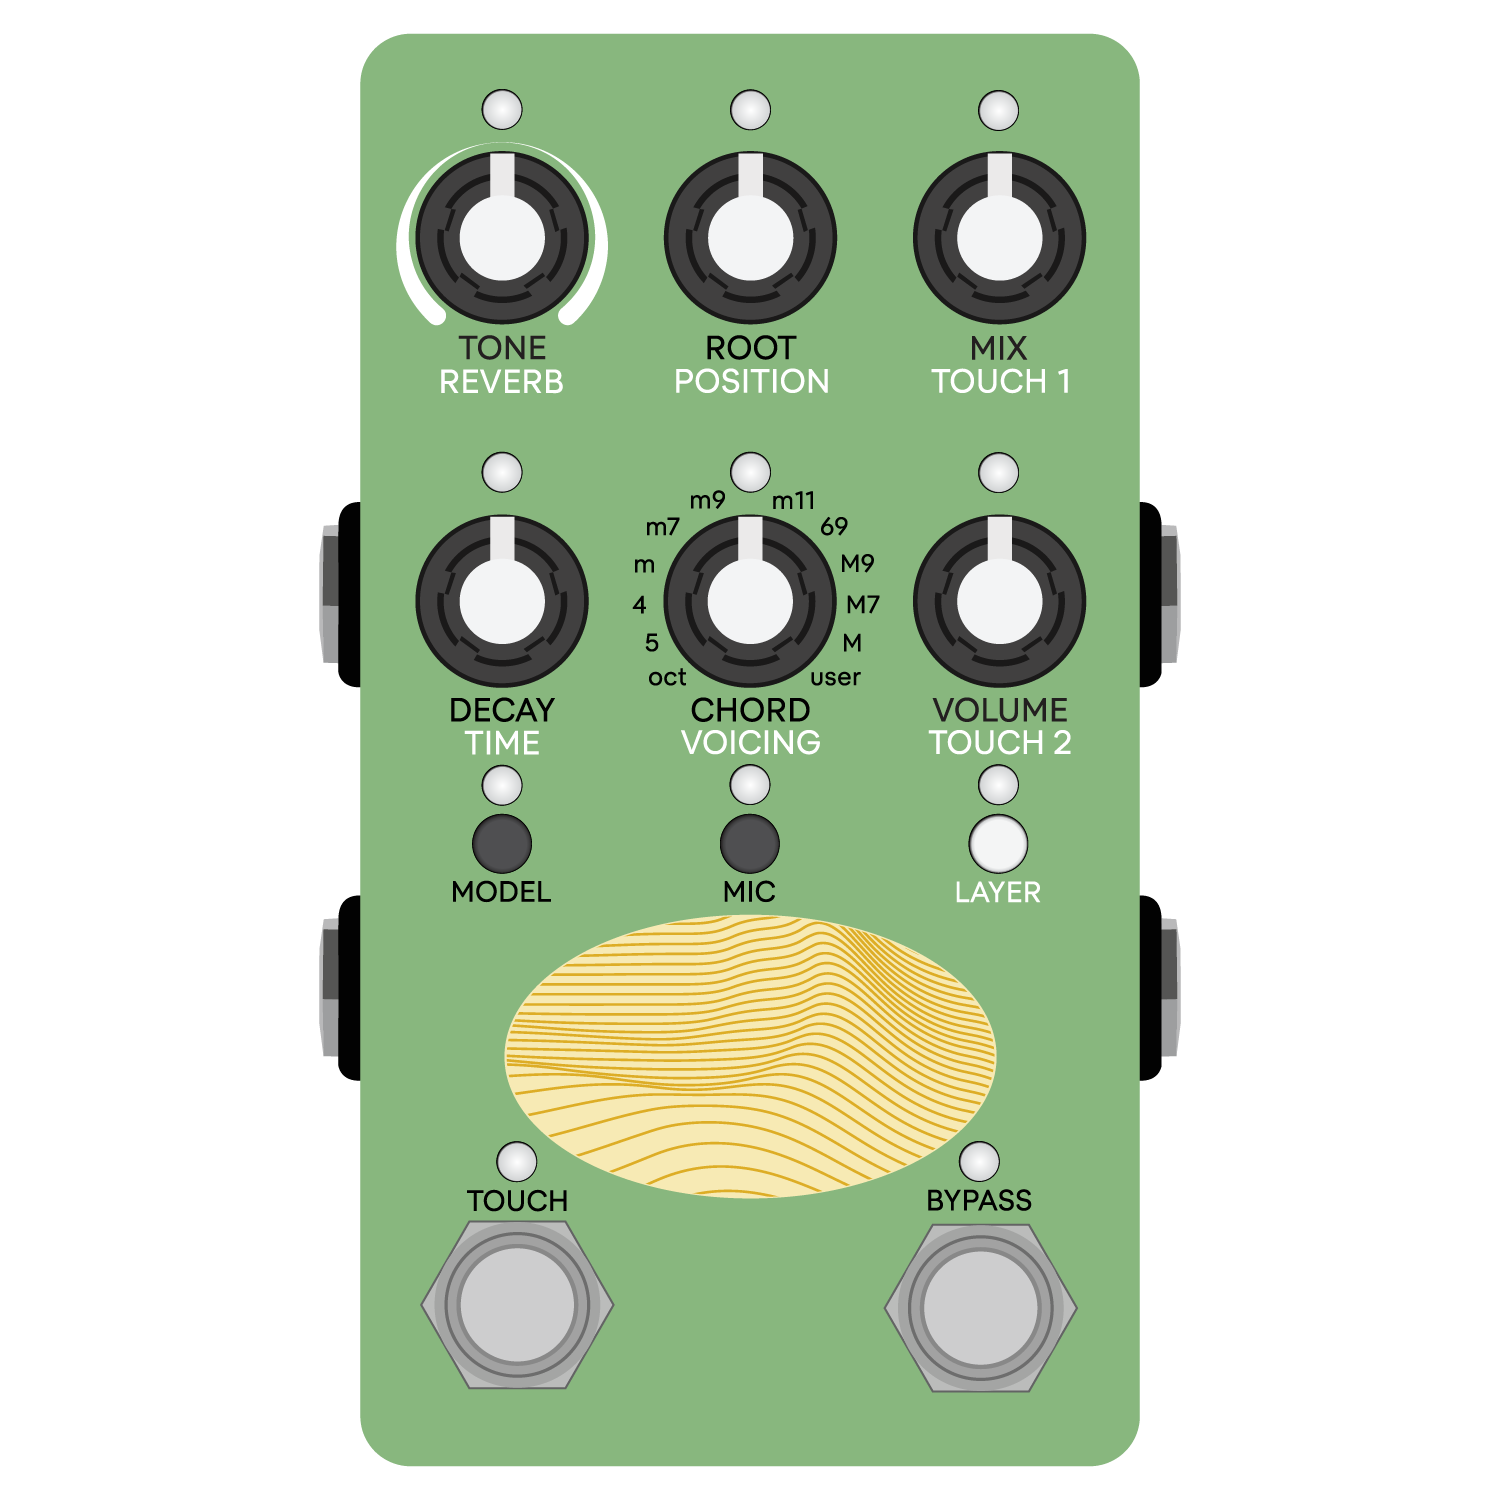
Knob Controls
The pitches of the 6 strings, tubes, or bars are tuned to chords, and you can use the various controls to shape their character — from tone and decay to excitation position and more.
MIX
Controls the balance between your input signal and the output of the resonators.
VOLUME
Controls the overall output level of the wet signal. Resonators can get notoriously loud — use this control to keep levels in check.
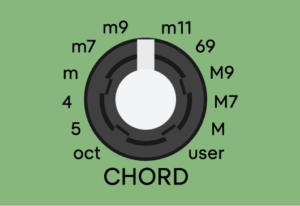
CHORD
Re-tunes the resonators in real-time, with 12 preset chords to select from. The LED blinks as you transition between chords.
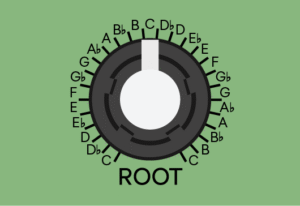
ROOT
Adjusts the root note of your selected chord, quantized to semitones. Middle C is at 12 noon, and you can pitch shift +/- an octave from there. The LEDs blinks as you step from one note to the next.
VOICING
Inverts and transposes your selected chord, letting you rearrange notes and push the chord into different ranges of the frequency spectrum.
Let your ear guide how CHORD, ROOT, and VOICING are tuned. With a bit of intention and careful listening, Ghosts is a powerful harmonic companion.

Overwhelmed by the chord options?

Try keeping the CHORD knob tuned to octaves or fifths, then set your root note. You'll find more flexibility in what you can play while still staying in tune with the resonators.
TONE
Controls the brightness of the resonators. Simultaneously adjusts a low-pass filter on your input audio, and the high-frequency decay of the physical models. The resonators are brightest at fully clockwise. For additional tone control, experiment with the INPUT FILTER.
DECAY
Adjusts the decay time of the resonators. At max decay, they sustain infinitely.
Setting DECAY to zero bypasses the resonators.

This allows you to use the reverb or any of the Touch Modes independently.
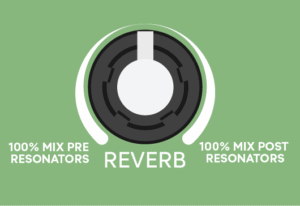
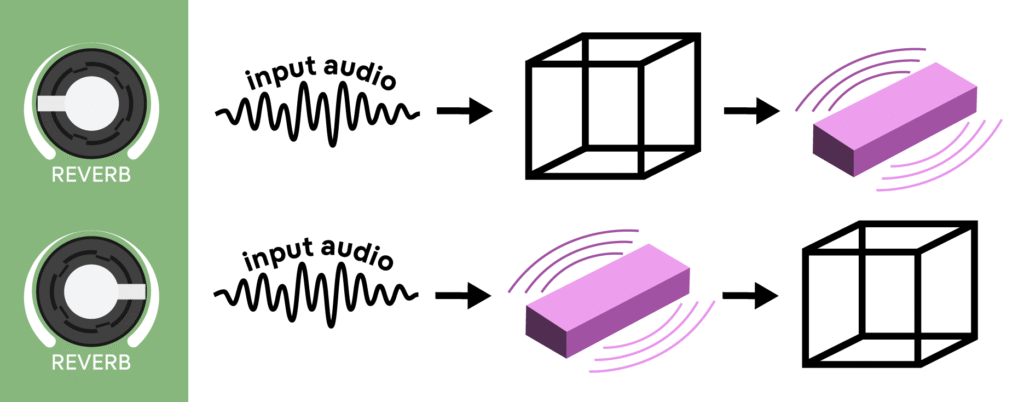
REVERB
Controls the reverb mix + placement, so the amount of reverb, and whether it’s placed pre- or post-resonators. If you are playing Ghosts as an instrument with the internal exciter (PLUCK / STRIKE or AIR), place the reverb post.
Let the space excite the model — or let the model excite the space.

Placing the reverb pre smears the input, creating a soft, cloudy drone that stirs the resonators.

Placing it post provides greater spatial definition, which is ideal for a more traditional reverb effect.
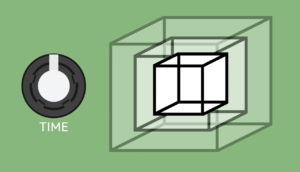
TIME
Controls the decay time of the reverb. At max decay, it sustains infinitely.
POSITION
A model-dependent control that sets the physical excitation point along the resonators. This adjusts which harmonic overtones are emphasized.

TOUCH 1 and TOUCH 2 are the Touch Mode controls. We’ll cover those shortly.
Hidden layer
There is a third layer of knob controls that provide some additional utilities. For the most part these are set it and forget it settings.
Hold LAYER and tap MIC to enter the hidden layer.
The LEDs light up pink to indicate that you’re editing hidden controls. Tap LAYER to exit.
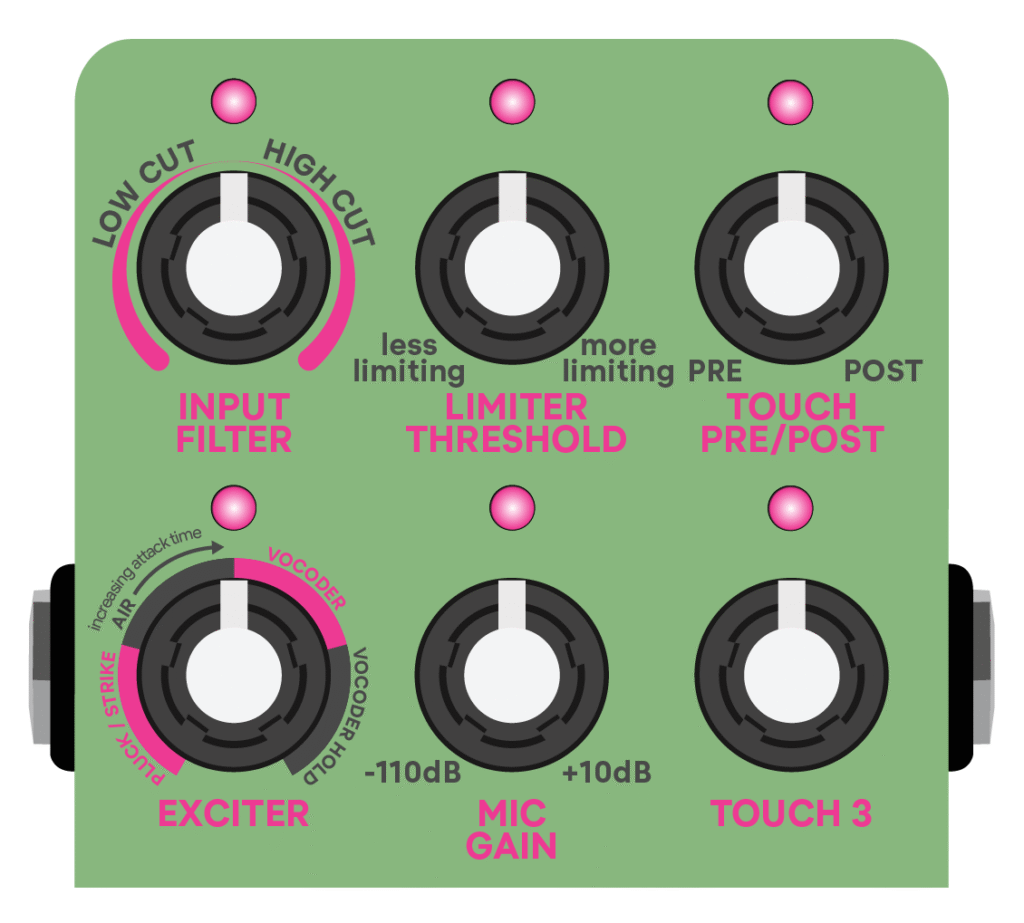
INPUT FILTER — TOP LEFT KNOB
An input low-cut or high-cut filter to sculpt your incoming audio before it hits the resonators. Adjust this control in relation to your particular setup.
A tip for guitar players:

Try engaging the input filter a bit left of noon to roll off some low-end.

This results in the upper harmonics of your instrument exciting the resonators instead of the fundamental — reducing harmonic buildup and leaving you with a more focused sound.
LIMITER THRESHOLD — TOP CENTER KNOB
A brick wall output limiter to tame the resonators. Turn up this control if you experience unwanted volume spikes. The limiter is always engaged but set to the minimum by default.
MIC GAIN — BOTTOM CENTER KNOB
Adjusts the gain of the contact mic. The range is different for instrument level and line level, but between about 12 noon and 2 o’clock is generally a sweet spot.
The mic is extremely sensitive at high GAIN settings! Experiment with caution to protect your hearing and avoid feedback.
EXCITER — BOTTOM LEFT KNOB
Selects the exciter type. This control applies if you are using MIDI notes to play Ghosts as an instrument.
TOUCH PRE / POST — TOP RIGHT KNOB
Touch Modes can be placed before or after the resonators, with pre as the default. Use this control to toggle the placement.
TOUCH 3 — BOTTOM RIGHT KNOB
Provides an optional utility for each Touch Mode:
- TERRAZZO — Dry / wet mix
- ENDLESS LOOP — Loop volume
- RHYTHM GENERATOR — Drum volume
- SHEPARD SHIFTER — Dry / wet mix
Touch Modes
The Touch Modes offer a versatile collection of tools and effects surrounding the physical models. All Touch Modes can be placed pre- or post-resonators, and can be synced to MIDI clock.
Touch Mode controls
What the TOUCH footswitch does depends on which Touch Mode you choose.
TOUCH 1 and TOUCH 2 provide the knob controls.
Hold the LAYER button while tapping TOUCH to choose a Touch Mode.
The TOUCH LED indicates your selection:
TERRAZZO (green LED)
ENDLESS LOOP (red LED)
RHYTHM GENERATOR (blue LED)
SHEPARD SHIFTER (pink LED)
Footswitch behavior
You can latch the TOUCH footswitch or engage it momentarily. These have different use cases.
- Latching — Quick tap TOUCH to engage, then tap again to disengage. Latching is for “always on” effects.
- Momentary — Keep TOUCH held down to engage, then let go to disengage. Momentary presses are great for brief performance effects.
To use a Touch Mode as a stand-alone tool, set DECAY to zero to bypass the resonators.

For ENDLESS LOOP, if you'd like your loop to continue playing when you bypass the pedal, set Ghosts to buffered bypass with trails.
TERRAZZO

Terrazzo is a streaming granular processor that disassembles sound into colorful fragments and binds them into new forms. 6 read heads spread across the stereo field — some play forward, or reversed, some at normal speed, some an octave up.
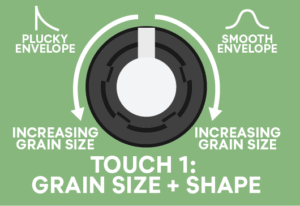
TOUCH 1 — GRAIN SIZE + SHAPE
Left from 12 noon produces plucky grains that increase in size. Right from noon produces smooth grains that increase in size. Grain size ranges from 100 msecs to 3 seconds.
TOUCH 2 — GRAIN TRIGGER RATE
Provides a clock pulse. As you twist the knob clockwise, grains trigger faster.

Grain size and trigger rate interact in a cool way that creates some really interesting and varied effects.

When grains are shorter than the clock pulse, they re-trigger in sync, producing tremolo-like sounds.

Set TOUCH 1 and TOUCH 2 around noon for a tremolo effect.

As the grain size exceeds the clock pulse, grains start firing on different clock edges, creating bouncy syncopated rhythms.

As you push the grain size further, more abstract and free-flowing patterns emerge.
 ENDLESS LOOP

Endless Loop is a simple varispeed looper, capable of infinite overdubs. This is an input looper by default — perfect for capturing the contact mic or incoming audio and transforming it into rhythmic gestures that excite the resonators.
See ENDLESS LOOP + MIDI for some best practices when syncing the looper to MIDI clock.
There are 2 ways to record:
- Quick tap TOUCH to start recording — then tap again to stop.
- Hold down TOUCH to record — then release to stop.
When recording the initial loop, the Touch LED turns solid red. This first write sets your loop length. From recording, Ghosts switches to overdubbing, indicated by a glowing red LED. From overdubbing, pressing the footswitch again switches to playback, indicated by a blue LED that ramps in brightness as your loop plays from start to finish. You can re-engage the footswitch at any time and overdub endlessly.
Double tap TOUCH to stop playback and erase your loop.
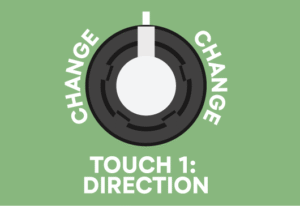
TOUCH 1 — DIRECTION
This knob works just like bi-directional recording on a tape player. You can record and play in both directions.
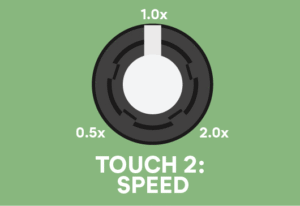
TOUCH 2 — SPEED
Use this control to pitch shift your loops. Speed varies continuously from 0.5x to 2x, and impacts maximum loop length.
Record up to 40 seconds at 0.5x speed, 20 seconds at 1x speed, or 10 seconds at 2x speed.
 RHYTHM GENERATOR
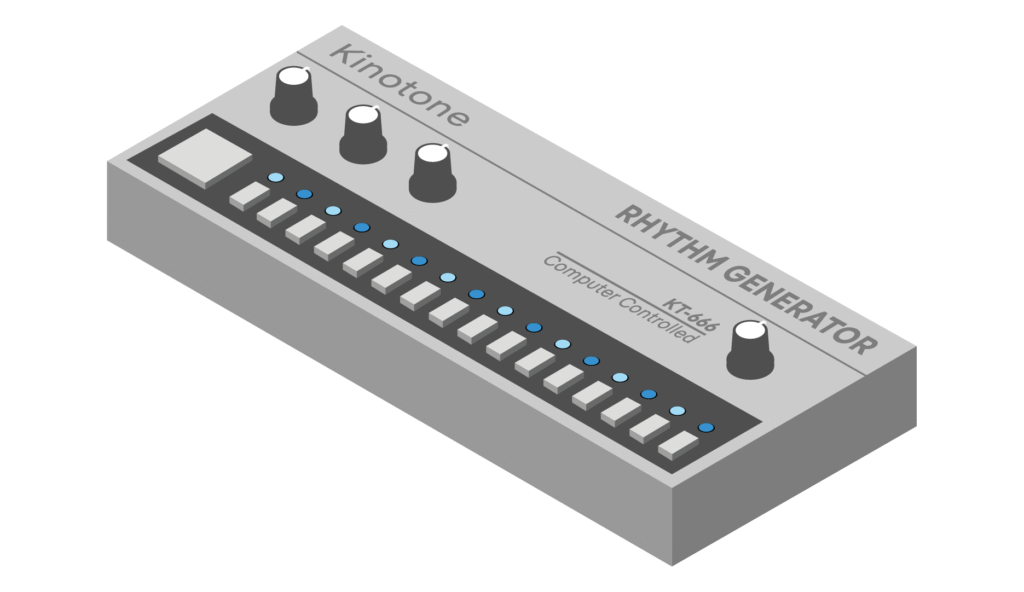
Rhythm Generator is a virtual-analog model of a legendary 1981 drum machine with punchy analog resonator circuits. Resonators to excite resonators! Kick, snare, hi-hat. Real-time synthesis (no samples).
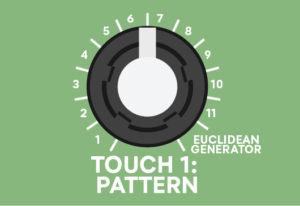
TOUCH 1 — PATTERN
Selects between 11 curated patterns and a 12th Euclidean random notch. The 12th notch algorithmically generates a brand new pattern each time it’s re-selected.
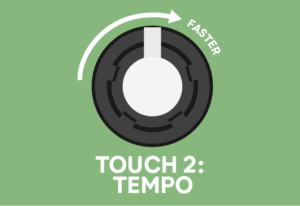
TOUCH 2 — TEMPO
Adjusts the tempo of the drum pattern.
To use Ghosts as a standalone drum machine, set DECAY to zero to bypass the resonators.
Shepard Shifter
Shepard Shifter creates an auditory illusion of endlessly rising or falling spectral peaks, emphasizing different frequencies in the resonators. It’s a virtual-analog Bode frequency shifter — designed to move deliberately slowly like a phaser or flanger.
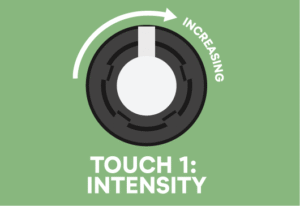
TOUCH 1 — INTENSITY
Controls the intensity of the effect.
TOUCH 2 — DIRECTION + RATE
Left from 12 noon creates descending peaks that accelerate as you turn further. Right from noon creates ascending peaks that accelerate as you turn further.
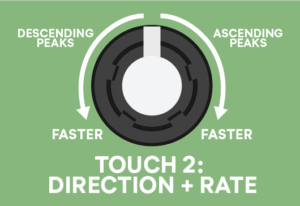
Try pairing Shepard Shifter with the contact mic (pre- resonators) to create bubbly pan drum sounds.
Touch Modes pre / post
When using Ghosts with external audio or the contact mic — the Touch Modes can be placed before or after the resonators.
Pre is the default setting. Use the TOUCH PRE / POST control toggle the placement.
If you are playing Ghosts as an instrument with the internal exciter (PLUCK / STRIKE or AIR), Touch is automatically shifted to the output.

In this scenario the resonators themselves are what generate sound — there is no incoming signal for the Touch Modes to process.
TERRAZZO
PRE-RESONATORS — When placed pre, Terrazzo becomes the exciter. The 6 strings, tubes, or bars respond to the grains, with each fragment plucking, striking, or brushing up against them. This lets you turn any sound into a texture that feels organic and alive.
POST-RESONATORS — When placed post, Terrazzo processes the the output of the resonators. The resonators generate a tone which Terrazzo shatters and reassembles into a new audio stream. This tends to yield a more synthetic and electronic sound.
ENDLESS LOOP
PRE-RESONATORS — When placed pre, Endless Loop is an input looper. After recording a loop, you can tweak the resonators in real-time while it plays back, adjusting their tone, decay, tuning, etc.
POST-RESONATORS — When placed post, Endless Loop is an output looper, which lets you capture the processed output of the resonators. This is ideal for building up layered overdubs with different models, pitches, voicings, etc.
RHYTHM GENERATOR
PRE-RESONATORS — When placed pre, Rhythm Generator gets mixed with the input signal, and the drums excite the resonators. You can turn percussive sounds into vibrant, tuned patterns and reshape them on-the-fly.
POST-RESONATORS — When placed post, the drums are mixed after the resonators. Your input audio continues to run through the resonators, while the drums stay clean and defined.
SHEPARD SHIFTER
PRE-RESONATORS — When placed pre, Shepard Shifter creates spectral peaks in your input audio that move across the frequency spectrum of the resonators, exciting different overtones as they go. This effect is only apparent when audio is being fed into the input.
POST-RESONATORS — When placed post, Shepard Shifter creates spectral peaks in the resonator output. This provides a more synthetic, lingering sound that continues even after the input has stopped, as the frequency shifter emphasizes the resonators’ overtones while they decay.
Presets
Ghosts has 6 onboard presets, and you can save up to 32 via MIDI. The factory presets showcase a variety of sounds Ghosts is capable of, and exploring them is a great way to spark ideas when you’re first starting out.
The following settings are saveable into a preset: black and white controls, hidden layer controls, mic and model settings, selected Touch Mode, user chord and scale.
Loading presets
Hold the LAYER button for 3 seconds to enter the Presets Bank. A single LED lights up, and you can now tap LAYER to toggle through 6 slots, indicated by the MODEL, MIC, and LAYER LEDs (from left to right).
Preset slots 1–3 are red
Preset slots 4–6 are blue
Hover over a slot and tap TOUCH to load. The LEDs will briefly glow a unique color. The preset that you load becomes your live settings.
If you want to load another preset, hold LAYER again for 3 seconds, toggle to the slot you want to hear, and tap TOUCH to load.
Factory presets
![]()
1. INIT — HOME BASE
Resets all knob controls to default settings
Touch Mode: TERRAZZO
User scale: 12-tone equal temperament![]()
2. DARK SHIFTER *
Touch Mode: SHEPARD SHIFTER
User scale: Hyperconcord![]()
3. STRING LOOPS
Touch Mode: ENDLESS LOOP
User scale: 29th harmonic rainbow![]()
4. GLITTER PHYSICS *
Touch Mode: TERRAZZO
User scale: 7 limit JI![]()
5. HARMONIC PULSE *
Touch Mode: RHYTHM GENERATOR
User scale: Subset of 13 EDO![]()
6. SPARKLE SHIFTER *
Touch Mode: SHEPARD SHIFTER
User scale: Subset of 666 EDO
For presets marked with an asterisk (*), engage the TOUCH footswitch to hear the full effect.
Saving your settings
To overwrite a preset with your live settings, enter the Presets Bank (hold LAYER for 3 seconds), then tap LAYER to toggle to the slot you want to overwrite.
Tap BYPASS twice to confirm and save.
To exit without loading or saving, simply hold LAYER again for 3 seconds.
NOTE: The INIT preset cannot be overwritten
If you want to restore the factory presets, check out the factory reset option.
Physical Modeling Instrument
Connect a MIDI keyboard to Ghosts, and it becomes a 6-voice physical modeling instrument. Dial in a cello, a zither, a marimba — or engage a Touch Mode to push things into stranger territory.
You can also use Ghosts like a vocoder, shaping your input signal into resonant, playable tones.
This works by sending MIDI notes.
Ghosts automatically detects TRS MIDI Type A and Type B connections. See MIDI Overview for more details.
When playing Ghosts with MIDI notes, there are a few key concepts to understand:
- Input gating and MIDI takeover.
- How to “wake up” the tuning controls when you are done sending MIDI notes.
- The different exciter options and what they offer.
Input gating and MIDI Takeover Mode
When Ghosts receives MIDI notes, it enters MIDI Takeover Mode.

In MIDI Takeover Mode, a few things are happening:
The input signal is gated by default. Incoming audio and the contact microphone are muted unless a MIDI note is held.
CHORD, ROOT, and VOICING are bypassed. Ghosts is no longer listening to to these settings — you have complete control over the resonator tuning with the notes you play.
We gate the input by design. Without gating, all 6 voices would be constantly reacting to the input, creating a chaotic 6-note drone and making it impossible to play clear melodies.

If you'd like to play MIDI notes and have them hold until you play different notes, try VOCODER HOLD.
Exiting MIDI Takeover Mode

To exit MIDI Takeover Mode, Twist the ROOT knob. This tells the resonators to resume listening to the CHORD, ROOT, and VOICING knobs.
Exciter options
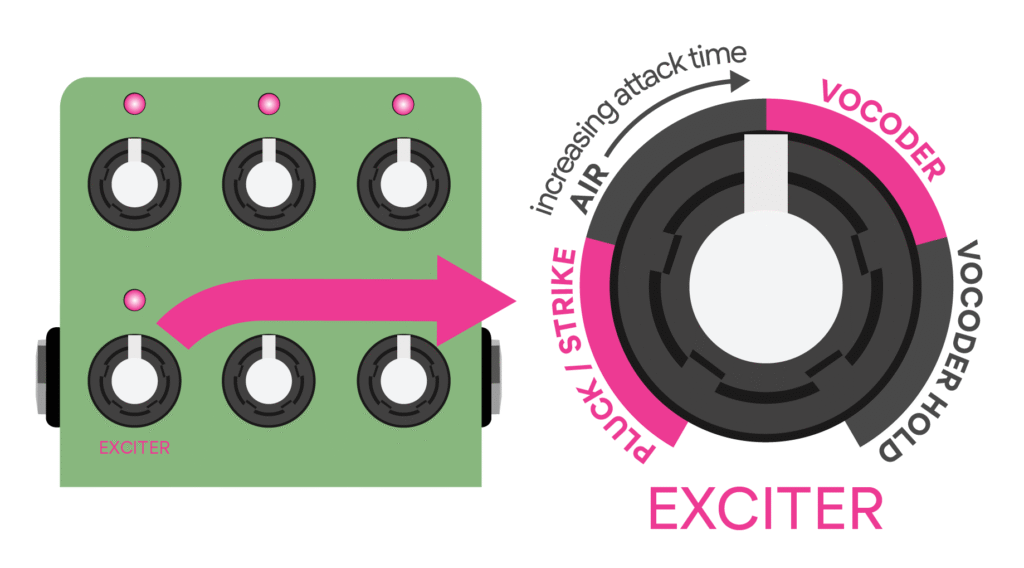
Tap LAYER to exit.
The exciter is what sets the resonators in motion. It’s the hand that plucks a string, the mallet that strikes a bar, or the air moving through a tube.
But your input audio or the contact mic can also be the exciter.
The EXCITER control determines how Ghosts responds when you send it MIDI notes.
PLUCK / STRIKE or AIR
internal exciter
PLUCK / STRIKE or AIR are the internal exciter options.
If the EXCITER control is set to either of these positions, the internal exciter is ON.
When set to PLUCK / STRIKE or AIR, the MIDI notes you play re-tune the resonators and excite them simultaneously. No external audio required — just MIDI notes.
PLUCK / STRIKE
STRINGS are plucked. TUBES and BARS are struck.
AIR
A breath-like excitation that can be used across all models. As you twist the knob clockwise within the AIR region, it increases the attack envelope time.
When using PLUCK / STRIKE or AIR, Ghosts is a complete instrument rather than an audio effect.

Try experimenting with the physical models, as well as tone, decay and position settings to emulate a wide variety of acoustic instruments.

Twist the ROOT knob to resume using Ghosts as an audio effect.
Internal exciter OFF (VOCODER or VOCODER HOLD)
VOCODER and VOCODER HOLD let your input audio or the contact mic be the exciter.
If the EXCITER control is set to either of these positions, the internal exciter is OFF.
When set to VOCODER or VOCODER HOLD, the MIDI notes you play re-tune the resonators, while the input is what excites them.
VOCODER
When you send Ghosts a MIDI note, it re-tunes a resonator voice and opens its gate, allowing the input to excite it. When you release the note, the gate closes and the resonator decays naturally.
VOCODER HOLD
In this scenario, you can lift your fingers off the keys, and the notes will be held until you play new ones (the input won’t be muted between phrases).
For example, if you play C–D–E–F–G–A then release the keys, the resonators will be tuned to those notes and your input audio is free to excite them.
You don’t need to press all the notes at once though — as long as one is held, you can add more to the stack. When a seventh note is played, the oldest note is replaced by the newest. If you release all notes and then play a chord, Ghosts clears the previous stack and holds only the new notes.
When using VOCODER or VOCODER HOLD, Ghosts is a powerful processing tool for vocals, drum machines, and more.
Looped exciter sounds
You can also capture unique exciter sounds using the built-in looper. This is one of our favorite ways to use Ghosts.
Give it a try with the contact mic:
1. Make sure TOUCH PRE / POST is set to pre (so the looper is at the input).
2. Set the EXCITER control to VOCODER or VOCODER HOLD.
3. Select ENDLESS LOOP as your Touch Mode.
4. Engage the looper, turn on the mic, and strum the surface. Try capturing a short loop (1-2 seconds), then overdub a few strums to build up a richer sound.
NOTE: the mic may be gated, but it’s still recording — watch the TOUCH LED to confirm.
5. Start sending MIDI notes during playback.
Your loop becomes the sound that’s triggered when you press the keys.
MIDI Overview
Ghosts is compatible with any MIDI controller that has a 5-pin DIN or TRS MIDI output.
If your controller has a DIN MIDI out, connect your MIDI cable to a DIN-to-TRS MIDI adapter, then plug that into Ghosts’ MIDI input. An example adapter can be found here.
If your controller has a TRS MIDI out, use a TRS cable to connect to Ghosts’ MIDI input.
Ghosts automatically detects TRS MIDI Type A or Type B connections.
Our previous pedals have internal jumpers to switch between TRS MIDI Type A, Type B, or Type CBA (Chase Bliss Audio MIDI Box). We no longer support the CBA option — if you would like to pair Ghosts with a Chase Bliss MIDI Box, connect to the MIDI thru port using a 5-pin DIN MIDI cable and a DIN-to-TRS adapter like the one linked above.
USB MIDI
Ghosts also supports MIDI over USB. You can use the included USB-C cable to send MIDI from your DAW or other USB MIDI host. Note that Ghosts is a USB MIDI device, and is therefore not compatible with most USB MIDI keyboards, as they are also devices.
MIDI channels
Ghosts defaults to MIDI channel 1. To change MIDI channels, make sure nothing is connected to the CV / EXP input and hold down both footswitches while applying power. A single LED will light up, and now you can use the LAYER button to toggle between 12 available MIDI channels.
The MODEL, MIC, and LAYER LEDs (from left to right) indicate the MIDI channels in sets of 3.
Channels 1-3 are green, channels 4-6 are blue, channels 7-9 are pink, channels 10-12 are red, and channels 13-15 are white.
- To select a MIDI channel, press TOUCH.
- To exit without selecting, press BYPASS.
After selecting or exiting Ghosts will boot up normally. The MIDI channel you select is persistent between power cycles.
MIDI CC messages
Ghosts’ controls can all be modified via various MIDI CC messages. It responds to the following:
| MIDI CC #: | Destination: | Range: |
| 14 | Mix | 0-127 |
| 15 | Volume | 0-127 |
| 16 | Root | 0-127 |
| 17 | Chord | 0-127 |
| 18 | Tone | 0-127 |
| 19 | Decay | 0-127 |
| 20 | Touch 1 | 0-127 |
| 21 | Touch 2 | 0-127 |
| 22 | Position | 0-127 |
| 23 | Voicing | 0-127 |
| 24 | Reverb Mix & Placement | 0-63 = Pre Resonator Mix 64-127 = Post Resonator Mix |
| 25 | Reverb Decay | 0-127 |
| 26 | Touch Pre Post | 0-63 = Pre 64-127 = Post |
| 27 | Touch 3 | 0-127 |
| 28 | Limiter Threshold | 0-127 |
| 29 | Mic Level | 0-127 |
| 30 | Input Filter | 0-63 = High Pass 64-127 = Low Pass |
| 31 | Exciter Type | 0-31 = Pluck / Strike 32-63 = Air 64-95 = Vocoder 96-127 = Vocoder Hold |
| 32 | Touch Mode | 0-31 = Endless Loop 32-63 = Rhythm Generator 64-95 = Shepard Shifter 96-127 = Terrazzo |
| 33 | Model | 0-42 = Strings 43-85 = Tubes 86-127 = Bars |
| 34 | Mic On / Off | 0-64 = Off 65-127 = On |
| 51 | Ignore MIDI Clock | 0 = Ignore 1-127 = Listen |
| 52 | Ignore MIDI Transport (Start / Stop) | 0 = Ignore 1-127 = Listen |
| 60 | Clear Endless Loop | 0-64 = False 65-127 = True |
| 80 | Touch Footswitch | Endless Loop: Send 127 to advance state (rec, dub, play, dub, play, etc.) All other Touch Modes: 0-64 = Off 65-127 = On |
| 81 | Bypass Footswitch | 0-64 = Off 65-127 = On |
Loading presets with MIDI
Ghosts has 32 total preset slots. Presets 1-6 are accessible on the pedal itself. You can send MIDI Program Change messages to load the full range from 1-32.
Sending a Program Change of 1 will load preset 1, a Program Change of 19 will load preset 19, etc. A Program Change of 0 or >32 will not load any preset.
When presets 1-6 are engaged, the preset LEDs briefly light up a solid color: green, blue, pink, red, white, yellow.

When loading presets 7-32, that same color pattern is repeated in banks of 6.

For example, presets 7 and 13 are both green, presets 8 and 14 are both blue, presets 9 and 15 are both pink, etc.
Saving presets 7-32 with MIDI
Program Change messages can also be used to program presets slots 7-32.
To save your settings into one of these slots, send Ghosts a program change message while you are in the Presets Bank (hold the LAYER button for 3 seconds).
NOTE: The factory settings for presets 7-32 are not initialized. These don't do anything interesting by default and you will need to program them before use.
ENDLESS LOOP + MIDI
Ghosts can take a jittery MIDI clock and generate a stable internal clock that stays locked to the grid. This allows you to quantize your loop lengths and sync them with your favorite drum machine, sequencer, or DAW.
When a MIDI clock is received, the LAYER LED blinks to indicate the downbeat. If this doesn’t match your external device, send Ghosts a MIDI Start message to establish the correct downbeat. Once received, Ghosts will be synced with your device(s).
To record with ENDLESS LOOP, engage TOUCH slightly before the beat where you want recording to begin, and disengage slightly before the end of the final bar you want to capture.
Ghosts automatically ensures that the maximum loop length is a division of the grid. If you exceed the max length, it automatically switches from recording to overdubbing. During playback, Ghosts applies micro-timing adjustments to prevent your loop from drifting out of sync.
The SPEED control provides 3 options: 0.5x, 1x, or 2x. Speed and direction changes go into effect when your loop wraps around to the start.
We do not recommend changing tempo or starting / stopping the MIDI clock during playback.

If a loop is recorded at one tempo and the tempo changes during playback, Ghosts will attempt to time stretch and pitch shift the loop to stay within the grid — but it will likely lose the downbeat during re-synchronization and produce unexpected behavior.

Ghosts also expects a steady MIDI clock while the looper is active. If you’re using a DAW and pressing Start / Stop during playback, there may not be enough timing information immediately available for Ghosts to determine the correct playback speed and position, which can cause loops to drift out of tune or out of time.
User Chord and Scale
The user notch on the CHORD knob serves two purposes: it lets you define a custom chord, and it lets you retune the resonators to a system other than 12-tone equal temperament.
You can also combine these functions — send a custom scale first, then set a chord within that tuning. User chord and scale are persistent between power cycles and can be saved into presets.
User Chord
To send a custom chord, set the CHORD knob to user and set the EXCITER control to VOCODER HOLD.
Then play a chord of up to 6 MIDI notes.
Tap LAYER twice and wait 3 seconds to trigger a state-save. Your chord is now stored in memory, and Ghosts will retune the resonators to this chord if the user notch is selected.
Keep in mind that loading a preset will overwrite your chord with the user chord saved in that preset slot. So if you’d like to keep your chord long-term, save your settings into a preset.
User Scale
If you’re setting up custom scales, we assume that you already have some familiarity and experience with mictrotuning. We are not here to hand-hold and provide specific guidance on preparing or formatting tuning files — there are many excellent resources for this online. If you’re a complete beginner, consider exploring some of the user scales included in the factory presets.
Ghosts uses MTS (MIDI Tuning Standard) Bulk Tuning Dump SysEx files to retune the resonators to scales beyond 12-tone equal temperament. Since MTS files aren’t human-readable, we highly recommend using a tool like ScaleWorkshop to design your custom scales and export the required MTS Bulk Tuning Dump file for Ghosts.
If a preset index is requested when preparing your MTS file, Ghosts ignores this value. Active microtuning data in stored in the live state.
After exporting your MTS Bulk Tuning Dump file, send it to Ghosts using a tool like MIDI-OX (Windows) or SysEx Librarian (MacOS). You can send the file via Ghosts’ USB-C port or the TRS MIDI input.
Ghosts will briefly glow to show successful receipt of an MTS file. If you don’t see any visual feedback, check your setup and try again.
Once the file has been accepted, you can play your scale with MIDI notes as long as the CHORD knob is set to the user notch.
Tap LAYER twice and wait 3 seconds to trigger a state-save. For long-term use, save your settings into a preset. You can combine these steps with the chord process above to create a custom chord tuned to your scale.
Max for Live
This will be made available after release.
Ableton users can download our Max for Live device to control Ghosts with MIDI. This can be found on the Ghosts product page under the Extras tab.
CV / Expression
You can use the CV / EXP input to map Ghosts’ parameters using control voltage or an expression pedal. The CV / EXP input has a range of 0-5 volts.
To access the CV / EXP Mapping Menu, make sure a TS or TRS cable is connected to the CV / EXP input, then hold down both footswitches while applying power. The footswitch LEDs will turn blue.
Use the TONE knob to scroll the parameters. Tap LAYER to access:
- Black controls (green LAYER LED)
- White controls (white LAYER LED)
- Touch footswitch (blue LAYER LED). Only one parameter on this layer. All knob LEDs light up if mapped, and are blank if unmapped.
To map knob control(s), hover over the control you want to use and tap the TOUCH footswitch. To confirm a control has been mapped successfully, you can twist the TONE knob and continue scrolling — any mapped controls will be lit up white. If you want to unmap a control, just scroll back to it and tap TOUCH again.
When you are done mapping, tap BYPASS to save your settings and exit.
When a parameter is mapped to CV / EXP, the knob is taken over by the CV / EXP jack.

For example, if you're using an expression pedal, the setting will be at 0% when the expression pedal is in the heel position, and 100% in the toe position.

Likewise with CV, the setting is at 0% if you apply 0 volts, and 100% if you apply +5 volts.
Mixing, Input Level, Bypass Options
Mixing, input level, and bypass settings are global and persistent between power cycles — you only need to visit these menus if you want to change them.
Mixing and input level options
To access the Mixing / Input Level Menu, hold down the TOUCH footswitch while applying power to Ghosts. Both footswitch LEDs will turn blue.
Default settings are mono in / mono out instrument level, and analog bypass.
The MODEL, MIC, and LAYER LEDs (from left to right) indicate settings 1-3, and 4-6. Tap LAYER to toggle between them.
- To save a new setting press TOUCH.
- To exit without saving press BYPASS.
After saving or exiting Ghosts will boot up normally.![]() 1. STEREO IN / STEREO OUT — INSTRUMENT LEVEL
1. STEREO IN / STEREO OUT — INSTRUMENT LEVEL![]() 2. MONO IN / STEREO OUT — INSTRUMENT LEVEL
2. MONO IN / STEREO OUT — INSTRUMENT LEVEL
![]() 3. MONO IN / MONO OUT — INSTRUMENT LEVEL (default)
3. MONO IN / MONO OUT — INSTRUMENT LEVEL (default)
![]() 4. STEREO IN / STEREO OUT — LINE LEVEL
4. STEREO IN / STEREO OUT — LINE LEVEL
![]() 5. MONO IN / STEREO OUT — LINE LEVEL
5. MONO IN / STEREO OUT — LINE LEVEL
![]() 6. MONO IN / MONO OUT — LINE LEVEL
6. MONO IN / MONO OUT — LINE LEVEL
INSTRUMENT LEVEL provides some helpful guardrails. It lowers the OUTPUT LIMITER threshold by 10 dB, limits the contact mic volume, and softens the levels of the drum machine and internal exciter. LINE LEVEL enables the full dynamic range of Ghosts.
Bypass options
To access the Bypass Menu, hold down the BYPASS footswitch while applying power to Ghosts. Both footswitch LEDs will turn yellow.
The MODEL, MIC, and LAYER LEDs (from left to right) indicate settings 1-3. Tap LAYER to toggle between them.
- To save a new setting press TOUCH.
- To exit without saving press BYPASS.
After saving or exiting Ghosts will boot up normally.![]() 1. ANALOG BYPASS (default)
1. ANALOG BYPASS (default)
Uses an analog switch to completely bypass Ghosts’ audio converter. Your audio stays analog when the pedal is bypassed.![]() 2. BUFFERED BYPASS
2. BUFFERED BYPASS
A smooth and silent option where your audio still runs through the electronics when bypassed. This is setting is automatically enabled if you set Ghosts to MONO IN / STEREO OUT (we need a buffer to split your signal).![]() 3. BUFFERED BYPASS WITH TRAILS
3. BUFFERED BYPASS WITH TRAILS
Another silent option. Your input signal is unaffected, but Ghosts still acts as a sound source, so you’ll continue to hear resonator and reverb decay, loops, and drums patterns.
Factory Reset
To restore Ghosts to all factory defaults you can do a quick factory reset on your unit. This restores onboard presets 1-6 and default input level, mixing, and bypass options.
A factory reset does not erase any presets created using Program Change messages (slots 7-32).
Remember that if your goal is to simply reset the knob controls to default settings, you can load the INIT preset.
To factory reset your unit, hold the LAYER button for 3 seconds to enter the Presets Bank.
Then, hold LAYER and double tap TOUCH. After a few seconds Ghosts will reboot on its own.
Firmware Updates
If new firmware is made available we will share about it on our forum and link to instructions here.
Firmware is installed using the provided USB-C cable.
If you believe you’ve discovered a firmware bug, email support@kinotoneaudio.com or share your findings on the Kinotone forum.