
Ribbons User Manual
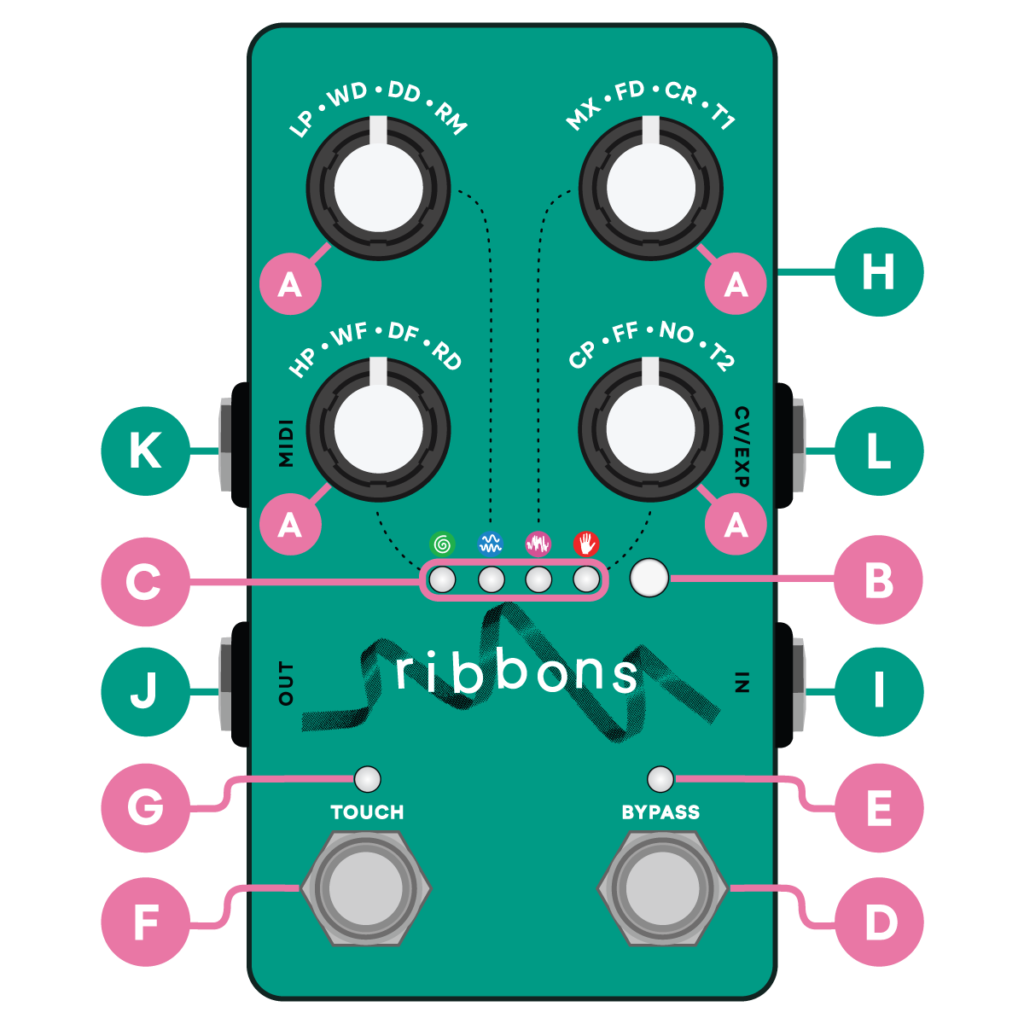
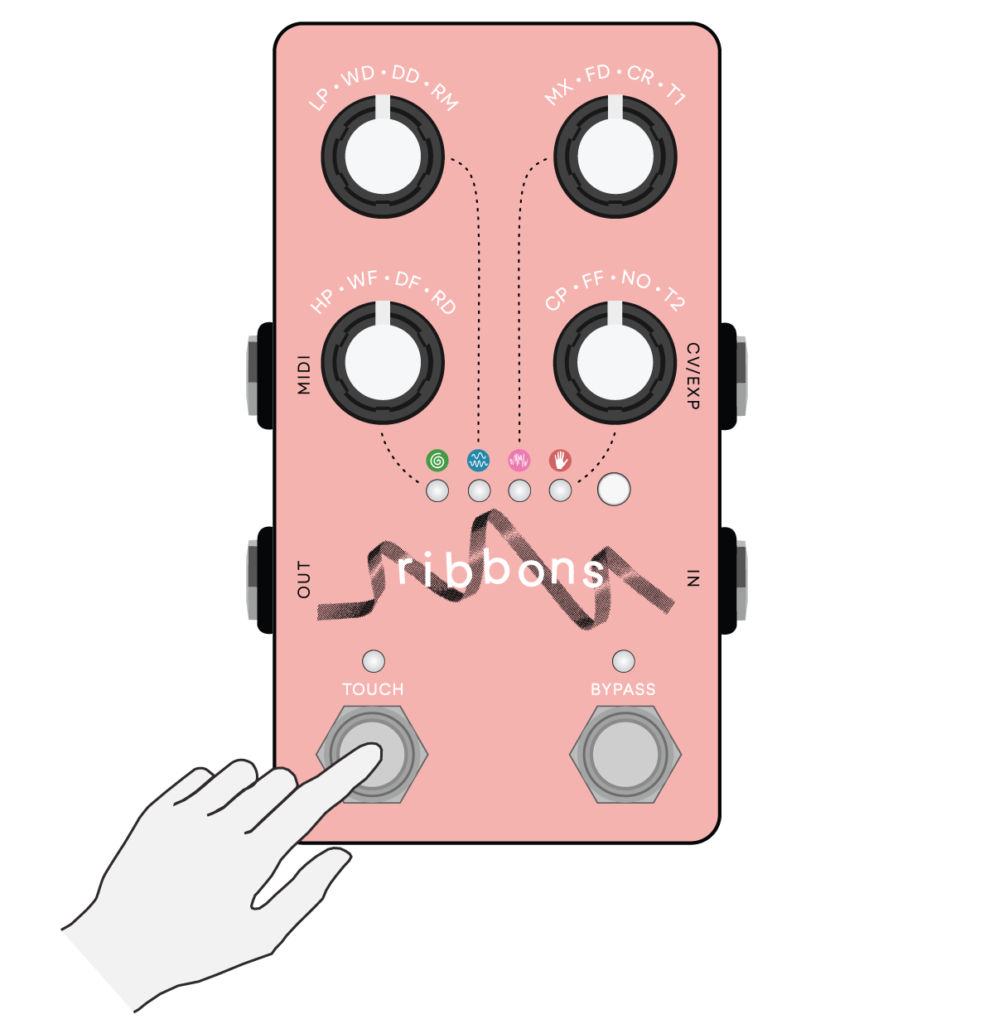
Controls
A. Knobs
B. Push button
C. Page and parameter LEDs
D. Bypass footswitch
E. Bypass LED
F. Touch footswitch
G. Touch LED
Inputs and Outputs
H. Power input
I. TRS stereo input
J. TRS stereo output
K. MIDI input
L. CV / EXP input
This manual reflects firmware version 2.0.

If you are running earlier firmware, please refer to the previous revision of our online manual found here.

Have questions? Join the Kinotone community to connect with us and other users at forum.kinotoneaudio.com
For direct support email support@kinotoneaudio.com
Contents
- About Ribbons
- Getting Started
- Tape Effects
- Presets
- Touch Modes
- 4-Track Looper
- Hidden Options
- MIDI Overview
- CV / Expression
- Input Level, Mixing, Bypass Options
- Factory Reset
- Firmware Updates
About Ribbons
Ribbons is a powerful compact toolkit that celebrates the idiosyncrasies of imperfect mediums and translates them into a simple, flexible interface that gives you tons of control.
Getting Started
Take care to use an isolated +9VDC center-negative power supply rated for at least 180 mA.

Ribbons passes a stereo in / stereo out signal by default via TRS input and output jacks. To use it in stereo you will need TRS style cables. The default setting will also work with TS cables for a mono setup. To split a mono signal into stereo, you can set Ribbons to mono in / stereo out.
We do not recommend using Ribbons with a daisy chain.

Be sure to reduce the volume on your amplifier or audio playback system when applying power. Like many devices, it may produce a subtle 'pop' sound.
Use the Bypass footswitch to engage or disengage Ribbons.
- If the Bypass LED is ON, effects are engaged.
- If the Bypass LED is OFF, effects are disengaged.
Tape Effects
When you power on Ribbons, its default mode allows you to edit the tape effects, which broadly refers to the different parameters abbreviated on the front panel.
4 knobs have unique controls across 4 pages. Each page is color-coded with a thematic icon.
Tap the push button to access the controls you want to edit. One tap shows your current page, and multiple taps advance the page. The idea is to show the current page as a reminder if you haven’t touched the pedal in awhile, but to not interrupt flow if you are actively editing settings.

1. Mix and Utility Controls
2. Wow and Flutter Controls
3. Degradation Effects
4. Reverb, Touch Modes
![]() The spiral page has a dedicated mix knob, high and low-pass filters, and compression.
The spiral page has a dedicated mix knob, high and low-pass filters, and compression.![]() A pair of sine waves representing slow and fast oscillation (wow and flutter).
A pair of sine waves representing slow and fast oscillation (wow and flutter).![]() A degraded, noisy signal, for more asynchronous and unpredictable effects.
A degraded, noisy signal, for more asynchronous and unpredictable effects.![]() A hand representing touch. This last page includes controls for the reverb, as well as the different Touch Modes.
A hand representing touch. This last page includes controls for the reverb, as well as the different Touch Modes.
Visual feedback
When you switch pages, the LED beneath the icon indicates which page you’re on. Then, all 4 LEDs settle to show you the real-time parameter values for that page.
Dotted lines illustrate how each knob connects with an LED. As you turn a knob clockwise, the color intensity changes from its base color to glowing white, with some white introduced at 12 noon.
The LEDs are a visual guide. By not only listening, but also monitoring the intensity of the LEDs, you can easily track your settings.
The Bypass LED is normally solid green, but if your signal gets too loud it will flicker.
Relative knobs
When you switch pages, the physical position of a knob and its parameter may be momentarily misaligned.
When this occurs, the control responds in a relative way, meaning that the knob will attenuate or increase the parameter based on the actual amount of space that’s available. Once they match up, the knob starts tracking again as you’d expect.
This sounds complicated but it’s really simple, and you’ll get a feel for it by watching the LEDs.
Transparent settings

You don't lose your settings when jumping from one page to another.

All of Ribbons’ parameters work together, so dialing in your desired effect is a matter of adjusting the knobs on each page.

Feel like starting over? No worries. Hold the push button for 3 seconds until the first LED lights up red. Then tap Touch.

You’ve just loaded the INIT preset, which resets all of the effects to a transparent state. This is a useful trick to get in the habit of. Powering off and on won’t help, since Ribbons remembers your last used settings between power cycles.
 Page 1 — Mix and Utility
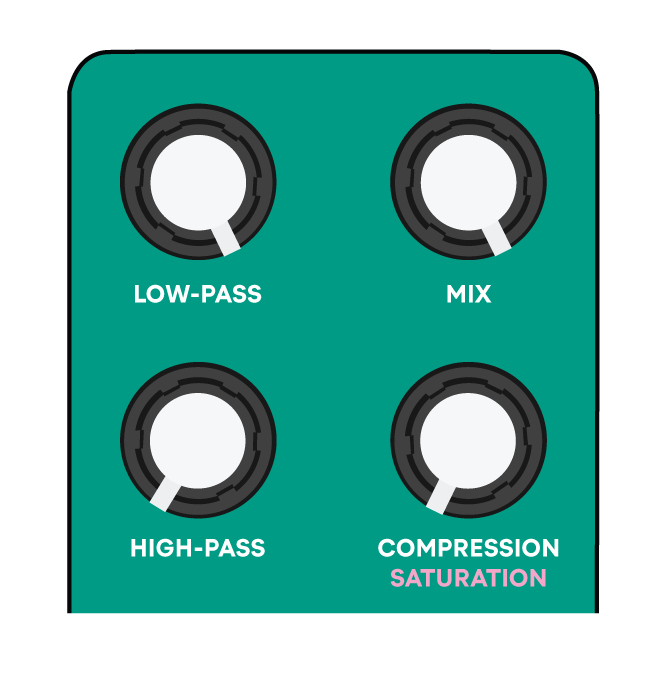
MIX (MX) — Ribbons has a dedicated mix knob for all of its sounds and effects. This is designed so that you can blend dry and wet signals without phasing issues.
The main use case for this knob is to use it in conjunction with the different modulation settings. For example, at 100% mix you can get a tape-like vibrato, at 50% a lush chorus, and at zero you’ll get no effects at all — just your dry signal.
LOW-PASS (LP) — A slightly resonant four-pole virtual-analog low-pass filter. Rotating the knob counter-clockwise removes treble and brightness from your signal.
HIGH-PASS (HP) — A symmetrical and opposite high-pass filter. Rotating the knob clockwise removes bass and boominess from your signal.
Sculpting harmonics with the filters is essential to achieving many classic lo-fi sounds.

Ribbons’ filters are modeled after the filter from a very famous 1970s synthesizer. By design, you can completely silence incoming audio by turning the LP knob all the way to the left, or the HP knob all the way to the right.

If you have suddenly lost sounds and are unsure why, double check your page 1 settings.
COMPRESSION (CP) — Controls the dynamics of your incoming audio and attenuates the loudest sounds. As you increase it, your audio will feel warmer and more balanced.
When used on guitar it can add some amazing sustain to your notes, and on full mixes it has a magical way of gluing your sounds together without distorting them.
Our algorithm is modeled after the Vinyl Sim compressor. It’s an excellent one-knob compressor with lots of character that was used on a number of iconic hip hop records in the early 2000s.
There is also TAPE SATURATION if you’d prefer that here instead of compression. You can easily swap out the CP knob for a saturation parameter, and the change is persistent unless you switch it back. This is one of the hidden options.
 Page 2 — Wow and Flutter
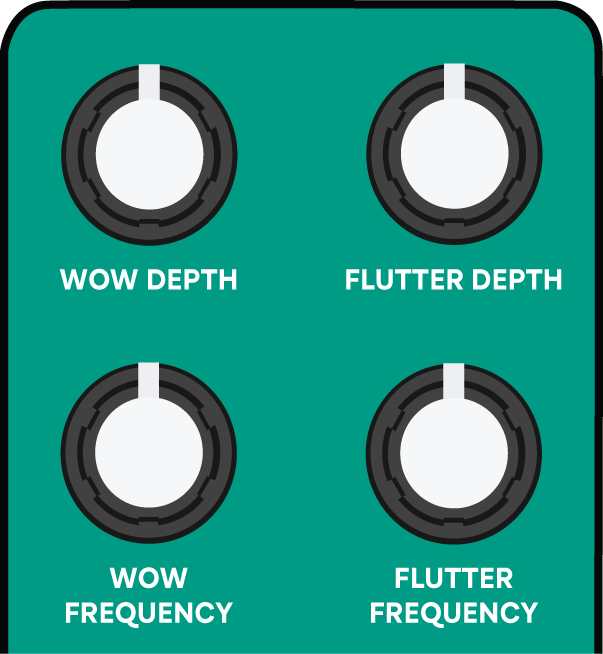
Wow emulates slower pitch modulation caused by malfunctioning components in a tape transport. So something like a worn out belt or deformed rubber rollers.
WOW DEPTH (WD) — By turning up depth, your audio’s pitch will start to randomly wobble. As you increase it, the intensity gets more dramatic.
WOW FREQUENCY (WF) — Changes the max speed at which these variations occur.
Flutter emulates faster and more jittery pitch modulation sometimes found on tape players. This can be caused by things like bent capstans, backlash from worn out gears, or other obstructions in the tape path that create unexpected friction.
FLUTTER DEPTH (FD) — Turning up depth will introduce subtle, stuttery pitch variations in your signal.
FLUTTER FREQUENCY (FF) — As you increase frequency, these variations become more chaotic.
Ribbons' random wow and flutter parameters are modeled after spectral and waveform data collected from all kinds of tape players, ranging from perfectly functioning to completely broken — four-track cassette machines, reel-to-reels, dictaphones, mangled cassette loops, tape delays, and more.
 Page 3 — Degradation
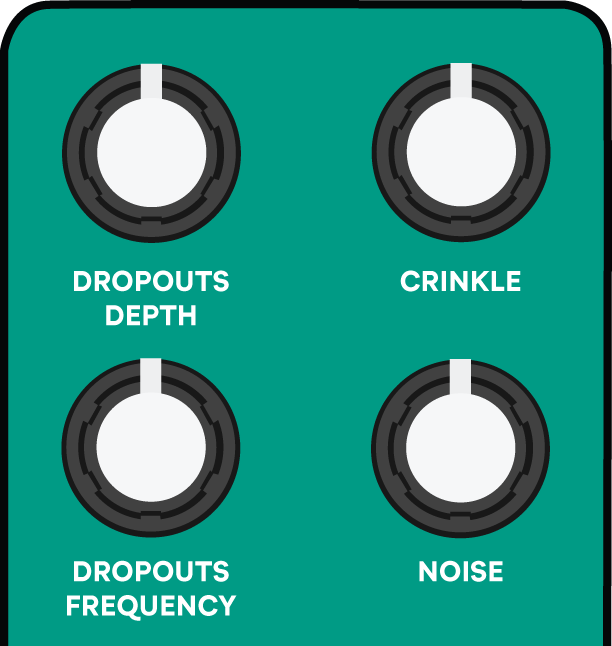
Dropouts emulate the sound of tape getting stuck momentarily and then catching up. So think physical interruptions, like tape getting snagged on an object, or intentionally manipulating a tape during playback.
DROPOUTS DEPTH (DD) — Controls the max intensity of a dropout when it occurs.
DROPOUTS FREQUENCY (DF) — Controls the probability of a dropout occurring.
CRINKLE (CR) — Emulates surface-level imperfections on a wrinkly piece of cassette tape. By turning up this knob you crumple up the tape more and more. You’ll hear brief moments of signal loss as the tape separates from the tape head.
Dropouts and crinkle provide separate processing on the left and right channels, making them a great way to introduce some interesting variety across the stereo field.
NOISE (NO) — This knob gives you the ability to cross-fade between 2 flavors of noise:
Static hiss like you’d find on an old tape player, and clicks & pops reminiscent of a dusty, crackly record. Easily dial in one or both using a single twist of the knob.

 Page 4 — Reverb, Touch
Page 4 has controls for the reverb, as well as the Touch Modes. A good way to remember this last page is:
red for reverb, hand for touch.
Ribbons’ reverb algorithm draws inspiration from famous rack reverb units of the 70s and 80s.
We carefully studied many of these designs and came up with our own unique structure that’s simple, elegant, and modern sounding.
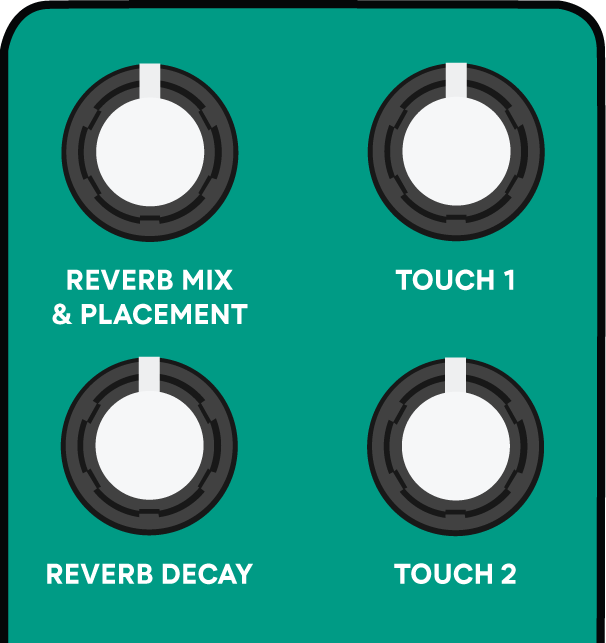
REVERB MIX & PLACEMENT (RM) — Both mix and placement are on the top-left knob, so you can control the amount of reverb applied, and where it goes in your signal chain, either before or after the other effects.
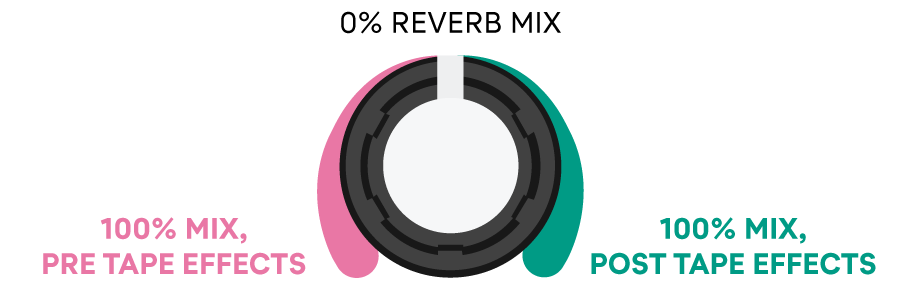
You can change the character of the reverb by playing with the placement setting.

Putting the reverb before the effects creates more of a haunting and aged sound, whereas putting it after allows it to ring out nice and clear.
REVERB DECAY (RD) — At its minimum decay time, the reverb sounds springy and echoey. As you increase it, the reverb tail becomes smoother and more diffuse.
At max decay it will ring out infinitely, creating a never-ending wash of ambient sound.

We once ran a test where we set the decay time to infinite and strummed a chord. A week later you could still hear that ghostly reverb tail droning along...
Those are all of the primary controls on Ribbons.
As you might imagine, this opens up lots of possibilities for customizing unique sounds and textures.
  A little goes a long way

When creating a lo-fi patch, simplicity often yields the most convincing results. Try blending just a few effects to start, keeping things subtle.

Cranking up too many controls at once can quickly lead to a muddy, cartoonish sound.

Take your time, experiment, and enjoy finding sweet spots.

Remember to use the INIT preset any time you feel like starting over.
Some of the Touch Modes provide even more lo-fi effects, like Broken Machine, Crushed Cassette, and UnrealPlayer.
We’ll cover Touch Modes soon, but first up — presets.
Presets
Try out the factory presets to hear some sounds Ribbons is capable of. There are 8 presets on the pedal, and you can save up to 32 with MIDI.
Loading presets
Hold the push button for 3 seconds to enter the Presets Menu. A single LED will light up, and now you can toggle through 8 slots: 1, 2, 3, 4 are red, and 5, 6, 7, 8 are blue. Hover over a slot and tap Touch to load. The LEDs will briefly glow a unique color.
The preset that you load becomes your live settings.
Factory presets
![]()
1. INIT — no effects, transparent
Wish you could start over? Not to worry. Load up INIT to reset the effects to a transparent state.
Touch Mode: Tape Stop![]()
2. Lo-Fi Tape
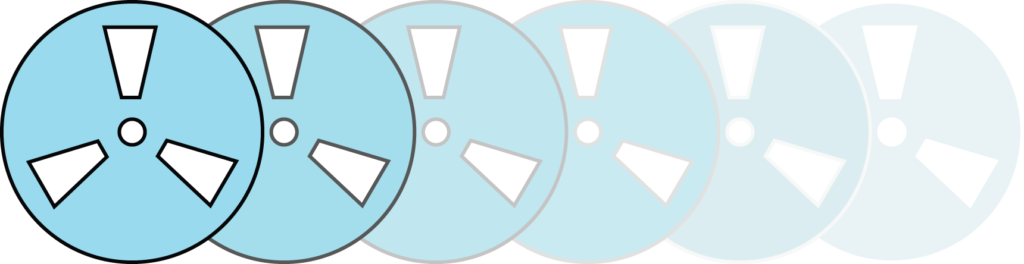
Touch Mode: Disintegration Loop![]()
3. Lo-Fi Chorus
Touch Mode: Broken Machine![]()
4. Melted Vinyl
Touch Mode: Magnetic Dance![]()
5. Broken Telephone *
Touch Mode: Crushed Cassette![]()
6. MP3 Madness *
Touch Mode: UnrealPlayer![]()
7. Hi-Fi Compression
Touch Mode: Repeater![]()
8. Endless Space
Touch Mode: UnrealPlayer
A Touch Mode that complements the preset is assigned to each one.

* For Broken Telephone and MP3 Madness, the Touch Mode is integral to the sound.

After loading either of these presets, engage the Touch footswitch again to hear the intended effect. (Touch LED should be ON.)
If you’re jamming with a preset and want to load a different preset, hold the push button again for 3 seconds, toggle to the slot you want to hear, and tap Touch to load.
Saving your settings
To overwrite a preset with your live settings, enter the Presets Menu and toggle to the slot you want to overwrite.
Tap Bypass twice to confirm and save. To exit without loading or saving, simply hold the push button again for 3 seconds.
NOTE: The INIT preset cannot be overwritten.
If you ever want to restore the factory presets, check out the factory reset option.
You can save up to 32 presets using PC messages.
Touch Modes
The Touch Modes offer some exciting, on-the-fly performance effects that transform your incoming audio in unique ways.
A few provide additional lo-fi character that you can tap into, and you’ll also find creative looping options. The Touch Modes interact with all of the different effects and can be saved into a preset.
When we first launched Ribbons there were 4 Touch Modes and now there are 7. We don’t expect people to use or even try all of them, but they’re a lot of fun and you might find a couple that you connect with.
Try loading INIT before exploring the Touch Modes so you can hear what they do on their own.
Touch Mode controls
What the Touch footswitch does depends on which Touch Mode you select.
Hold the push button while tapping Touch to select the one you want to use.
The Touch LED indicates each Touch Mode with a unique color or pattern. Some have a solid LED and others have a flickering LED.
The T1 and T2 knobs on page 4 provide controls.
MAGNETIC DANCE 
(solid green LED)

Magnetic Dance is a chordal looper that can capture a segment of audio and turn it into a stunning drone.
You can record anything from a micro-loop up to 20 seconds.
Upon playback, 4 stereo tape heads start dancing around the loop. When each head reaches the end of the loop, it resets and jumps to a random starting point.
There are 2 options to record a loop:
- Hold down Touch to record — then release to stop.
- Tap Touch to start recording — and tap again to stop.
While your loop is playing back, you can re-engage the Touch footswitch to get new audio in the buffer. The old loop will fade out while the new loop fades in.
Double tap Touch to stop playback and erase your loop.
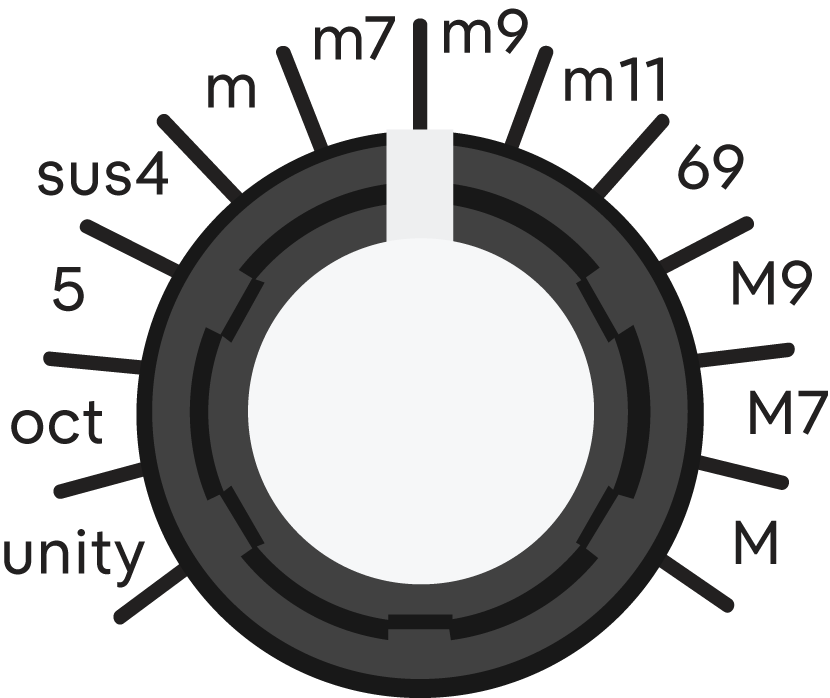
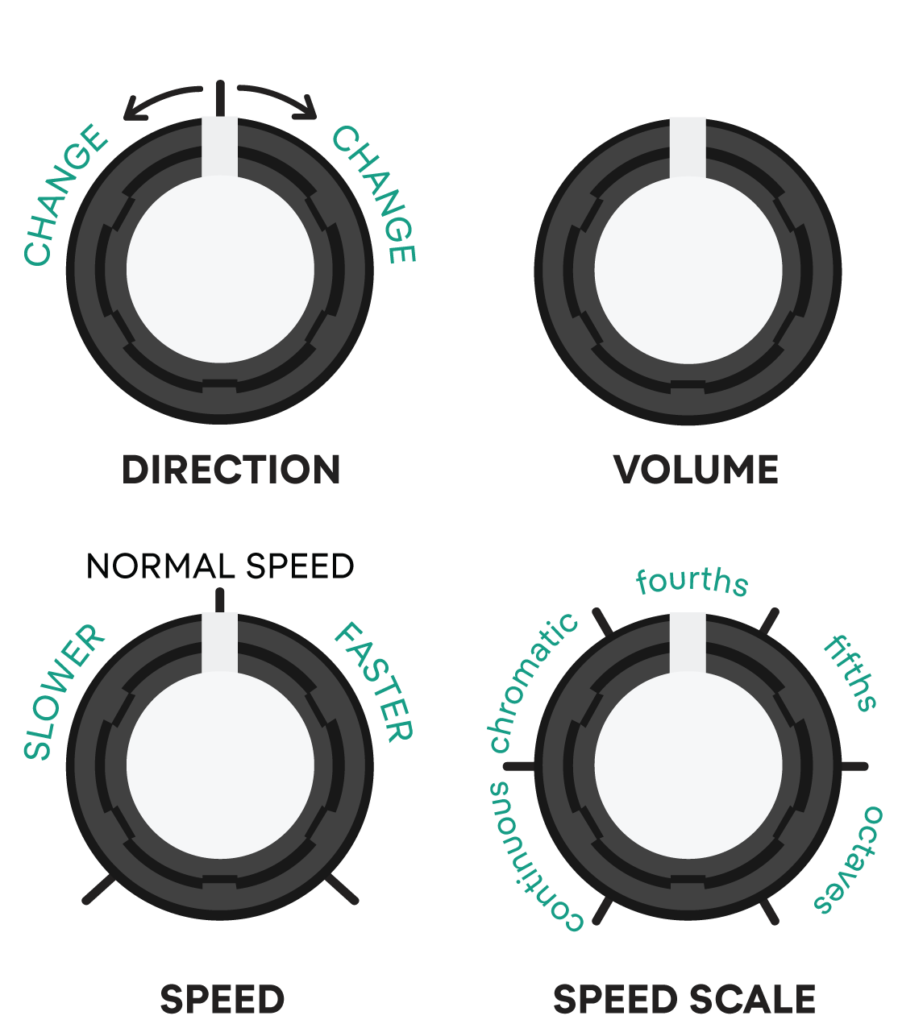
RATE (T1) — Controls the rate at which the tape heads move, with rates tuned to 4-note chords.
Unity, octaves, and fifths sound great on almost all material. The rest generally sound best with single notes, or chords made up of octaves, perfect fourths, or perfect fifths.
DIRECTION & VOLUME (T2) – Controls the playback direction and volume of the tape heads. Your loop becomes quieter as you move away from 12 noon.
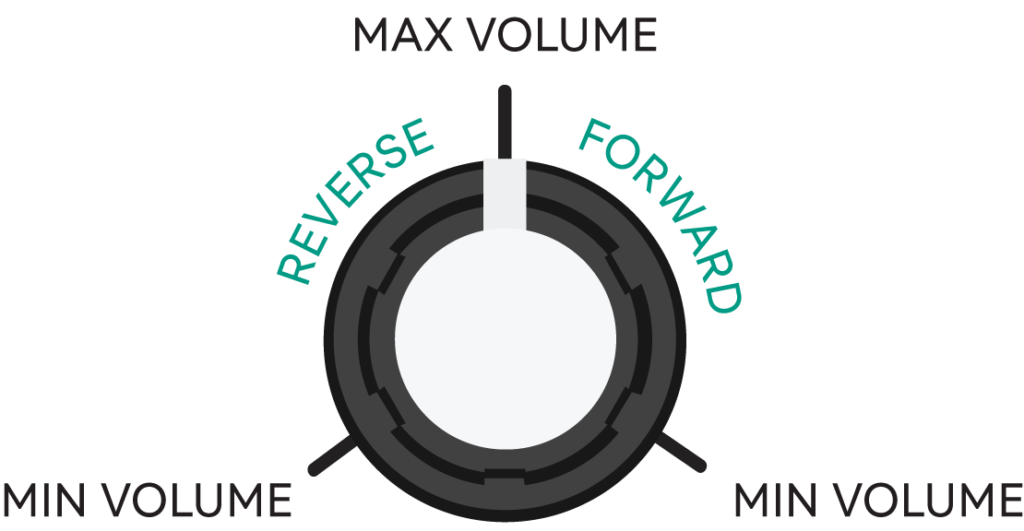
TAPE STOP 
(solid dark blue LED)
Tape Stop slows down and drops the pitch of your audio, then picks it back up, with flexible timing controls.
It’s not a one-shot tape stop though — it’s responsive as if you were physically touching a reel of tape. For example it can be slowed way down, then picked back up, then slowed just a bit, then picked back up, and so on. Try experimenting with the footswitch for creative pitch bending effects.
- For momentary effects — Hold down Touch to drop the pitch, then release to pick it up.
- For latched effects — Tap Touch to drop the pitch, and tap again to pick it up.
STOP TIME (T1) — Controls how long it takes for your audio to reach a complete stop.
START TIME (T2) — Controls how long it takes to catch back up again.
Timing for both knobs ranges from 100 msecs (fully counter-clockwise), up to 10 seconds (fully clockwise).
Can Ribbons shoegaze? We think so!

With a fuzz after Ribbons, set reverb mix to 100% pre-fx and add lots of compression or saturation. You can use Tape Stop to create shoegaze-y pitch bends with your foot. We prefer this over a tremolo bar because it also bends the pitch of the reverb tail.
BROKEN MACHINE 
(solid light blue LED)
Broken Machine adds even more random tape modulation to your signal.
At its minimum it can be used in subtle ways, similar to the wow and flutter parameters, then at its maximum you can get some intense rewind effects or abrasive and totally unpredictable sounds.
- For momentary effects — Hold down Touch to engage, then release to stop.
- For latched effects — Tap Touch to engage, and tap again to stop.
DEPTH (T1) — Controls the intensity of the effect.
CHAOS (T2) — Controls how often the machine does something random.
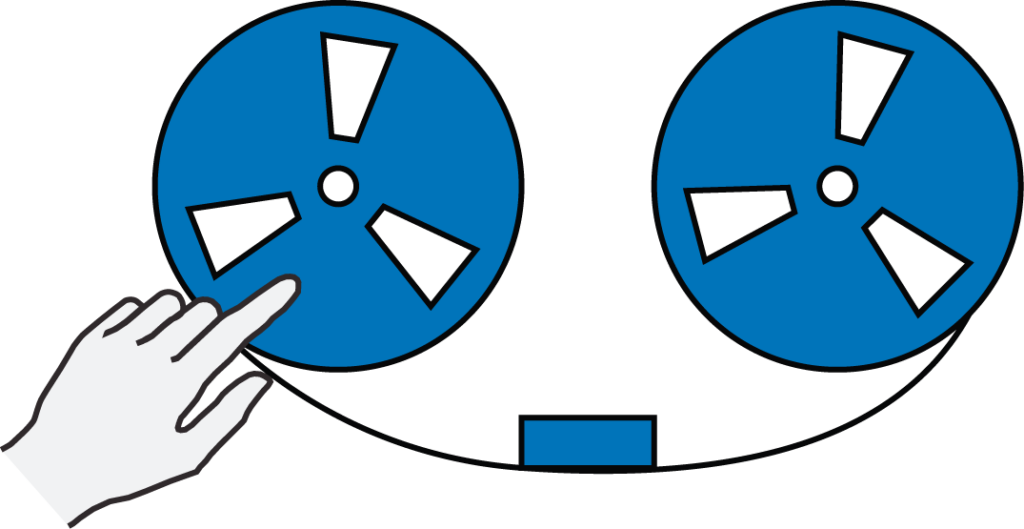
REPEATER
(flickering green LED)
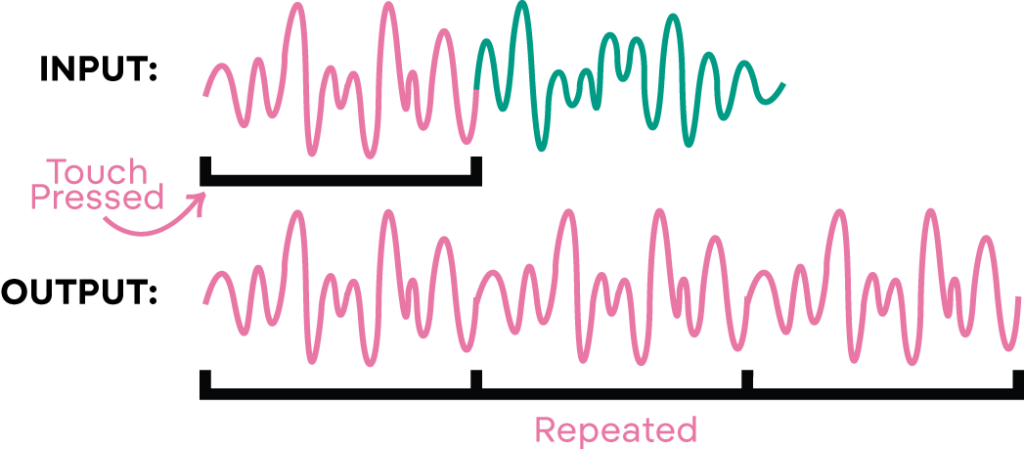
Repeater endlessly repeats a tiny slice of audio that you can subdivide for CD skipping sounds.
This Touch Mode is inspired by classic DJ mixer-style roll and slip roll effects.
First, use Touch as a tap tempo to set your loop length. This has to be short — 1.2 seconds max.
Now hold down Touch to capture audio. When the next tempo downbeat is reached, your loop will automatically start playing back and endlessly repeat.
- For momentary effects — Keep Touch held down to engage your loop, then release to stop playback.
- For latched effects — Tap Bypass while Touch is being pressed to latch your loop. Tap Touch again to stop playback.
LOOP DIVISION (T1) — Controls the division of the loop length. Use longer subdivisions for more rhythmic sounds and shorter ones for stutter effects.
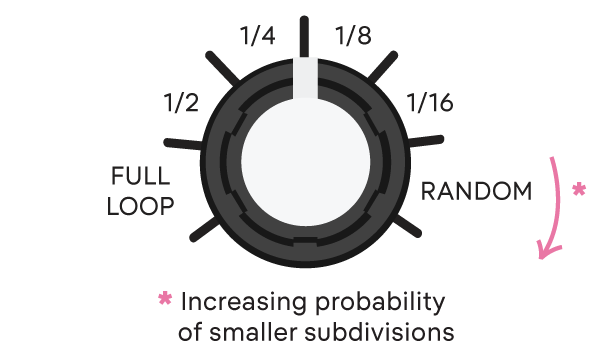
Within the RANDOM region, rotating T1 clockwise increases the probability of smaller subdivisions being used. Depending on your loop length, 1/8 and 1/16 can sound a little harsh, so by keeping this knob slightly shy of 100% you can easily dial them out if you want to.
MIX & TYPE (T2) — Controls the wet/dry mix of repeated audio and toggles between STANDARD or RESAMPLING.
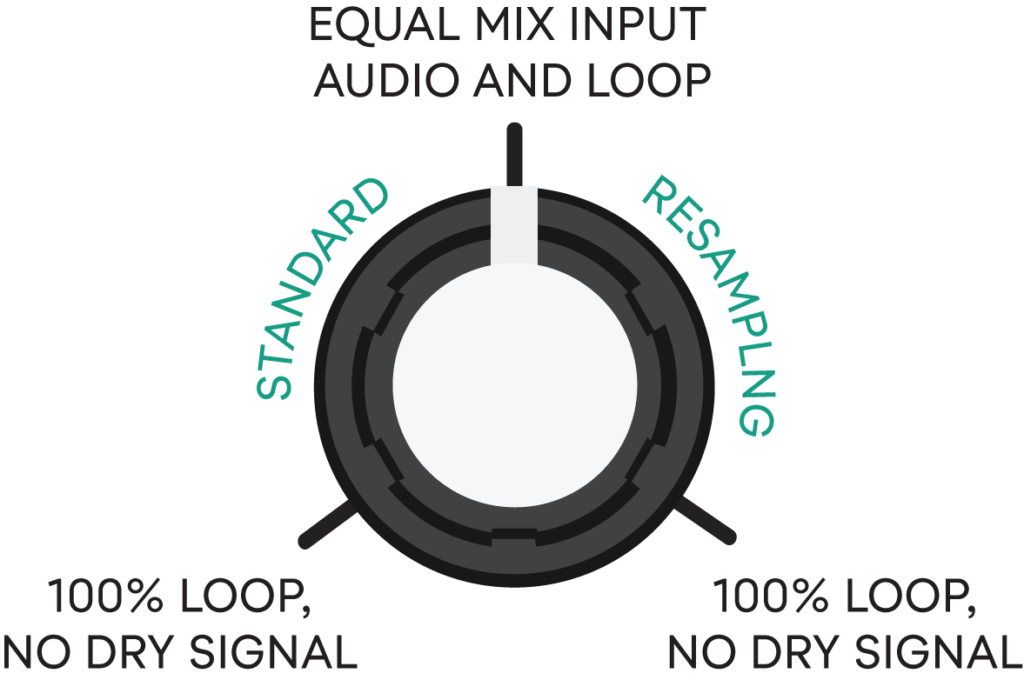
T2 all the way left or right does a “dry kill”, so you will only hear your loop during playback.
By twisting the T2 knob closer to 12 noon, you mix in more of your incoming audio.
T2 also toggles between STANDARD or RESAMPLING:
STANDARD REPEATER — Samples audio any time the Touch footswitch is pressed. With this option, the loop that you capture is static, meaning you need to release and re-engage Touch to sample new audio.
RESAMPLING REPEATER — Allows you to resample audio hands-free. With this option, new audio is automatically sampled every time Ribbons detects a transient, like a snare hit or a pick attack.
With STANDARD, the RANDOM region of T1 picks a random subdivision when the Touch footswitch is pressed. With RESAMPLING, it picks a random subdivision when a transient is detected.
Repeater is great with full mixes and is a lot of fun to play along with on a drum machine.

You can sync Repeater to your other devices using MIDI clock.

The clock overrides the tap tempo and sets the max size of your loop.
CRUSHED CASSETTE
(flickering dark blue LED)

Crushed Cassette provides sample rate reduction and bit depth reduction with μ-law companding.
Use this mode to emulate the sound of your favorite vintage sampler or lo-fi telecoms of decades past.
- For momentary effects — Hold down Touch to engage, then release to stop.
- For latched effects — Tap Touch to engage, and tap again to stop.
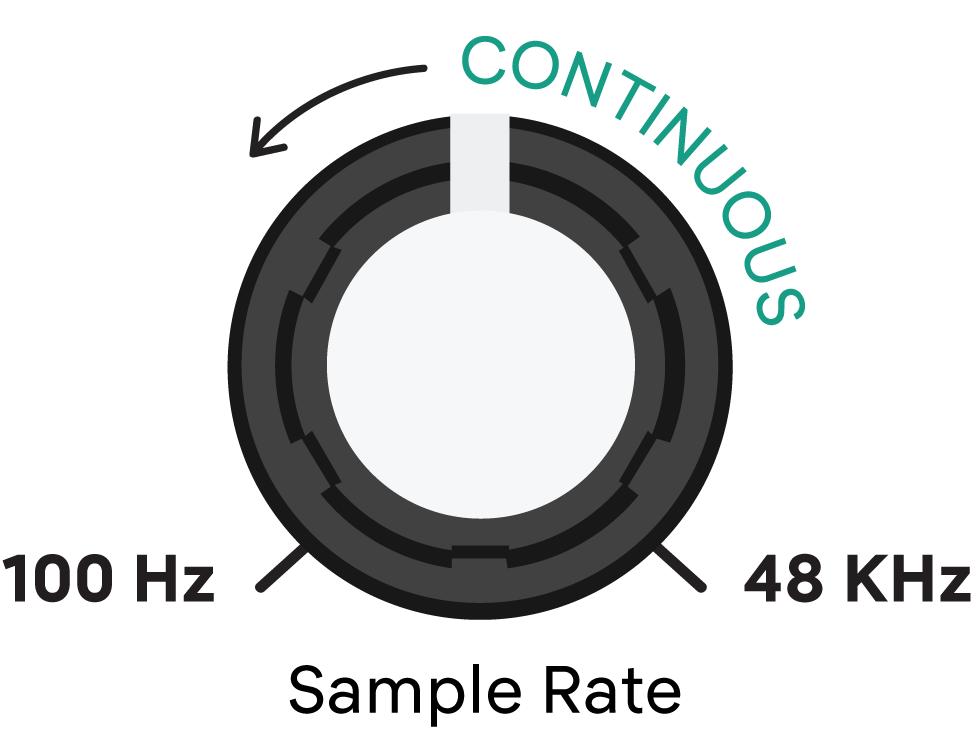
SAMPLE RATE REDUCTION (T1) — Rotating the T1 knob counter-clockwise reduces the sample rate, introducing aliasing and inharmonic sounds. This ranges from 48 kHz (hi-fi) down to 100 Hz.
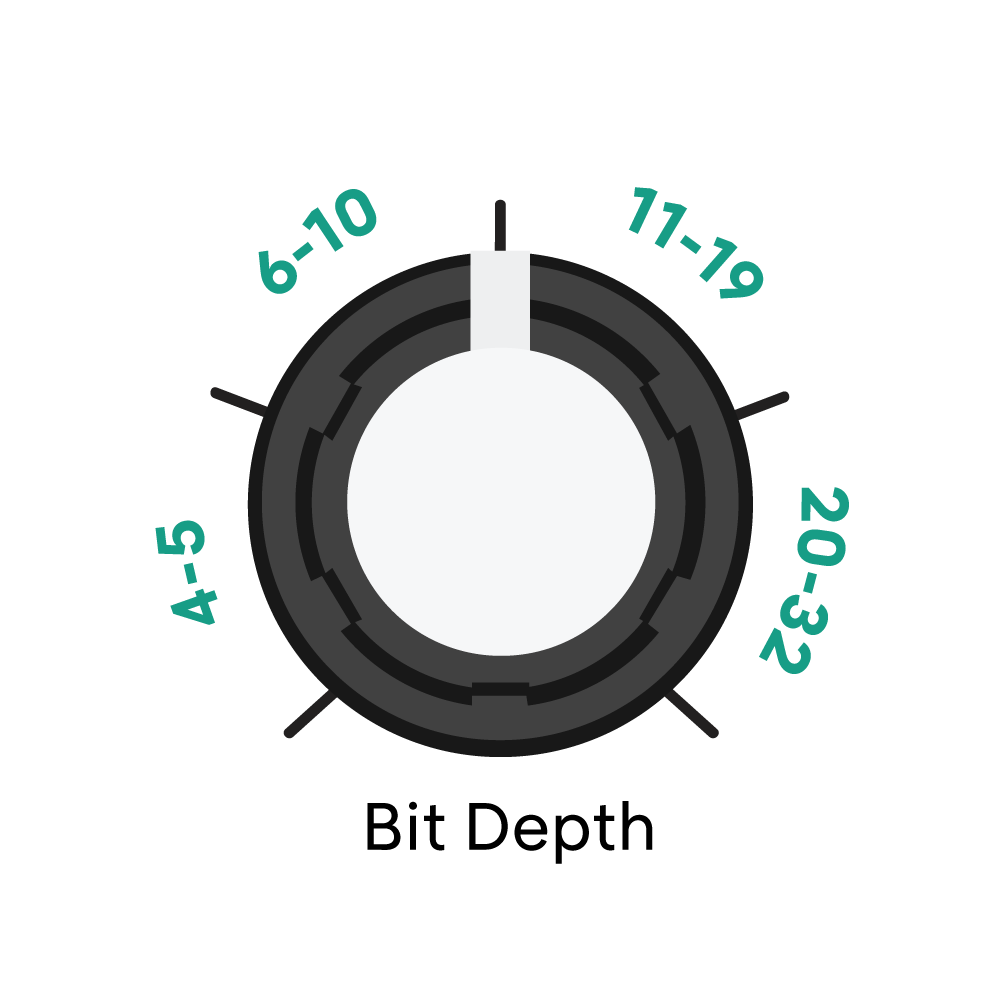
BIT DEPTH (T2) — Controls the number of bits used to reproduce your signal, from 32 bits (hi-fi) down to 4 bits.
Most bit-crushers have a gated quality where your signal abruptly disappears when it gets too quiet. μ-law companding prioritizes quiet parts of your signal, resulting in a bit-crushed sound with lots of haunting distortion, but without the gating effect, so your signal decays more naturally.
At extremes, Crushed Cassette can introduce some pretty abrasive artifacts. You can use the low-pass filter on page 1 to reduce some of these while still maintaining interesting lo-fi textures.
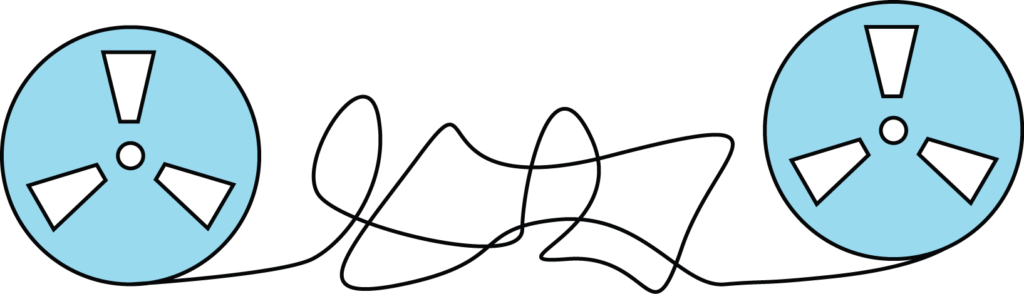
DISINTEGRATION LOOP
(flickering light blue LED)
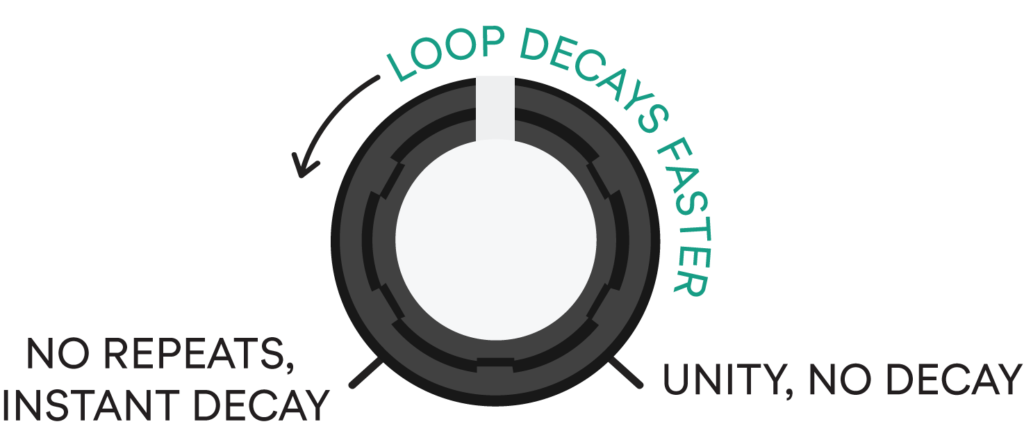
Disintegration Loop is a sound-on-sound style looper with controls for loop decay, speed, and direction.
It can range from a simple utility looper, to a tape delay, to an experimental looper where your sounds age, distort, and become completely unrecognizable over time.
There are 2 options to record to the loop:
- Hold down Touch to record — then release to stop.
- Tap Touch to start recording — and tap again to stop.
The first write sets your loop length. The Touch LED will ramp from 0% to 100% brightness as your loop plays from start to finish.
The Touch footswitch works like a write head.
When engaged, a few things are happening:
- You are recording, so you can overdub new audio.
- Your loop can decay in volume.
- Your loop disintegrates. Each time your loop repeats, it gets re-run through all of the effects you have dialed in on Ribbons. Try experimenting with some subtle settings to hear how they impact things.
Double tap Touch to stop playback and erase your loop.
VOLUME DECAY (T1) — Controls volume decay over time. T1 works like the feedback knob on a delay pedal. Touch must be engaged for your loop to decay. If disengaged, the loop will maintain its current volume.
SPEED & DIRECTION (T2) — Can be used to time stretch and reverse your loop. Try setting T2 around 9 or 3 o’clock when you record, that way you have room to both speed up or slow down.

If you modify T2 while overdubbing, speed and direction changes get printed to the loop in real-time, just like an actual tape player.
Setting the reverb pre-fx will place the reverb into the feedback loop of the looper. You can use this to create compositions reminiscent of Alvin Lucier’s famous 1969 piece “I Am Sitting in a Room”, with your sounds eventually becoming transformed and overtaken by the resonant frequencies.
UNREAL PLAYER 
NOTE: If you have a unit made in 2024 or later the LED color for UnrealPlayer is solid red. If you have a 2023 or 2022 unit that is upgraded to firmware 2.0, the color pattern is pulsing blue and green (there are no red LEDs on the footswitches for earlier units).
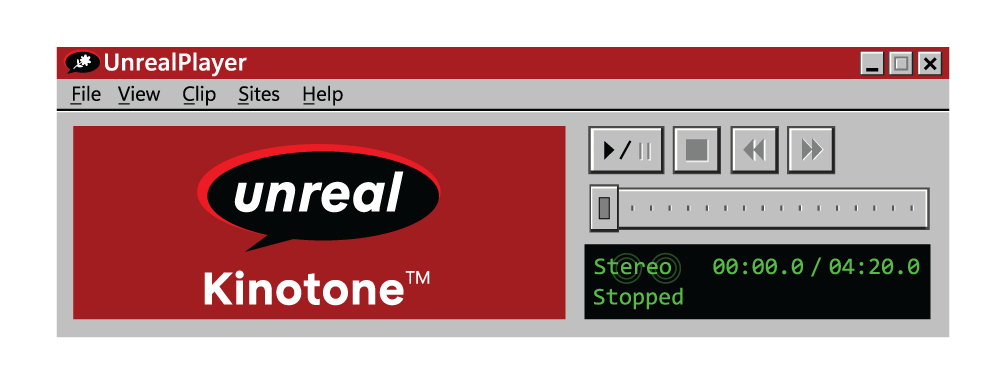
UnrealPlayer is a spectral processor that emulates artifacts and imperfections of early audio streaming and file-sharing eras.
Blurry, grainy, bubbly, and strangely reverberous. This Touch Mode feels unmistakably modern. It’s basically the sound of Windowlicker in a pedal.
- For momentary effects — Hold down Touch to engage, then release to stop.
- For latched effects — Tap Touch to engage, and tap again to stop.
DEGRADATION (T1) — Randomized spectral data loss.
BLUR (T2) — Spectral data frames are increasingly blurred together, creating partial or full freeze effects.
LO-FI is the default. It’s great for real-time MP3 emulation but the BLUR effect sounds gritty.

If you hold Bypass and tap Touch, the Touch LED gets brighter, indicating the HI-FI option.

This adds latency but makes BLUR sound clean and pretty. Switch between lo-fi & hi-fi with this button combo.
4-Track Looper
Ribbons also features a 4-track looper.
You can record up to 4 separate stereo loops and overdub infinitely. Each track has its own controls for loop speed, speed scale, direction, and volume.
This lets you craft intricate, evolving soundscapes. Build up layered tracks of varying lengths, shift the pitch, apply quantization, reverse loops, or swell elements in and out.
It also works as a more straightforward, practical looper if you prefer to use it that way. You can sync your tracks to an external device using MIDI clock.
Looper controls
When editing tape effects, the Bypass LED is green.
When editing looper controls, the Bypass LED is blue.
Hold the push button and tap Bypass to enter / exit the 4-track looper mode.
You can easily switch back and forth to modify tape effects while your loops are playing back.
Each page is a looper track with its own controls.

Tap the push button to toggle between the 4 tracks. One tap shows your current track, and multiple taps advance to the next track.
Default settings for each track are normal speed, continuous speed scale, forward direction, and 100% volume. Since Ribbons’ knobs are relative, when you switch looper tracks you may need to sweep the knob to get it tracking with the LED.
Recording and overdubbing
There are 2 options to record to a loop:
- Hold down Touch to record — then release to stop.
- Tap Touch to start recording — and tap again to stop.
When you are recording, the Touch LED turns red.
NOTE: If you have a 2023 or 2022 unit that is upgraded to firmware 2.0, you do not have red LEDs on the footswitches. For earlier units, when you are recording the LED glows green, and then ramps through shades of blue during playback.
The first write sets your loop length. The Touch LED will ramp from 0% to 100% brightness as your loop plays from start to finish. If you exceed the max loop length during the first write, Ribbons automatically switches from recording to overdubbing.
Create layers of sound by overdubbing on a single track or recording to a new one.

Overdubbing lets you add layers that stay in sync with the original loop, but you won’t be able to undo. Recording to a new track allows you to clear a loop if you want to re-record it, but it won’t stay in sync with the other tracks.
Stop / erase loops
- To erase a specific track — Hold the push button and tap Touch while on that track.
- To erase all tracks — Hold the push button for 3 seconds while on any track.
If you want to “stop” a track without erasing it, just turn the volume for that track all the way down.
Track Speed (bottom-left knob)
Speed can vary continuously from approx. 0.5x to 2x.
Your speed setting impacts the max loop length:
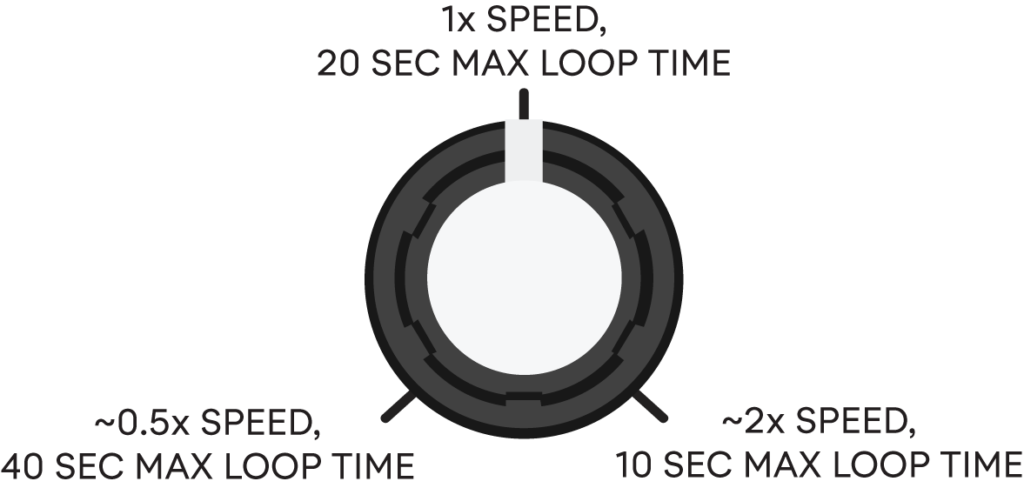
Adjust the Speed knob to pitch shift your loops.
Right after recording, the sound will play back at the same pitch. Increasing the speed raises the pitch and shortens your loop. Decreasing the speed drops the pitch and extends your loop.
With Speed at 12 noon and Speed Scale at continuous, try recording an empty loop container. Then tap in to overdub and sparsely add sounds.

Stop recording and slowly twist Speed counter-clockwise. Your audio will smoothly pitch down a whole octave.
Track Speed Scale (bottom-right knob)
When you’re adjusting the speed of a loop, you may want to quantize the speed setting so that pitch changes sound more musical.
How Speed responds depends on the Speed Scale.
Ribbons provides 5 different scale options that you can experiment with:
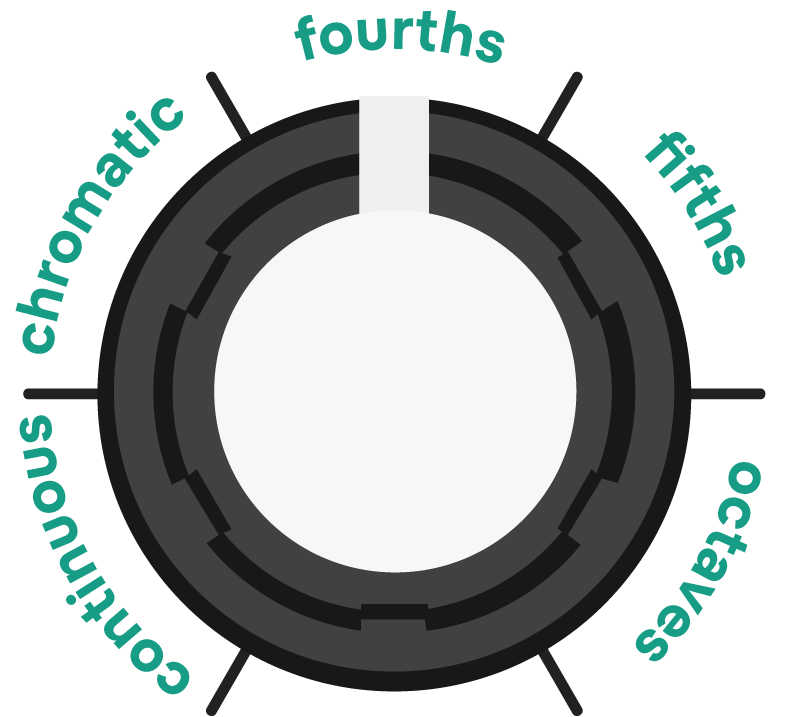
- Continuous (+/- 12 semitones; not quantized)
- Chromatic (+/- 12 semitones)
- Fourths (+/- 2 fourths)
- Fifths (+/- 2 fifths)
- Octaves (+/- 1 octave)
Track Direction (top-left knob)
Track direction works just like a tape player that’s capable of bi-directional recording. It can be used to reverse the playback direction of any particular loop.
Try recording to a loop, then change its direction. It will play in reverse.

Now if you overdub, the new audio plays forward while the original loop still plays in reverse.

If you switch directions again, the original loop will play forward while the new audio plays in reverse.
Track Volume (top-right knob)
You get a volume control for each looper track.
Leave the volume turned up when you record if you want to hear playback immediately.
You can also set this to zero before recording and increase it during playback to swell in your loop.
The Volume knob is a great tool for introducing changes during playback.

If you have multiple loops playing back, you can temporarily lower the volume on a track, adjust its settings — like reversing the direction or increasing the speed — and then gradually bring the volume back up.

This way the loop sounds transformed but you avoid hearing any sudden, jarring changes.
Hands-free track selection
There is an alternate way to change looper tracks that you can do with your foot, which is useful for some setups.
- While in the 4-track looper mode (blue Bypass LED), hold Bypass for 3 seconds until the LED starts to glow. This indicates that the Bypass footswitch is overriding its normal functionality.
- Tap Bypass to toggle through the 4 looper tracks. The Bypass footswitch effectively becomes your push button.
- Use Touch as normal to record or overdub.
- Hold Bypass and tap Touch to clear a specific track.
- Hold Bypass again for 3 seconds to return the Bypass footswitch to normal operation.
While in this hands-free track selection state, the Bypass footswitch has no other function.

You must return the Bypass footswitch to normal operation to be able to exit the 4-track looper mode and resume using the pedal’s other features.
4-Track Looper + Tape Effects
You can switch between editing looper controls and tape effects while your 4-track loops are playing back. Simply hold the push button and tap Bypass. The Bypass LED indicates looper controls or tape effects.
Adjust the filters, add reverb, or modify any of the effects. Once you’re happy with your sound, just pull up the 4-track controls again to keep playing with the looper, or to stop and erase any of the tracks.
You can also load presets if you want to apply dramatic changes to your loops during playback.
4-Track Looper + Touch Modes
As of firmware 2.0, you can use any of the Touch Modes while your 4-track loops are playing back.
We didn’t used to think this was possible but we figured out some new tricks with our DSP chip.
Some applications of this are more practical than others, but the possibilities are pretty amazing and worth exploring.

4-track loops into UnrealPlayer? Incredible.

4-track loops into Disintegration Loop? Slightly insane, but why not!
Looper + MIDI
Ribbons can take a jittery MIDI clock and generate a stable internal clock that stays locked with the grid / beat. This can be used to quantize your loop lengths and synchronize the looper with your favorite drum machine, sequencer, or DAW.
When a clock is received, the 4th LED (red hand) will start blinking on each of the looper tracks. This is Ribbons’ way of indicating where it thinks the downbeat is.
If it doesn’t match your drum machine, sequencer, or DAW, then you’ll need to send Ribbons a MIDI Start message to tell it where the downbeat is. Once received, Ribbons will be synced with your device(s).
To record, engage Touch slightly before the beat where you want your recording to start. Disengage slightly before the end of the final bar you want to record to.
Ribbons ensures that the max loop time is some division of the grid so that if you exceed it your loop stays within the grid. If you exceed the max loop time, Ribbons automatically switches from recording to overdubbing.
During loop playback, Ribbons applies micro-timing adjustments to prevent loops from drifting out-of-sync with the grid.
The speed knob provides 3 options: 0.5x, 1x, or 2x.
The speed scale knob is disabled when MIDI clock is applied.
Speed and direction changes go into effect when your loop wraps around to the start.
The direction and volume knobs function the same.
OTHER NOTES:

We do not recommend sending MIDI clock tempo changes to Ribbons while loops are playing back.

If a loop is recorded at one tempo and changed to another tempo during playback, Ribbons will attempt to time stretch and pitch shift the loop to stay within the grid. However, it will likely lose the downbeat during re-synchronization and produce unexpected behavior.

Also, Ribbons expects a constant clock to be applied while using the looper. So if you're using Ribbons with a DAW and pressing Start and Stop while loops are playing back, you may also get unexpected behavior as your loops attempt to re-synchronize with the downbeat.
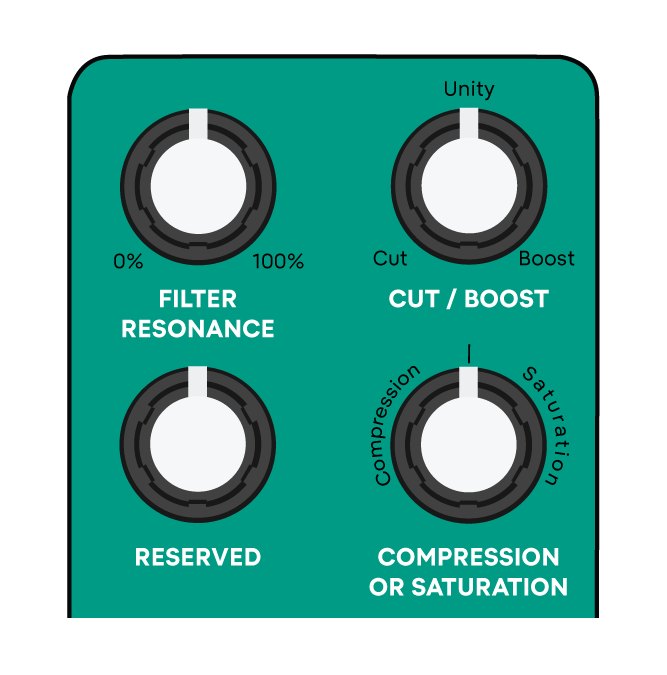
Hidden Options
Ribbons allows you to configure the following hidden options:
- Filter resonance
- +/- 6 dB boost or cut
- Compression or Saturation (easily switch between them)
All of these settings can be saved into a preset. One could use Compression while another uses Saturation, a preset could have more or less gain, etc.
While editing tape effects (Bypass LED is green), hold down Bypass while adjusting the control you want to configure. This can be done from any page. The change you apply is persistent unless you switch it back or load a preset with a different setting.
MIDI Overview
Ribbons is compatible with any MIDI controller that has a 5-pin DIN or TRS MIDI output.
If your controller has a DIN MIDI out, connect your MIDI cable to a DIN-to-TRS MIDI adapter, then plug that into Ribbons’ MIDI input. An example adapter can be found here. You can also check out this forum post for some verified cable solutions.
If your controller has a TRS MIDI out, use a TRS cable to connect to Ribbons’ MIDI input.
Ribbons can manage 3 different types of TRS MIDI connections: TRS Type A (factory setting), Type B, or Type CBA.
If you need to switch types, move both jumpers on the inside of the device, per the image below. The jumpers must match the TRS MIDI type used by your controller or adapter.
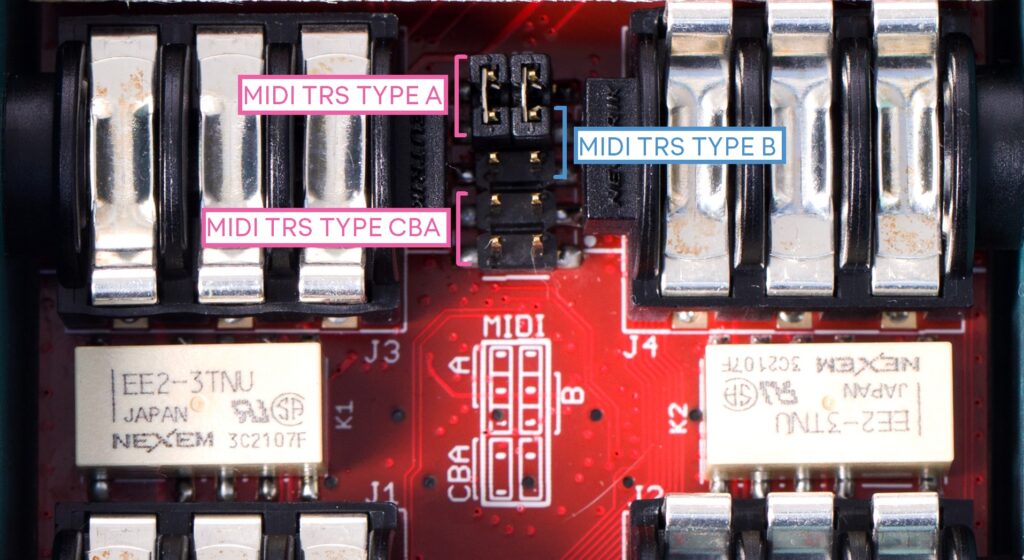
IMPORTANT: Take extreme care when performing this step and only touch the MIDI jumpers. Electrostatic discharge (ESD) to internal components can easily damage Ribbons.
- TRS Type A
Default setting — MIDI standard, Korg, Make Noise, etc.- MIDI 4 (Source) to TRS RING
- MIDI 2 (Shield) to TRS SLEEVE
- MIDI 5 (Sink) to TRS TIP
- TRS Type B
Arturia, Novation, 1010music, etc.- MIDI 4 (Source) to TRS TIP
- MIDI 2 (Shield) to TRS SLEEVE
- MIDI 5 (Sink) to TRS RING
- TRS Type CBA
Chase Bliss Audio MIDI Box. Connection used by Chase Bliss and some other pedal manufacturers. If you use this configuration, we recommend using a short TRS cable (~2 feet) to guarantee reliable transmission.- TRS to TRS (no crossed wires)
MIDI channels
Ribbons defaults to MIDI channel 1. To change MIDI channels, make sure nothing is connected to the CV / EXP input and hold down both footswitches while applying power. A single LED will light up, and now you can use the push button to toggle between 16 available MIDI channels.
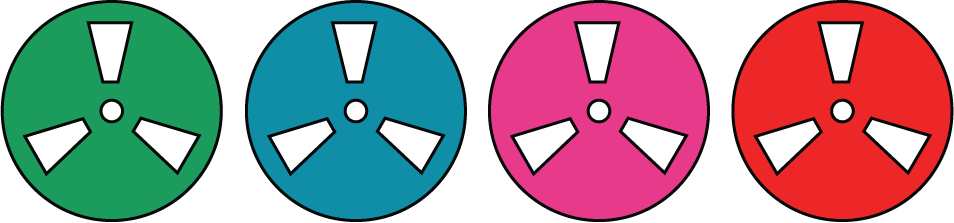
Channels 1-4 are green, channels 5-8 are blue, channels 9-12 are pink, and channels 13-16 are red.
- To select a MIDI channel, press Touch.
- To exit without selecting, press Bypass.
After selecting or exiting Ribbons will boot up normally. The MIDI channel you select is persistent between power cycles.
MIDI CC messages
NOTE: The MIDI implementation below reflects firmware version 2.0. If you are running earlier firmware, please use the 1.3 MIDI CC chart here.
Ribbons’ controls can all be modified via various MIDI CC messages. It responds to the following:
| MIDI CC #: | Destination: | Range: |
| 14 | High-Pass Filter | 0-127 |
| 15 | Low-Pass Filter | 0-127 |
| 16 | Mix | 0-127 |
| 17 | Compression / Saturation | 0-127 |
| 18 | Wow Frequency | 0-127 |
| 19 | Wow Depth | 0-127 |
| 20 | Flutter Depth | 0-127 |
| 21 | Flutter Frequency | 0-127 |
| 22 | Dropouts Frequency | 0-127 |
| 23 | Dropouts Depth | 0-127 |
| 24 | Crinkle | 0-127 |
| 25 | Noise | 0-127 |
| 26 | Reverb Decay | 0-127 |
| 27 | Reverb Mix & Placement | 0-127 |
| 28 | Touch Param 1 | 0-127 |
| 29 | Touch Param 2 | 0-127 |
| 30 | Touch Mode Select | 0-18 = Magnetic Dance 19-36 = Tape Stop 37-54 = Broken Machine 55-73 = Repeater 74-91 = Crushed Cassette 92-109 = Disintegration Loop 110-127 = UnrealPlayer |
| 31 | Ribbons Mode Select | 0-64 = Tape Effects 65-127 = Looper |
| 32 | Change Looper Track | 0-31 = Track 1 32-63 = Track 2 64-95 = Track 3 96-127 = Track 4 |
| 33 | Clear Current Looper Track | ≥65 = True |
| 34 | Clear All Looper Tracks | ≥65 = True |
| 35 | Track 1 Direction | 0-127 |
| 36 | Track 1 Speed | 0-127 |
| 37 | Track 1 Volume | 0-127 |
| 38 | Track 1 Scale | 0-127 |
| 39 | Track 2 Direction | 0-127 |
| 40 | Track 2 Speed | 0-127 |
| 41 | Track 2 Volume | 0-127 |
| 42 | Track 2 Scale | 0-127 |
| 43 | Track 3 Direction | 0-127 |
| 44 | Track 3 Speed | 0-127 |
| 45 | Track 3 Volume | 0-127 |
| 46 | Track 3 Scale | 0-127 |
| 47 | Track 4 Direction | 0-127 |
| 48 | Track 4 Speed | 0-127 |
| 49 | Track 4 Volume | 0-127 |
| 50 | Track 4 Scale | 0-127 |
| 51 | Ignore MIDI Clock | 0 = Ignore ≥1 = Listen |
| 52 | Synth Attack | 0-127 |
| 53 | Synth Release | 0-127 |
| 54 | Synth Volume | 0-127 |
| 55 | UnrealPlayer Fidelity | 0-64 = Lo-fi 65-127 = Hi-fi |
| 56 | Reserved | 0-127 |
| 57 | Filter Resonance | 0-127 |
| 58 | Makeup Gain | 0-127 |
| 59 | Switch between Compression or Saturation | 0-64 = Compression 65-127 = Saturation |
| 60 | Clear Touch Mode Loops | ≥65 = True |
| 80 | Touch Footswitch | 0-64 = Off 65-127 = On |
| 81 | Bypass Footswitch | 0-64 = Off 65-127 = On |
Loading presets with MIDI
Ribbons has 32 total preset slots. Presets 1-8 are accessible on the pedal itself. You can send MIDI Program Change messages to load the full range from 1-32.
Sending a Program Change of 1 will load preset 1, a Program Change of 19 will load preset 19, etc. A Program Change of 0 or >32 will not load any preset.
When presets 1-8 are loaded on the pedal, the LEDs briefly glow a unique color: green, blue, pink, red, yellow, light blue, purple, white.

When loading presets 9-32, that same color pattern is repeated in banks of 8.

For example, presets 9 and 17 both glow green, presets 10 and 18 both glow dark blue, etc.
Saving presets 9-32 with MIDI
Program Change messages can also be used to program presets slots 9-32.
To save your settings into one of these slots, send Ribbons a program change message while you are in the Presets Menu (hold the push button for 3 seconds).
NOTE: The factory settings for presets 9-32 are not initialized. These don't do any thing useful or interesting by default and you will need to program them before use.
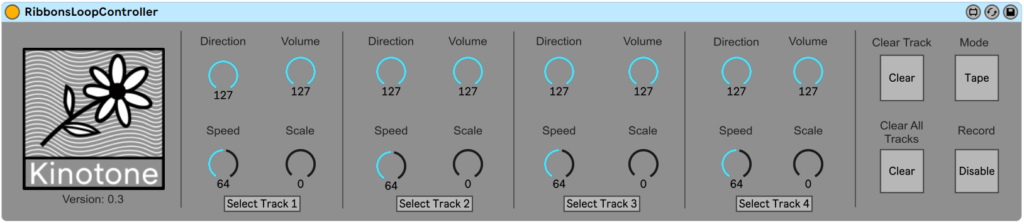
Max for Live
Ableton users can download our Max for Live devices to control Ribbons with MIDI. These can be found on the Ribbons product page under the Extras tab. You’ll find 2 devices: one to control all of the different tape effects and Touch Modes, and another for controlling the looper.

Sine Wave Synthesizer
Ribbons has an internal 4-voice sine wave synth that can be processed using all of the tape effects, Touch Modes, and 4-track looper. Just plug in and play — the synth and your incoming audio get mixed together and run through all of the effects.
To use the sine wave synth, connect a MIDI keyboard and start sending MIDI note data. You can also send a Pitch Bend message to smoothly bend the pitch of notes +/- 5 semitones.
MIDI CC messages 52, 53, and 54 allow for control over the synth attack, release, and volume.
Try messing with the tape effects while playing the synth to dial in spooky mellotron-like sounds. Since the sine waves are so pure they make a great starting point for building textures.

Do you want to turn the sine wave synth off?

MIDI note data is channel-specific. To prevent the sine wave synth from being triggered, simply change the MIDI channel on Ribbons to one that your external device isn't using.

MIDI clock on the other hand is global, so Ribbons can sync to a clock without the synth being triggered.
CV / Expression
You can use the CV / EXP input to map Ribbons’ parameters using control voltage or an expression pedal. The CV / EXP input has a range of 0-5 volts.
To access the CV / EXP Mapping Menu, make sure that a TS or TRS cable is connected to the CV / EXP input, then hold down both footswitches while applying power. The footswitch LEDs will turn light blue.
- Press the push button to toggle between 9 pages of mappable parameters.
- Use the top-left knob to scroll through the parameters on any given page.
- Press Touch to map / unmap a parameter. After pressing Touch to map, try slightly rotating the top-left knob to change the index. If the LED glows white, this shows you that the parameter has been mapped.
- When you are done mapping parameters, you must press Bypass to save your settings and exit. Ribbons will boot up normally.
If you look carefully, you'll notice that settings for the mapping menu are laid out using the same color and page layout as the device itself, working clock-wise from the bottom-left knob.
- Page 1 — Mix and Utility (green)
- High-pass, Low-pass, Mix, Compression or Saturation
- Page 2 — Wow and Flutter (blue)
- Wow frequency, Wow depth, Flutter depth, Flutter frequency
- Page 3 — Degradation (pink)
- Dropouts frequency, Dropouts depth, Crinkle, Noise
- Page 4 — Reverb, Touch Modes (red)
- Reverb depth, Reverb mix & placement, Touch Param 1, Touch Param 2
- Pages 5-8 — Looper mapping. Each page represents a looper track (green, blue, pink, red.)
- Speed, Direction, Volume, Speed scale
- Page 9 — Touch footswitch. Only one parameter on this page
- All LEDs light up if mapped, and are blank if unmapped.
When a parameter is mapped to CV / EXP, the knob itself during normal operation sets the midpoint of the expression pedal (+2.5V). If you rock the expression pedal to the heel position (0V), it will set the parameter to its minimum value. Likewise, if you rock the expression pedal to the toe position, it will set the parameter to its max value (+5V).
If the Touch footswitch is mapped to CV, it will engage when a CV > 2.5V is applied, and disengage when a CV < 2.5V is applied.
Input Level, Mixing, Bypass Options
Input level and mixing options
To access the Input Level / Mixing Menu, hold down Touch while applying power to Ribbons.
The page LEDs will indicate your current setting. Tap the push button to toggle.
- To save a new setting press Touch.
- To exit the menu press Bypass.
After saving or exiting Ribbons will boot up normally.![]()
1. STEREO IN / STEREO OUT, INSTRUMENT LEVEL (default)![]()
2. MONO IN / STEREO OUT
INSTRUMENT LEVEL![]()
3. STEREO IN / STEREO OUT
LINE LEVEL![]()
4. MONO IN / STEREO OUT
LINE LEVEL
Instrument level is ideal for guitars, basses, and other low-output instruments. Line level provides more headroom and is ideal for synthesizers, drum machines, and DAWs. If you are using Ribbons with a mono setup, the SISO options will work by default.
NOTE: If you have a 2022 or 2023 unit that is upgraded to firmware 2.0, you do not have a line level switch. On upgraded units, the options are:

1st LED: stereo in / stereo out
2nd LED: mono in / stereo out

"Instrument level" is extremely close to line level and should provide you with plenty of headroom regardless of your instrument or setup. The Bypass LED will flicker if you are clipping the input.
Bypass options
To access the Bypass Menu, hold down Bypass while applying power to Ribbons.
The page LEDs will indicate your current setting. Tap the push button to toggle.
- To save a new setting press Touch.
- To exit the menu press Bypass.
After saving or exiting Ribbons will boot up normally.
NOTE: If you have Ribbons configured for mono in / stereo out, select one of the buffered bypass options.![]()
1. ANALOG BYPASS (default)
Uses an analog switch to completely bypass Ribbons’ audio converter. Your audio stays analog when the pedal is bypassed.![]()
2. BUFFERED BYPASS
A smooth and silent option where your audio still runs through the electronics when bypassed.![]()
3. BUFFERED BYPASS WITH TRAILS
Another silent option where your input signal will no longer be affected but the device still acts as a sound source, so you’ll continue to hear certain effects being generated (reverb tails, Magnetic Dance loops, 4-track loops, etc).
Mixing and bypass settings are persistent between power cycles, so you only need to visit these menus if you want to change them.
Factory Reset
To restore Ribbons to all factory defaults you can do a quick factory reset on your unit. This restores onboard presets 1-8 and default input level, mixing and bypass options. This option was introduced in firmware 1.2.
A factory reset does not erase any presets created using Program Change messages (slots 9-32).
To factory reset your unit, hold the push button for 3 seconds to enter the Presets Menu.
Then, hold the push button and double tap Touch. After a few seconds Ribbons will reboot on its own. Do not remove power during the reset process.
Remember that if your goal is to simply clear your effects and start from a blank slate, you can load the INIT preset.
Firmware Updates
Occasionally we may release new firmware to address bugs or improve features.
The firmware update process for Ribbons is fast and easy — you simply play a .wav file into the device.

For a more hands-on tutorial check out our video guide.
To start, we must warn you that the firmware update file is not meant for listening and playing it back at loud volumes could potentially damage your hearing or other pieces of equipment. Do not connect Ribbons’ output to any other equipment until the update process is complete.
- Download the correct .wav file from the Ribbons Development Blog.
- Prepare your setup to play back the audio file (from your PC, smartphone, tablet, or audio interface). Make sure that your device will not “normalize” or alter the volume of the audio file (e.g. turning off Sound Check if using iTunes / Apple Music).
- Set your audio output to ~75%.
- Confirm that your playback device will not emit any unexpected sounds or notifications during the update process.
- Connect a TS or TRS cable to Ribbons’ input jack and connect the other end to your playback device.
- Power down Ribbons by disconnecting the power.
- Hold down the push button while applying power to enter bootloader mode. All of the LEDs on Ribbons should be glowing, indicating that it’s ready for a firmware update.
- Start playing the .wav file. After a few seconds, both footswitch LEDs should start blinking green, indicating that packets of data are being received.
- Wait until the audio file has finished playing back.
- If the update is successful, Ribbons will boot up normally.
- If the update fails, then various LEDs may light up red, or the pedal may not boot normally. In this scenario you will need to try the update process again. If you ever run into issues we can help you troubleshoot your setup. It’s often as simple as a faulty cable. We have installed the firmware on every single Ribbons using this method and it has always been reliable.
If you believe you’ve discovered a firmware bug, email support@kinotoneaudio.com or share your findings on the Kinotone forum.
A note about startup behavior
When Ribbons boots up, it goes through a startup sequence where the 4 LEDs all light up in a row. It runs tests to confirm that the internal memories are working as expected. If Ribbons fails a test when booting up it would throw an error code using the 4 LEDs. If you ever encounter a startup error please report it by emailing support@kinotoneaudio.com and we can help you resolve it.