Sparks User Manual
Contents
- About Sparks
- Getting Started
- Waveshaping and Utility
- State-Variable Filter
- Low-Frequency Oscillator (LFO)
- Envelope Follower (ENV)
- Presets
- MIDI Overview
- CV / Expression
- Mixing and Input / Output Level Options
- Factory Reset
- Firmware Updates
About Sparks
Sparks is a stereo analog sound design toolkit with two unique distortion circuits, a state-variable filter, and powerful modulation options. It can color your signal, sculpt the harmonics, and create motion.
Every control on Sparks is smooth and continuous. It departs from binaries and stepped knobs, letting you explore all the strange in-betweens. You can use this device in a lot of different ways, but the interface is playful, immediate, and surprisingly simple.
Check out our YouTube channel for patch ideas, tutorials, and a full video walkthrough.
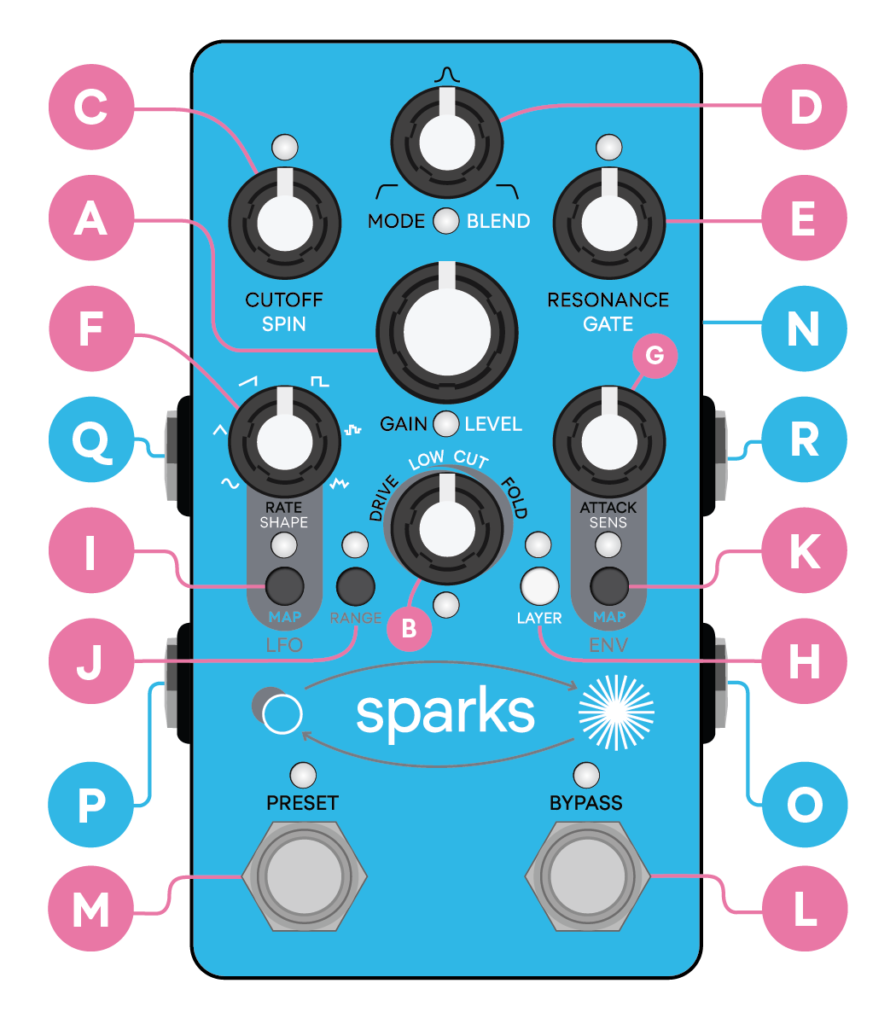
Controls
A. Gain / Level knob
B. Drive or Fold / Low-Cut knob
C. Filter Cutoff / LFO Spin knob
D. Filter Mode / Blend knob
E. Filter Resonance / Gate knob
F. LFO Rate / LFO Shape knob
G. ENV Attack / ENV Sensitivity knob
H. LAYER button
I. LFO Map button
J. LFO RANGE button
K. ENV Map button
L. BYPASS footswitch
M. PRESET footswitch
Inputs and Outputs
N. Power input
O. TRS stereo input
P. TRS stereo output
Q. MIDI input
R. CV / EXP input
The content in this manual currently reflects firmware version 1.0.

Have questions? Join the Kinotone community to connect with us and other users at forum.kinotoneaudio.com
For direct support email support@kinotoneaudio.com
Getting Started
Take care to use an isolated +9VDC center-negative power supply rated for at least 280 mA. We do not recommend using Sparks with a daisy chain.

Sparks passes a stereo in / stereo out signal by default via TRS input and output jacks. To use it in stereo you will need TRS style cables.
The default setting will also work with TS cables for a mono setup. If you have a mono input that you want to split into stereo, you can set Sparks to mono in / stereo out.
Be sure to reduce the volume on your amplifier or audio playback system when applying power. Like many devices, it may produce a subtle 'pop' sound.
Use the BYPASS footswitch to engage or disengage Sparks.
- If the BYPASS LED is ON, effects are engaged.
- If the BYPASS LED is OFF, effects are disengaged.
Basic controls
Each of the knobs on Sparks has two controls.
- Primary knob controls are labeled black.
- Secondary knob controls are labeled white.
- Tap the LAYER button to access the controls you want to edit. The LAYER LED lights up when you are on the white layer.
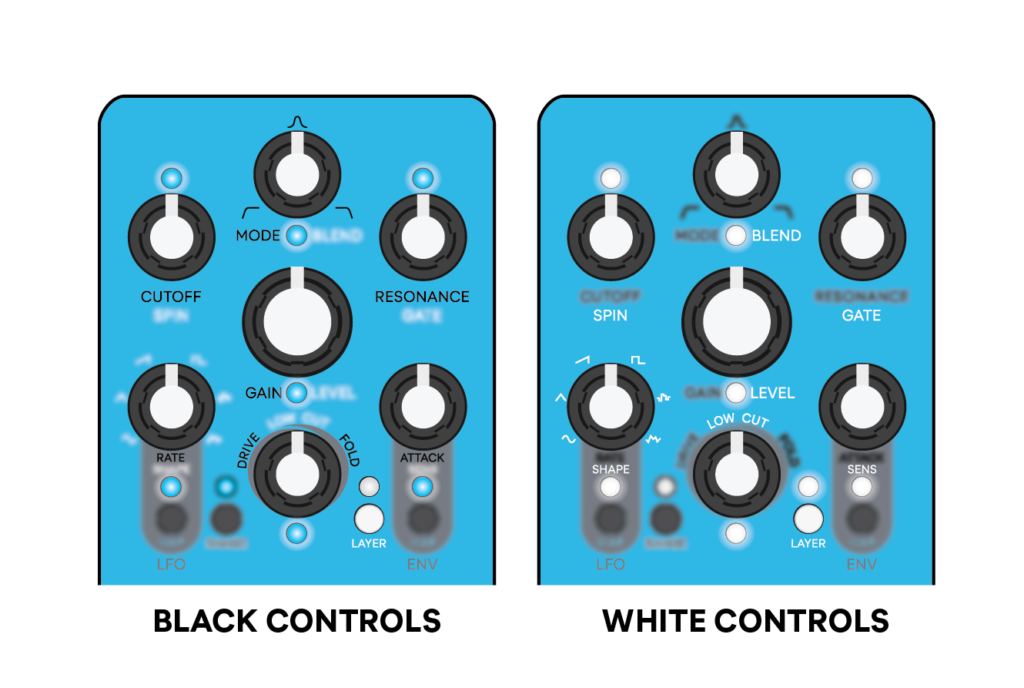
All of the controls work together. One layer isn’t necessarily more important. Once you get the hang of tapping LAYER, you’ll be navigating Sparks in no time.
Visual feedback
Each knob has its own LED. The LED conveys the real-time intensity of the setting, increasing in brightness as you rotate the knob clockwise.
- Black knob controls glow a gradient of blue.
- White knob controls glow a gradient of white.
The LEDs are a visual guide. By not only listening, but also monitoring the intensity of the LEDs, you can easily track your settings.
Relative knobs
When you switch layers, the physical position of a knob and its parameter may be momentarily misaligned.
When this occurs, the control is responsive in a relative way, meaning that the knob will attenuate or increase the parameter based on the actual amount of space that’s available. Once they match up, the knob will start tracking again as you’d expect.
This sounds complicated but it’s really simple, and you’ll get a feel for it by watch- ing the LEDs.
Transparent settings
Sparks remembers your settings between power cycles. To start over from a blank slate at any time, there are a few simple tricks to achieve a clean signal.
- To reset all of the black and white controls to a transparent state, hold LAYER for 3 seconds. This resets the knob settings to the following positions:
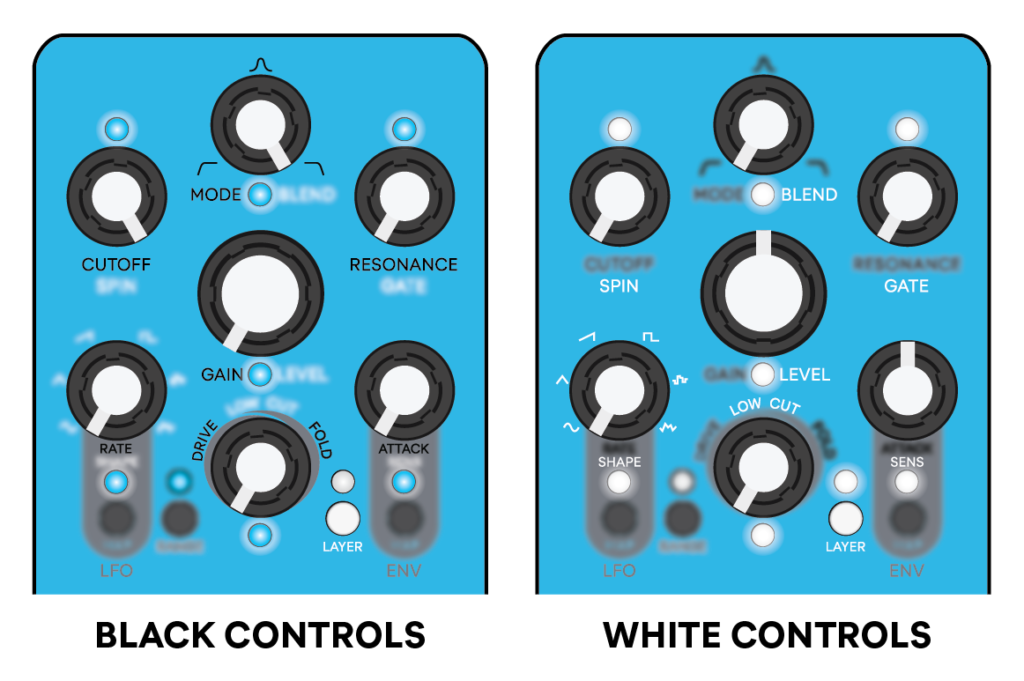
- To clear all LFO mappings, hold LFO MAP for 3 seconds.
- To clear all envelope mappings, hold ENV MAP for 3 seconds.
- You can hold any combination of these buttons depending on what you want to reset.
Waveshaping and Utility
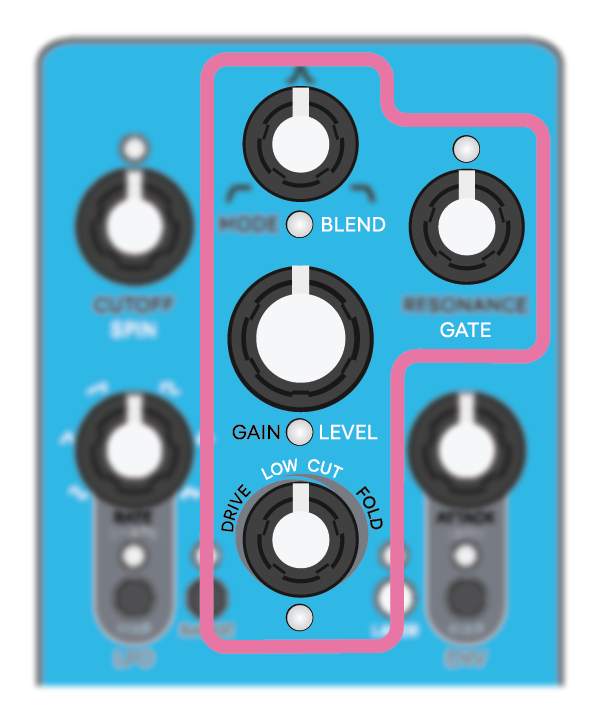
Sparks provides some flexible waveshaping and utility controls so you can dial in just the right distortion for your instrument and taste. It can achieve many results ranging from subtle to extreme and aggressive. The possibilities become even more wide-ranging when combined with the state-variable filter.
GAIN / LEVEL
The center knob sets both GAIN and LEVEL.
- GAIN — The amount of distortion applied to your input signal.
- LEVEL — The overall output volume.
This allows you to fine-tune things so that when the pedal is bypassed, your clean signal matches the volume of Sparks when it’s engaged.
Fair warning: Sparks has a huge amount of gain on tap.

If you ever experience too much distortion for your particular setup, there are multiple input and output level options to choose from.
DRIVE / FOLD
DRIVE and FOLD let you crossfade between a unique overdrive circuit, and a west-coast-style wavefolder.
- DRIVE — Provides soft sustain and controlled, pleasant clipping.
- FOLD — A complex, liquidy effect that distorts your input signal by inverting and folding the peaks.
You can explore a spectrum of harmonic intensity by adjusting the GAIN control and playing with different DRIVE / FOLD settings.
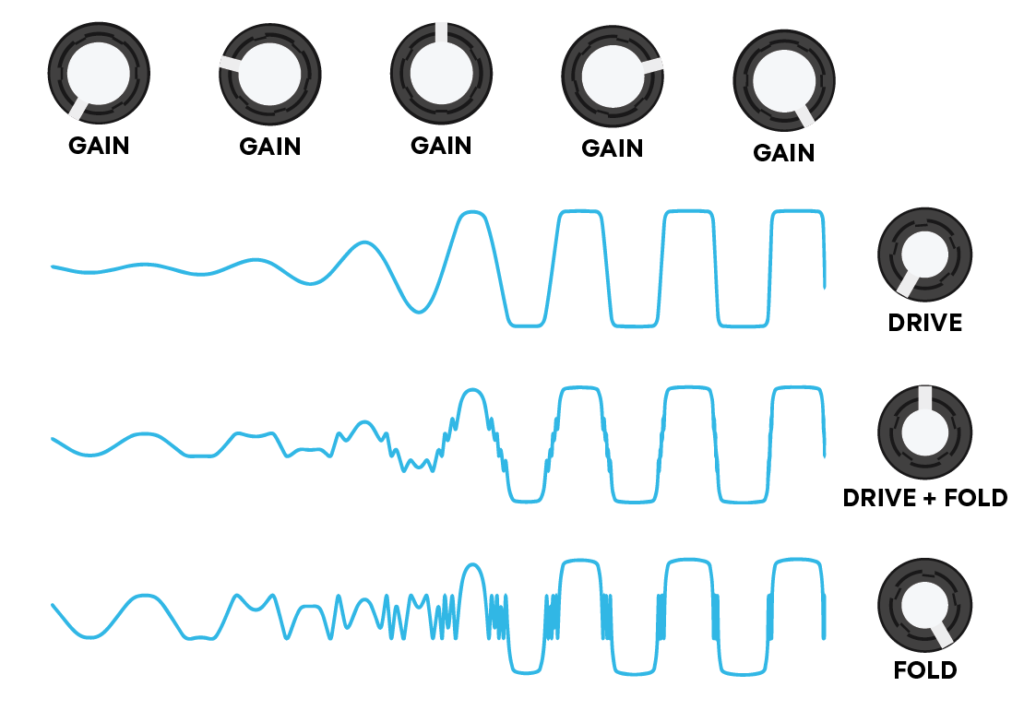
FOLD pairs best with harmonically simple material.

If you dime it on material that is harmonically rich to begin with, then it may sound a little chaotic.

Try the wavefolder on leads, octaves, or bass guitar. For the electronic musician, it’s great with drum machines and monophonic synths.
LOW-CUT
The LOW-CUT control is a pre-distortion high-pass filter ranging from 0 Hz–12 kHz. This allows you to adjust the amount of low-frequency content passing through to the DRIVE and FOLD circuits.
Twisting LOW-CUT clockwise removes bass, brightening your tone and adding clarity to polyphonic material. This can be ideal if you’re playing dense chords on the guitar.
Counter-clockwise yields a full spectrum with a flat frequency response. If you want to preserve bass, then leave LOW-CUT closer to zero.
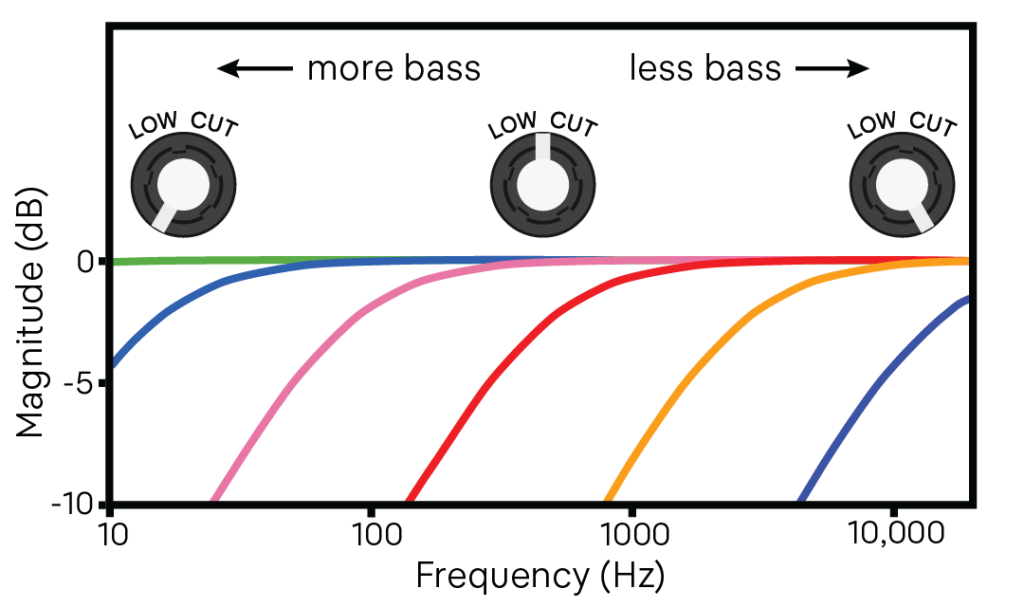
A pre-distortion low-cut is an essential ingredient in classic drive circuits. Sparks provides continuous control so you can tweak this however you want.
BLEND
This is different than a global mix control. Twisting BLEND clockwise introduces more of your dry signal from zero to 200%.
At 12 noon, your dry signal should be about as loud as your playing if you bypass Sparks. Fully clockwise, your dry signal is significantly boosted.
• Use BLEND to set the volume of your dry signal.

• Use LEVEL to set the volume of your wet signal.

GATE
The GATE control mutes all sound below the threshold that you set and can be used to tame background noise sometimes introduced at high GAIN settings.

GATE does not affect your dry signal by default. This allows for some interesting effects with a parallel clean blend. If you would like it to gate your dry signal, send Sparks MIDI CC 89, value >0.

GATE was initially quite different than what you’re hearing. It was sputtery, immediate, and had lots of character. Our beta team insisted that it wasn’t very practical though (and you’d probably agree). If you want to try the original control, send MIDI CC 90, value >0.

After applying a change via MIDI, tap LAYER and wait 3 seconds for Sparks to save state.
State-Variable Filter
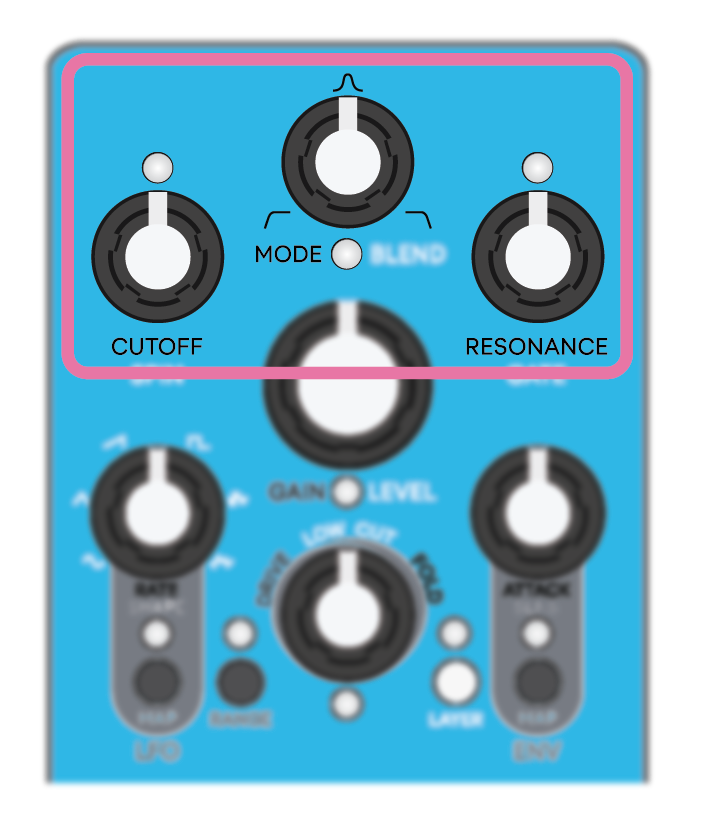
Sparks has a vibrant state-variable filter after the drive. Once you’ve landed on DRIVE / FOLD settings that you like, you can use the filter to sculpt your harmonics.
CUTOFF
CUTOFF adjusts the filter cutoff point, ranging from
20 Hz–20 kHz. What this knob does depends on how the MODE knob is positioned.
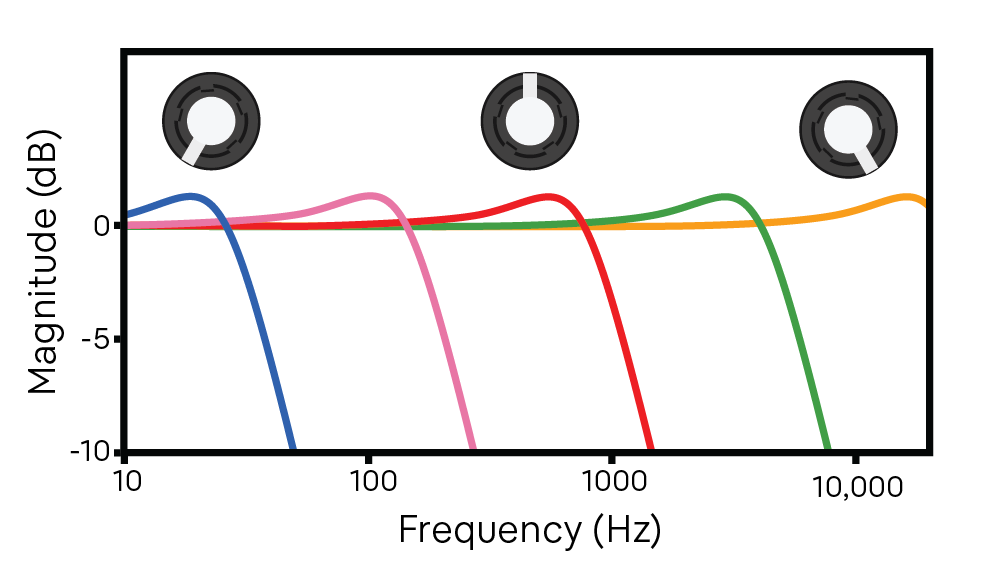
MODE
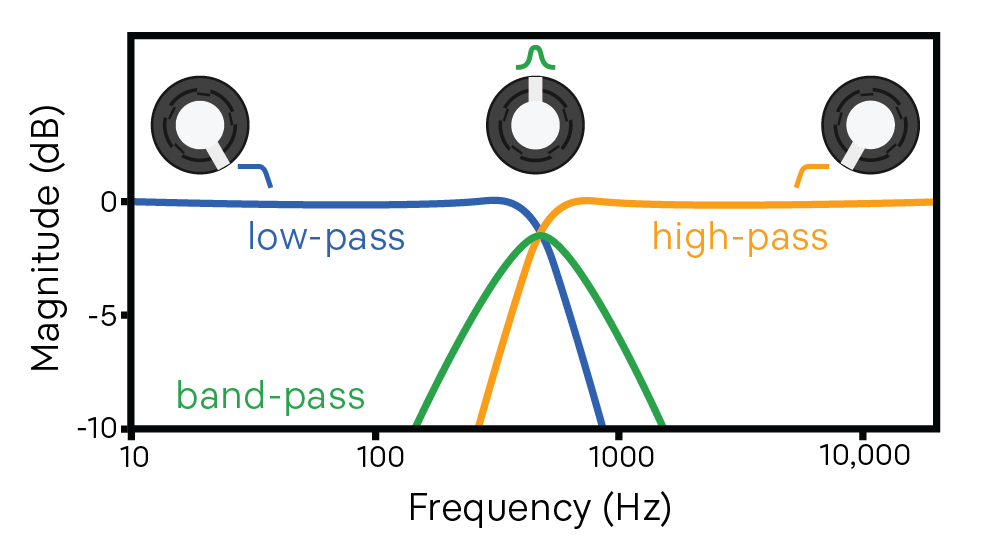
MODE lets you smoothly morph between filter types.
- HIGH-PASS

Rotating CUTOFF clockwise removes bass.
- BAND-PASS

Reduces treble and bass. Rotating CUTOFF shifts the center frequency.
- LOW-PASS

Rotating CUTOFF counter-clockwise removes treble.
RESONANCE
The filter resonance emphasizes the point just before the filter cutoff. The more resonance, the higher the boost.
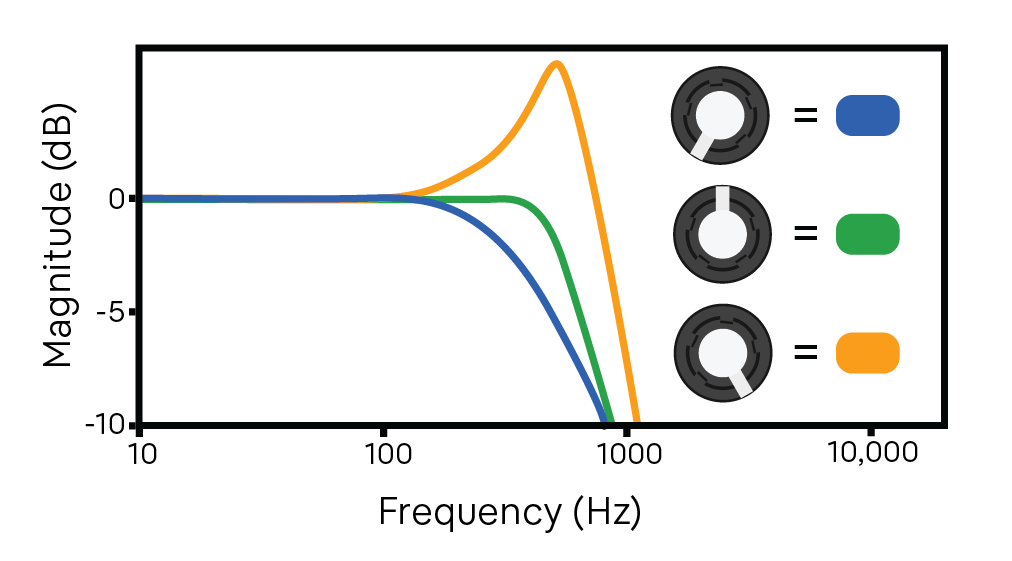
At max resonance the filter will self-oscillate.

If Sparks is unexpectedly singing on its own, try turning the resonance down.

The filter is also a powerful analog tool by itself. Set GAIN to zero if you feel like dialing back the dirt.
Low-Frequency Oscillator (LFO)
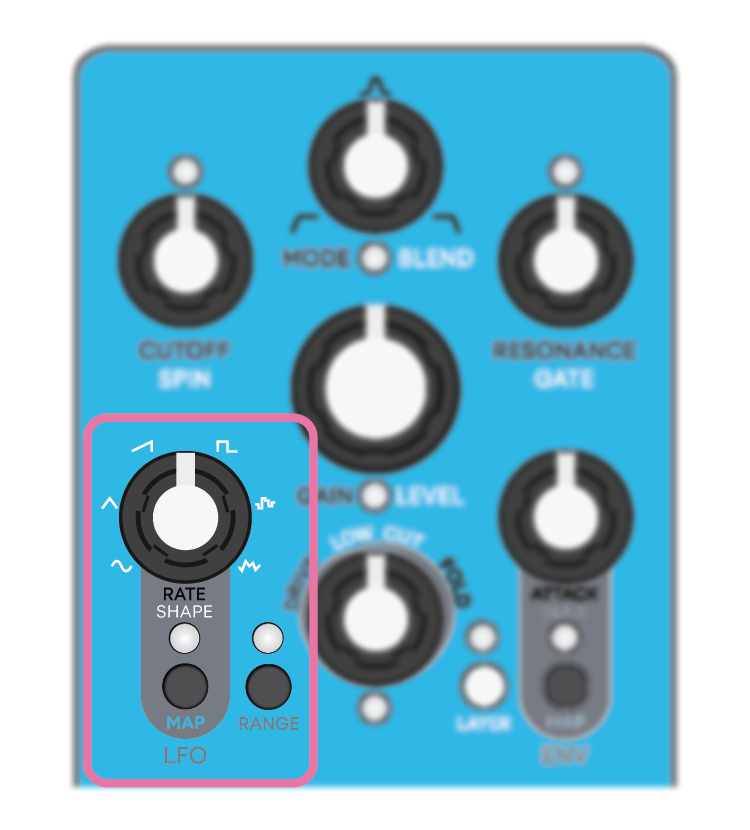
An LFO is a waveform that changes over time and is used to control the effects, adding motion or rhythm to any parameter. Think of it like an imaginary hand that twists the knobs for you.
- Assign the LFO to any knob control or to multiple.
- You can morph between waveform shapes.
- Speeds range from super slow well into audio rate.
Our workflow is inspired by modular synthesizers and uses attenuverters. Attenu-what?
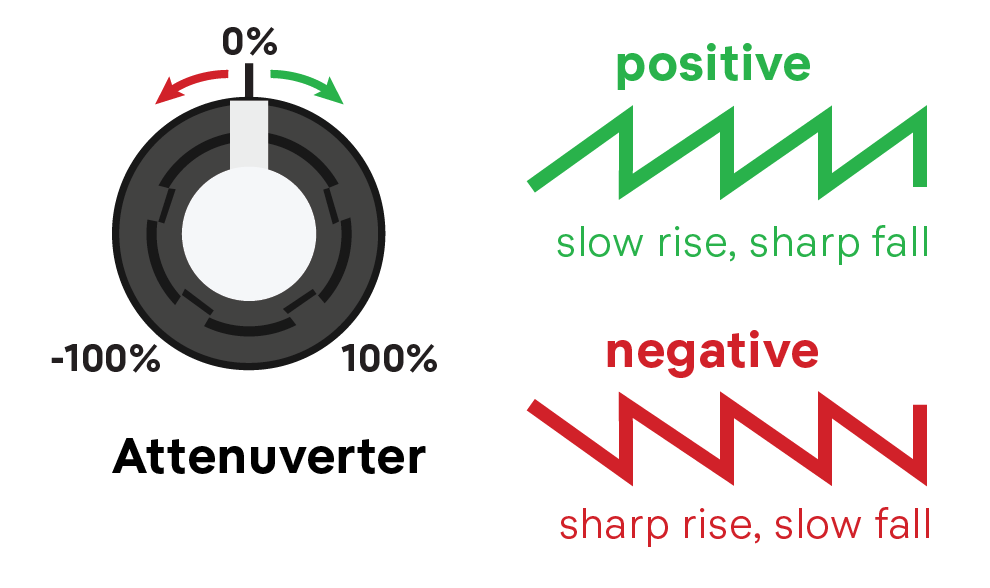
An attenuverter lets you set both the intensity and polarity of the modulation with a single knob. You can add subtle motion to one control and intense motion to another, one can go up while another goes down, and so on.
Or say you want a reverse sawtooth waveform. Well it’s already in there — just invert the polarity.
Mapping the LFO
To map the LFO, tap LFO MAP. The LFO LED glows green and red when you are editing mappings. You can tap LAYER as usual to access black or white controls. The LAYER LED lights up if you are mapping white controls.
Now twist the knob control(s) you want to modulate. Since the knobs on Sparks are relative, you may need to sweep it first to get the knob and LED in sync.
The knob works as an attenuverter. From 12 noon, the LED glows green to the right (positive polarity) and red to the left (negative polarity).
The further from noon the greater the depth of modulation. At noon there is no mapping and the LED is blank.
Tap LFO MAP again to exit and return to your live settings. The LEDs start tracking the intensity of the modulation.
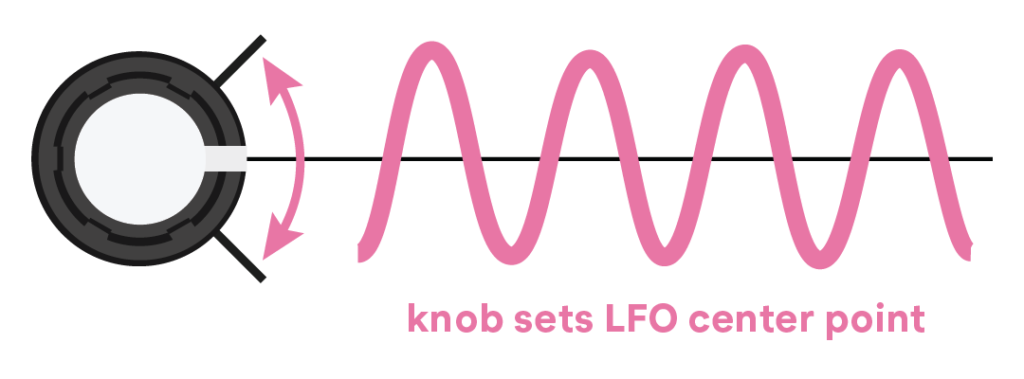
The knob now sets the center point that the LFO swings across. If you rotate the knob control you just mapped, the modulation travels up or down with it.
RATE and RANGE

RATE controls the speed of the LFO, or how quickly the waveform completes a single cycle and repeats itself.
The default range of the RATE knob is slow, ranging from 0.1 Hz at minimum to 250 Hz at max.
RANGE instantly doubles or quadruples the LFO speed.
- Tap once to double the range of the RATE knob.
- Tap again to quadruple the range of the RATE knob.
- Tap a third time to return to the default.
- You can also hold RANGE momentarily to activate the next range, and release to return to the previous range.
Sparks lets you sync the LFO to a MIDI clock!

The LFO syncs when it receives a MIDI start message followed by a MIDI clock, and will continuously monitor the clock to stay in time.
SHAPE
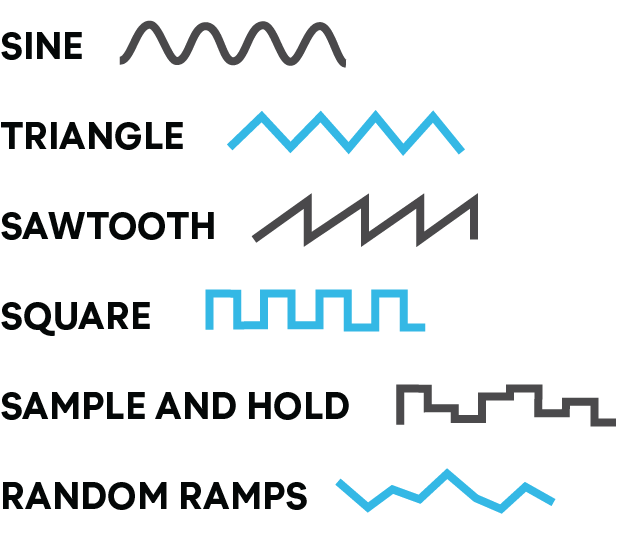
SHAPE controls the shape of the LFO. You can crossfade between waveforms for a wide variety of sounds.
Try modulating MODE to create a harmonic tremolo.

• Hold down LAYER and both MAP buttons for 3 seconds to reset Sparks to a transparent state.

• Tap LFO MAP, then twist MODE fully clockwise (100% intensity, positive polarity).

• Tap LFO MAP again, then set MODE and CUTOFF to 12 noon.

The LFO swings back and forth across the whole range of the MODE knob, sweeping between high-pass, band-pass, and low-pass filter types. CUTOFF sets the harmonic center of the tremolo.
SPIN
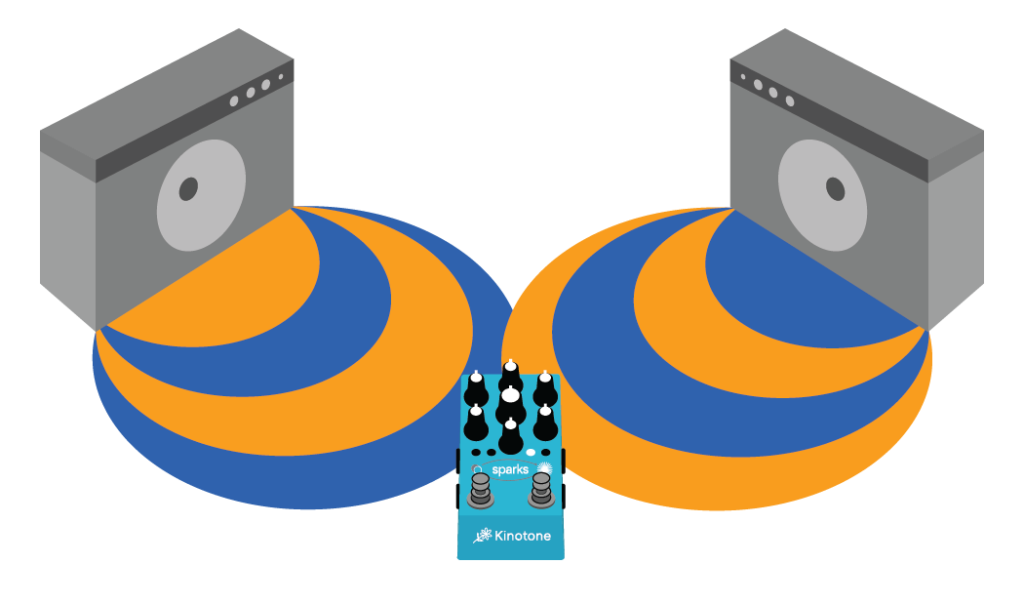
SPIN shifts the left and right LFO channels out of phase to create stereo movement. You can use this control to create immersive analog soundscapes that sprawl out across the stereo field.
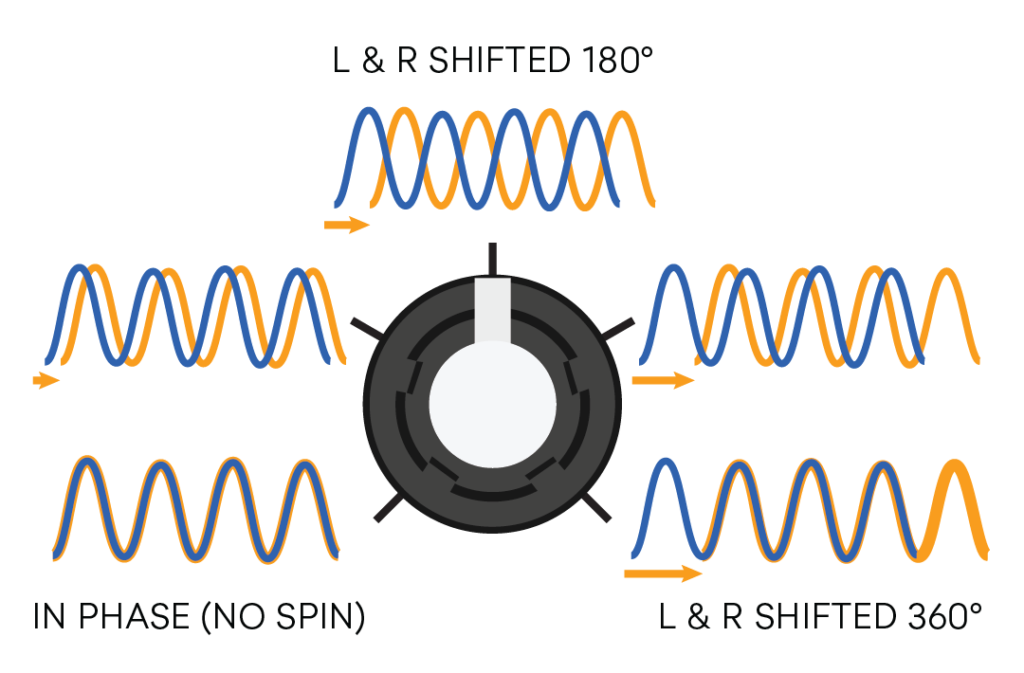
At fully counter-clockwise, the left and right LFO channels are in phase (SPIN is OFF). At 12 noon, the left and right channels are completely out of phase. At fully clockwise, the left and right LFO channels are shifted 360°.
SPIN has no perceivable effect if you are using Sparks in mono.
Envelope Follower (ENV)
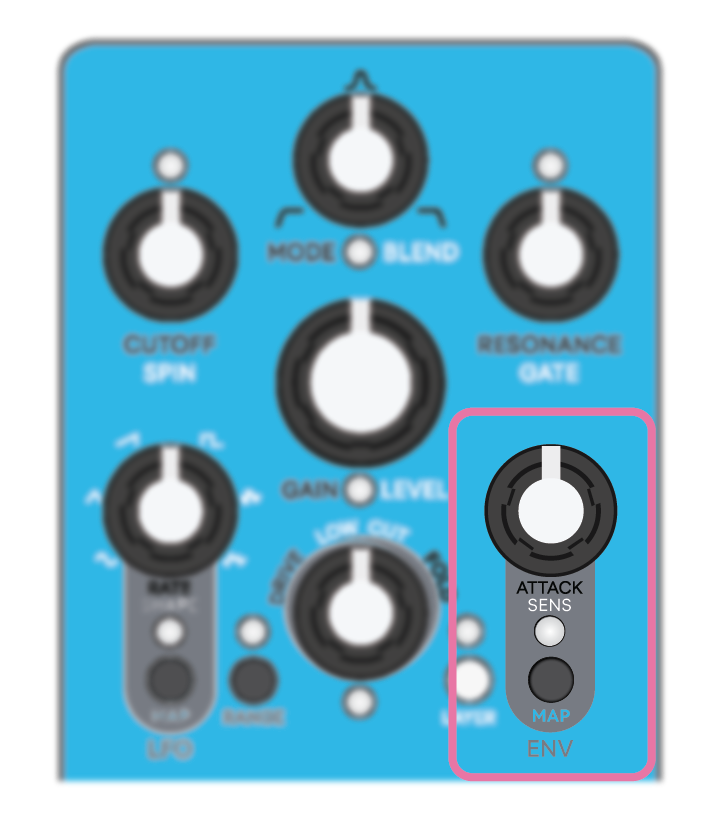
The envelope follower listens to your incoming audio and creates a control signal that reacts to the dynamics of your playing. You can use this to create effects like auto-wah, auto-swell, compression, and more.

Mapping the envelope follower
You can assign the envelope follower to any knob control or to multiple. The workflow is the same as it is for the LFO and uses attenuverters.
To map the envelope follower, tap ENV MAP. The ENV LED glows green and red when you are editing mappings. You can tap LAYER as usual to access black or white controls. The LAYER LED lights up if you are mapping white controls.
Now twist the knob control(s) you want to modulate.
The knob works as an attenuverter. From 12 noon, the LED glows green to the right (positive polarity) and red to the left (negative polarity).
The further from noon the greater the depth of modulation. At noon there is no mapping and the LED is blank.
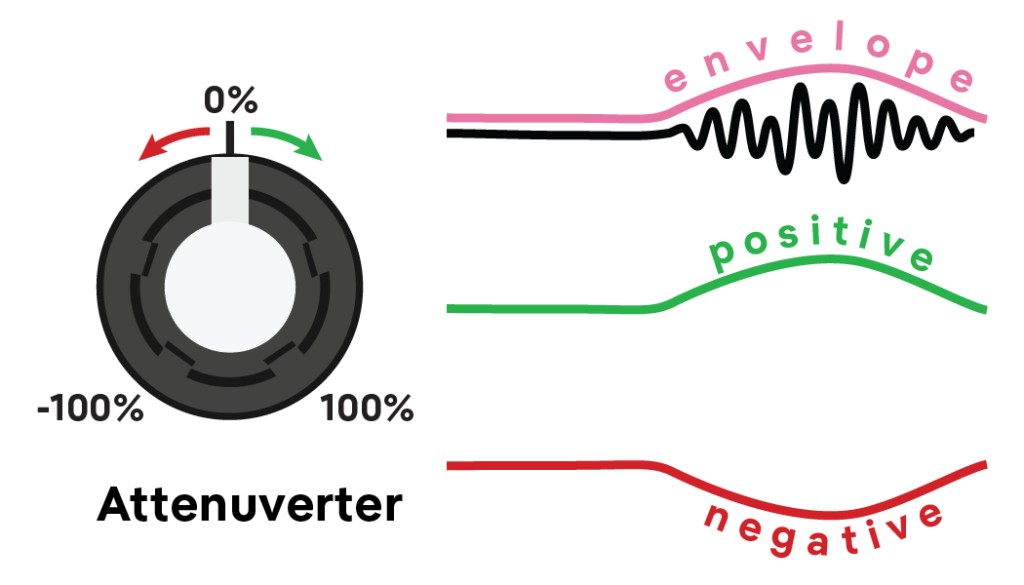
Tap ENV MAP again to exit and return to your live settings. The LEDs start tracking the intensity of the modulation.
If you have the LFO and ENV mapped to the same control, then its LED will convey the sum of real-time modulation.
The knob now sets the start point of the envelope. If you rotate the knob control you just mapped, the modulation travels with it.
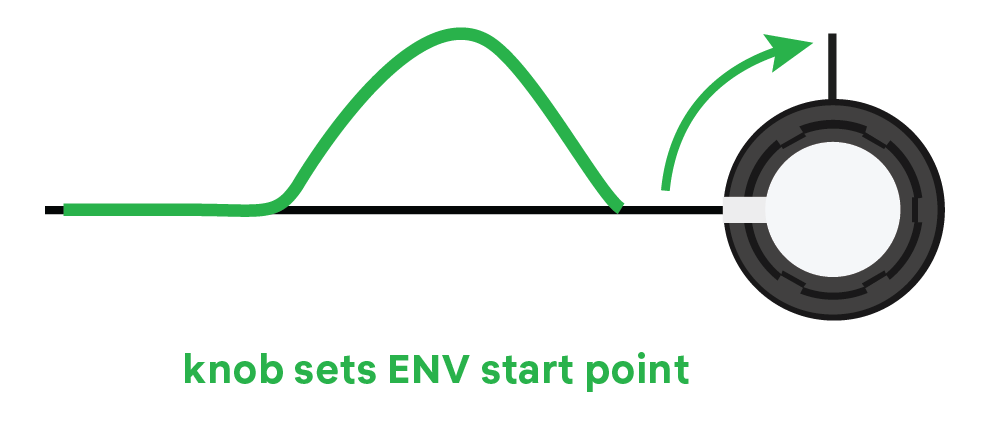
You can adjust the intensity of the modulation (or turn it off) by re-mapping it. To clear all ENV mappings, simply hold ENV MAP for 3 seconds.
ATTACK
ATTACK controls how fast the envelope follower tracks your input signal, ranging from snappy (fully counter-clockwise) to slow (fully clockwise).
SENS
SENS stands for “sensitivity” and you can think of this like a gain control for the envelope follower. Since input material can vary dramatically, you may want the envelope follower to be more or less sensitive. To set the sensitivity, play your instrument and adjust SENS until the LED seems like it reaches its max brightness.
Envelope style options
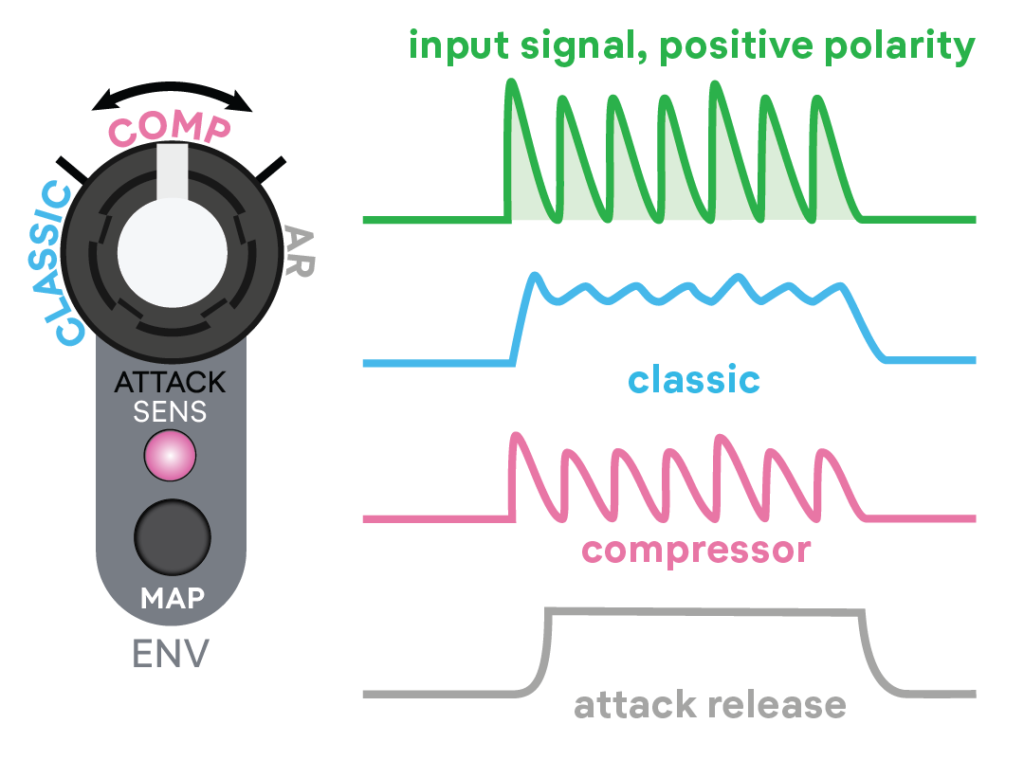
Sparks provides Classic, Compressor, and AR envelope styles. To select one, tap ENV MAP, then twist the ENV knob. The LED briefly steps in color to show when you move from one option to the next.
![]()
CLASSIC — Medium attack and release times. Inspired by the envelope follower in a famous 1970s semi-modular synthesizer.
Pair CLASSIC with the LFO RATE control (positive polarity, right of noon) to increase the speed of the LFO depending on the dynamics of your playing.
![]()
COMPRESSOR — Fast logarithmic attack and medium release times. With ATTACK set to noon, it mimics the response of the Vinyl Sim compressor. This is essentially an analog version of the compressor in Ribbons but with flexible timing controls.
Pair COMPRESSOR with the LEVEL control (negative polarity, left of noon) to turn Sparks into a great sounding compressor.
![]()
ATTACK RELEASE (AR) — Longer attack and medium release times. Pick attacks and transients trigger a synthesizer-style envelope.
Pair AR with the LEVEL or CUTOFF control (positive polarity, right of noon) for auto-swell effects.
Presets
Sparks has 6 onboard presets, and you can save up to 32 using MIDI.
Presets can be activated momentarily or latched, making them a fun performance effect with a dramatic transition between a preset and your live settings.
The PRESET footswitch engages / disengages your preset. Out of the box this loads “Harmonic Reverse.”
- For momentary effects — keep PRESET held down.
- For latched effects — tap PRESET briefly to engage, and tap again to disengage.
Presets are color-coded by the PRESET LED. To select a different preset, hold down LAYER and tap PRESET until you reach the preset you want to use.
Factory Presets:
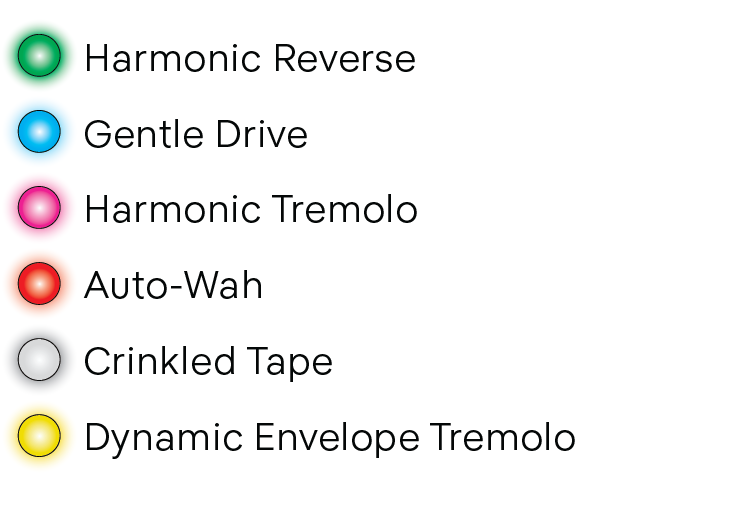
Sparks’ factory presets are designed for guitar.

It's tricky to create patches that sound good on guitar and synthesizers alike. We hope that our synth pals won’t be too offended by this.

If you ever want to restore the factory presets, check out the factory reset option.
Saving your settings
To save settings, you can either modify and overwrite an existing preset, or you can save your live settings into a preset. The action is the same for both.
- If you are editing a preset (PRESET LED IS ON) and you want to commit the changes you’ve made, hold LAYER and tap BYPASS twice.
This overwrites the preset slot with your modifications.
- If you are editing live settings (Preset LED is OFF) and you want to save your settings into a preset, hold LAYER and tap BYPASS twice.
This overwrites the current preset slot with your live settings. If you need to, just quick check which slot is selected before saving over it.
Hands-free preset selection
There is an alternate way to load presets that you can do with your foot, which is useful for live performance.
- Hold BYPASS for 3 seconds until the LED starts to glow. This indicates that the BYPASS footswitch is overriding its normal functionality.
- Tap BYPASS to toggle through the presets.
- TAP PRESET to load a preset. If you want to live audition them, just make sure that PRESET is engaged while you’re toggling.
- Hold BYPASS again for 3 seconds to exit and return the BYPASS footswitch to normal operation.
MIDI Overview
Sparks is directly compatible with all non-USB-style MIDI controllers. Use a TRS to DIN MIDI cable to connect to Sparks’ MIDI input. You can check out this post on our forum for some verified cable solutions.
Sparks can manage 3 different types of TRS MIDI connections: Type A (factory setting), Type B, or Type CBA.
If you need to switch types, move both jumpers on the inside of the device up or down, per the image below.
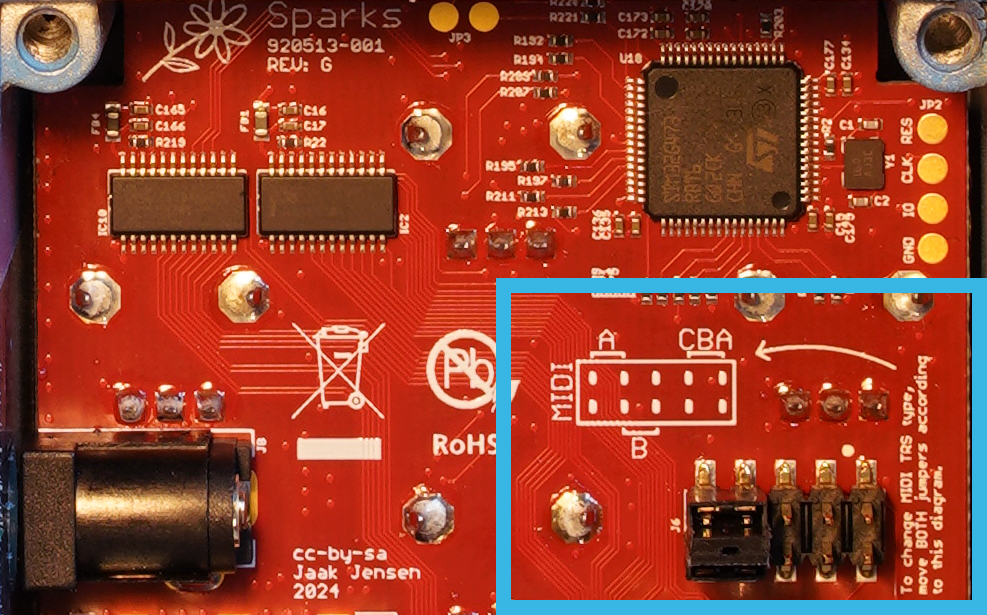
IMPORTANT: Take extreme care when performing this step and only touch the MIDI jumpers. Electrostatic discharge (ESD) to internal components can easily damage Sparks.
- TRS Type A
Default setting — MIDI standard, Korg, Make Noise, etc.- MIDI 4 (Source) to TRS RING
- MIDI 2 (Shield) to TRS SLEEVE
- MIDI 5 (Sink) to TRS TIP
- TRS Type B
Arturia, Novation, 1010music, etc.- MIDI 4 (Source) to TRS TIP
- MIDI 2 (Shield) to TRS SLEEVE
- MIDI 5 (Sink) to TRS RING
- TRS Type CBA
Chase Bliss Audio MIDI Box. Connection used by Chase Bliss and some other pedal manufacturers. If you use this configuration, we recommend using a short TRS cable (~2 feet) to guarantee reliable transmission.- TRS to TRS (no crossed wires)
MIDI channels
Sparks defaults to MIDI channel 1. To change MIDI channels, make sure nothing is connected to the CV / EXP input and hold down both footswitches while applying power. A single LED will light up, and now you can use the LAYER button to toggle between 16 available MIDI channels.
The LFO MAP, RANGE, LAYER, and ENV MAP LEDs (in that order) indicate the MIDI channels in sets of 4.
Channels 1-4 are green, channels 5-8 are blue, channels 9-12 are pink, and channels 13-16 are red.
- To select a MIDI channel, press PRESET.
- To exit without selecting, press BYPASS.
After selecting or exiting Sparks will boot up normally. The MIDI channel you select is persistent between power cycles.
MIDI CC messages
Sparks’ controls can all be modified via various MIDI CC messages. It responds to the following:
| MIDI CC #: | Destination: | Range: |
| 14 | Synth Attack | 0-127 |
| 15 | Synth Decay | 0-127 |
| 16 | Synth Sustain | 0-127 |
| 17 | Synth Release | 0-127 |
| 18 | Synth Waveform | 0-127 |
| 19 | Synth Bits | 0-127 |
| 20 | Synth Mod Option | 0 = LFO Pitch 1 = LFO Pulse Width 2 = Glide |
| 21 | Synth Mod Depth | 0-127 |
| 22 | Synth Hard Sync / Ring Mod | 0 = None 1 = Hard Sync 2 = Ring Mod |
| 23 | Synth Voice Mode | 0 = Poly 1 = Mono |
| 24 | Filter Cutoff | 0-127 |
| 25 | Filter Mode | 0-127 |
| 26 | Filter Resonance | 0-127 |
| 27 | Gain | 0-127 |
| 28 | Level | 0-127 |
| 29 | Drive / Fold | 0-127 |
| 30 | Blend | 0-127 |
| 31 | Low Cut | 0-127 |
| 32 | Gate | 0-127 |
| 33 | ENV Attack | 0-127 |
| 34 | ENV Sens | 0-127 |
| 35 | LFO Rate | 0-127 |
| 36 | LFO Shape | 0-127 |
| 37 | Spin | 0-127 |
| 38 | Map LFO Filter Cutoff | 0-64 [-] 65-127 [+] |
| 39 | Map LFO Filter Mode | 0-64 [-] 65-127 [+] |
| 40 | Map LFO Filter Resonance | 0-64 [-] 65-127 [+] |
| 41 | Map LFO Gain | 0-64 [-] 65-127 [+] |
| 42 | Map LFO Level | 0-64 [-] 65-127 [+] |
| 43 | Map LFO Drive / Fold | 0-64 [-] 65-127 [+] |
| 44 | Map LFO Blend | 0-64 [-] 65-127 [+] |
| 45 | Map LFO Low Cut | 0-64 [-] 65-127 [+] |
| 46 | Map LFO Gate | 0-64 [-] 65-127 [+] |
| 47 | Map LFO ENV Attack | 0-64 [-] 65-127 [+] |
| 48 | Map LFO ENV Sens | 0-64 [-] 65-127 [+] |
| 49 | Map LFO Spin | 0-64 [-] 65-127 [+] |
| 50 | ENV Style | 0-127 |
| 51 | Ignore MIDI Clock | 0 = Ignore ≥1 = Listen |
| 52 | Map ENV Filter Cutoff | 0-64 [-] 65-127 [+] |
| 53 | Map ENV Filter Mode | 0-64 [-] 65-127 [+] |
| 54 | Map ENV Filter Resonance | 0-64 [-] 65-127 [+] |
| 55 | Map ENV Gain | 0-64 [-] 65-127 [+] |
| 56 | Map ENV Level | 0-64 [-] 65-127 [+] |
| 57 | Map ENV Drive / Fold | 0-64 [-] 65-127 [+] |
| 58 | Map ENV Blend | 0-64 [-] 65-127 [+] |
| 59 | Map ENV Low Cut | 0-64 [-] 65-127 [+] |
| 60 | Map ENV Gate | 0-64 [-] 65-127 [+] |
| 61 | Map ENV LFO Rate | 0-64 [-] 65-127 [+] |
| 62 | Map ENV LFO Shape | 0-64 [-] 65-127 [+] |
| 63 | Map ENV Spin | 0-64 [-] 65-127 [+] |
| 80 | PRESET Footswitch | 0 = OFF ≥1 = ON |
| 81 | BYPASS Footswitch | 0 = OFF ≥1 = ON |
| 82 | LFO Range | 0-2 |
| 83 | Currently Selected Preset | 0-31 |
| 85 | Reset Black + White Controls | 0 |
| 86 | Clear LFO Mappings | 0 |
| 87 | Clear ENV Mappings | 0 |
| 89 | GATE Dry Signal | 0 = No ≥1 = Yes |
| 90 | GATE Response Style | 0 = Smooth (default) ≥1 = Choppy |
Loading presets with MIDI
Sparks has 32 total preset slots. Presets 1-6 are accessible on the pedal itself. You can send MIDI Program Change messages to load the full range from 1-32.
Sending Sparks a Program Change of 0 will load your live settings.
Sending a Program Change of 1 will load preset 1, a Program Change of 19 will load preset 19, etc. A Program Change >32 will not load any preset.
When presets 1-6 are engaged, the PRESET LED lights up a solid color: green, blue, pink, red, white, yellow.

When loading presets 7-32, the PRESET LED glows instead to help you distinguish between factory presets and presets created with PC messages.

That same color pattern (green, blue, pink, red, white and yellow) is repeated in banks of six.

For example, presets 7 and 13 are both glowing green, presets 8 and 14 are both glowing blue, etc.
Saving presets 7-32 with MIDI
Program Change messages can also be used to program presets slots 7-32.
You can either save your live settings into a preset, or you can modify an existing preset and commit your changes into a new slot.
NOTE: The factory settings for presets 7-32 are not initialized. These don't do any thing useful or interesting by default and you will need to program them before use.
To save your live settings into a preset slot (preset LED is OFF), hold BYPASS for 3 seconds until the BYPASS LED starts to glow. Now send a Program Change message between 7-32 for the slot you want to save into. Once received, Sparks will save your settings and load up the new preset.
The process is the same if you want to modify an existing preset and commit your changes into a new slot. If you are editing a preset (preset LED is ON), hold BYPASS for 3 seconds until the BYPASS LED starts to glow. Now send a Program Change message between 7-32 for the slot you want to save into. Once received, Sparks will save your settings and load up the new preset.
Syncing the LFO to MIDI clock
When a MIDI clock is applied to Sparks, the LFO automatically syncs to it. Applying a clock to Sparks and then dialing in a tremolo effect can be a really fun way to play along with other devices like a drum machine or a track in your DAW.
The RANGE LED blinks to indicate that a clock is being received.
The RANGE button and RATE knob work together to provide some interesting clock multiplication and division options.
When RATE is turned fully counter-clockwise, tapping RANGE toggles between:
- Halftime
- Normal time
- Triplets
- And back to half time
As you increase the RATE knob, it multiplies the clock by:
- 1x
- 2x
- 4x
- 8x
- 16x
Not only does Sparks track the rate of the MIDI clock, it tracks the downbeat too.
Changing the polarity of the LFO waveform will determine whether to emphasize the onbeat or the offbeat.
Max for Live
This will be added to our website soon.
Ableton users can download our Max for Live device to control Sparks with MIDI. This can be found on the Sparks product page under the Extras tab.
SID Chip-Inspired Synthesizer
Sparks has an internal SID-chip inspired synthesizer that you can play using MIDI note data. Check out this video for a hands-on demo.
The Sound Interface Device, aka SID Chip, was the iconic synth engine behind the Commodore 64 Home Computer. The SID was groundbreaking for its time and profoundly influenced chiptune, demoscene, and video game music of the 8-bit era.
Just like Sparks, the SID Chip was a hybrid device that pairs digital oscillators with an analog filter. This internal synth provides you with a complementary sound palette and turns Sparks into an instrument all on its own.
Please note that it’s not meant to be an end-all emulator that implements every feature of the original hardware chip. This is our own unique take on the 6581 chip that we think captures some of its best sonic characteristics, and adds some bells and whistles here and there. We also just like making pedals that are secretly synthesizers.
Classic SID Chip sounds are often gritty, crunchy, and very lo-fi.

The synth in Sparks is versatile because you can process it directly through the filter controls to sculpt the harmonics. In other words, it cleans up nicely if you want it to.

You can also of course drive, fold, use the LFO and envelope follower, etc.
Basic operation
To play the synth, connect a MIDI controller to Sparks and start sending MIDI note data. The synth and your incoming audio get mixed together. The synth is disconnected from the analog signal path when not in use.
Depending on your settings the synth voices can sometimes sound bright and buzzy.

If you find the sound of the raw synth oscillators too intense, just use the low-pass filter mode on Sparks to roll off a bit of treble and give them some analog character.
Editing synth settings
To recap, Sparks has primary controls (labeled black), and secondary controls (labeled white). You access the knobs functions you want to edit by tapping LAYER.
There is a third layer of knob controls for the synth. To access the synth settings, hold LAYER and tap RANGE. The LEDs light up pink to indicate that you are editing synthesizer settings.
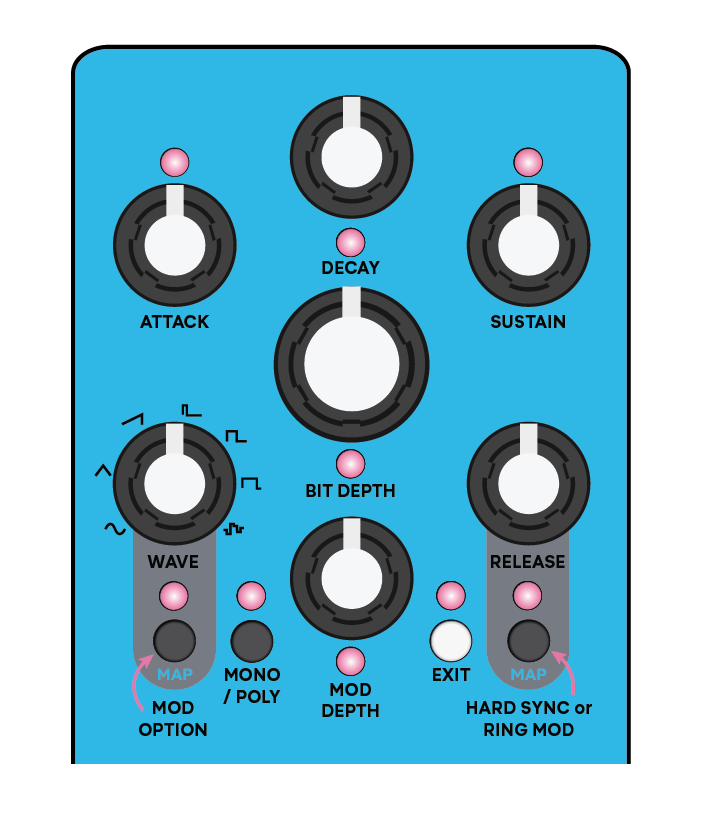
WAVEFORMS
Sparks provides 5 waveform types based on a 24-bit accumulator. You’ll notice 3 icons all representing square waves. This conveys some of the different pulse widths you can achieve for classic PWM effects.
- Sine — Smoothly ramps up and down. Not on the original chip but a nice option.
- Triangle — Angular with a linear rise and fall.
- Sawtooth — Smooth rise with a sharp fall.
- Pulse — Aka square wave. The pulse width is variable depending on where your knob is set within the pulse range.
- Noise — 23-bit Fibonacci LFSR noise. Clocked noise useful for generating static, wind, or percussive sounds. A distant relative of the Fluctuating Random Voltages section of The Source of Uncertainty.
ADSR ENVELOPE
Adjustable knob controls for ATTACK, DECAY, SUSTAIN, and RELEASE. Captures the strange pseudo-exponential release and decay of the original SID chip.
BIT DEPTH
The big center knob. Adjustable bit rate depth ranging from 4 bits (lo-fi) to 12 bits (hi-fi).
MONO / POLY
Tap the RANGE button to toggle between monophonic or polyphonic (4-voice) modes.
MOD OPTION
Tap LFO MAP to display your currently-selected option. Tap again to change it.
LFO PITCH MODULATION (red LED) — The LFO on Sparks modulates the pitch of the synth waveform you have selected.
LFO PULSE WIDTH MODULATION (white LED) — The LFO on Sparks modulates the width of the pulse waveform. To use PWM you must have the WAVE knob set within the pulse range.
GLIDE (yellow LED) — Classic portamento that slews the pitch from one note to the next.
PITCH and PULSE WIDTH are best used with slow LFO rates.

You can exit the synth layer as needed to adjust the LFO, then pull up the synth settings again to keep experimenting. Different LFO waveforms will also give you very different sounds.
MOD DEPTH
The MOD OPTION you select works in conjunction with the MOD DEPTH knob. Use DEPTH to adjust the intensity of the effect. You can set this knob to zero to “turn off” the modulation.
HARD SYNC OR RING MOD
Tap ENV MAP to display your currently-selected option. Tap again to change it. Red LED = off.
HARD SYNC (white LED) — Synchronizes the phase of each oscillator to the phase of an additional oscillator generated a fifth away. Use HARD SYNC in conjunction with LFO PITCH to add harmonic complexity and motion to the waveforms.
HARD SYNC is best used with slow LFO rates.
RING MOD (yellow LED) — Multiplies the oscillators with the LFO resulting in metallic, bell-like tones. To use RING MOD you must have the triangle waveform selected.
Classic ring-mod sounds are achieved with fast LFO rates. If you have RING MOD enabled, be sure to push the LFO into audio rate.
Tap the LAYER button to exit the synth layer. If you want to adjust any of the settings again, simply hold down LAYER and tap RANGE to pull up the controls.
CV / Expression
You can use the CV / EXP input to map Sparks’ parameters using control voltage or an expression pedal. The CV / EXP input has a range of 0-5 volts.
To access the CV / EXP Mapping Menu, make sure a TS or TRS cable is connected to the CV / EXP input, then hold down both footswitches while applying power. The footswitch LEDs will turn blue.
Use the CUTOFF knob to scroll between the primary knob controls. Tap LAYER if you want to scroll between the secondary knob controls (the LAYER LED lights up when you are on the white layer).
To map knob control(s), hover over the control you want to use and tap the PRESET footswitch. To confirm if a control has been mapped successfully, you can twist the CUTOFF knob to continue scrolling and any mapped controls will be lit up white. If you want to unmap a control, just scroll back to it and tap PRESET again.
When you are done mapping, tap the BYPASS footswitch to save and exit.
When a parameter is mapped to CV / EXP, the knob is taken over by the CV / EXP jack.

For example, if you're using an expression pedal, the setting will be at 0% when the expression pedal is in the heel position, and 100% in the toe position.

Likewise with CV, the setting is at 0% if you apply 0 volts, and 100% if you apply +5 volts.
Mixing and Input / Output Level Options
Mixing options
To access the Mixing Menu, hold PRESET while applying power to Sparks.
The LAYER LED indicates your current mix setting. Tap LAYER to toggle between the two options. ![]()
STEREO IN / STEREO OUT (default)![]()
MONO IN / STEREO OUT
- To save a new setting press PRESET.
- To exit without saving press BYPASS.
After saving or exiting Sparks will boot up normally.
Input / output level options
To access the Input Level Menu, hold down BYPASS while applying power to Sparks.
The LAYER LED indicates your current input / output setting. Tap LAYER to toggle between the four options. ![]()
INSTRUMENT IN / INSTRUMENT OUT (default)
Ideal for most guitar players. This option boosts your
signal at the input to maximize the amount of distortion
available. There is comparable attenuation at the output
to compensate.
![]()
INSTRUMENT IN / BOOST OUT
Useful if you want to really overdrive your amp or the
next pedal in your signal chain. Boosts your signal at the
input to maximize the amount of distortion available,
but with no attenuation at the output.![]()
LINE LEVEL IN / LINE LEVEL OUT
Ideal for synths, drum machines, and DAWs.
Provides more headroom (less distortion) than the
instrument level options.![]()
LINE LEVEL IN / BOOST OUT
Same as the previous option but with a 6 dB boost at the
output.
- To save a new setting press PRESET
- To exit without saving BYPASS
After saving or exiting Sparks will boot up normally.
Mixing and input level settings are persistent between power cycles, so you only need to visit these menus if you want to change them.
Factory Reset
To restore Sparks to all factory defaults you can do a quick factory reset on your unit. This restores onboard presets 1-6 and default mixing and input level options.
A factory reset does not erase internal calibration data, and it does not erase any presets created using Program Change messages (slots 7-32).
Remember that if you want to clear your effects and start over, you can simply hold LAYER, LFO MAP, and ENV MAP for 3 seconds.
To factory reset your unit, hold ENV MAP while applying power. All of the LEDs will turn red. Now tap LAYER and all of the LEDs will turn green. Tap PRESET to confirm the factory reset. Sparks will boot up normally.
Firmware Updates
NOTE: There have not been any firmware updates for Sparks. If there are you’d follow the steps below.
The firmware update process for Sparks is fast and easy — you simply play a .wav file into the device.
To start, we must warn you that the firmware update file is not meant for listening and playing it back at loud volumes could potentially damage your hearing or other pieces of equipment. Do not connect Sparks’ output to any other equipment until the update process is complete.
- Download the most recent .wav file from the Sparks Development Blog (this will be linked if there is an update available to install).
- Prepare your setup to play back the audio file (from your PC, smartphone, tablet, or audio interface). Make sure that your device will not “normalize” or alter the volume of the audio file (e.g. turning off Sound Check if using iTunes / Apple Music).
- Set your audio output to 100%. In general, if you are using a PC, smartphone, or tablet directly into Sparks, you’ll want to set the GAIN / LEVEL knob fully clockwise. If you are using an audio interface, set the GAIN / LEVEL knob counter-clockwise.
- Confirm that your playback device will not emit any unexpected sounds or notifications during the update process.
- Connect a TS or TRS cable to Sparks’ input jack and connect the other end to your playback device.
- Power down Sparks by disconnecting the power.
- Hold down the LAYER button while applying power to to enter bootloader mode. All LEDs should be glowing blue, indicating that it’s ready for a firmware update.
- Start playing the .wav file.
- After a few seconds, both footswitch LEDs should start alternating blinking blue, indicating that packets of data are being received. The LFO MAP, RANGE, LAYER, and ENV MAP LEDs act as a volume meter and should glow green throughout the update, showing that your volume is at a good level. If the LEDs turn red, then it means that your volume is either too high or low, but the update may still progress ok (as long as both footswitch LEDs are still alternating blinking blue).
- Wait until the audio file has finished playing back. This should take ~50 seconds.
- When the update finishes, all LEDs will briefly flash pink and Sparks should boot up normally.
- If the update fails, then various LEDs may light up red, or the pedal may not boot normally. In this scenario you will need to try the update process again. If you ever run into issues we can help you troubleshoot your setup. It’s often as simple as a faulty cable. We have updated hundreds of pedals using this method and it has always been reliable.
If you believe you’ve discovered a firmware bug, email support@kinotoneaudio.com or share your findings on the Kinotone forum.
